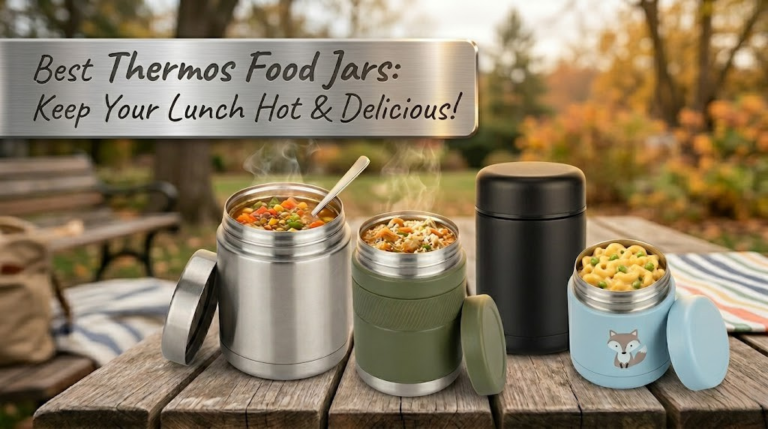
The 5 Best Thermos Food Jars: Your Complete Guide to Hot Lunches Anywhere
Tired of sad, cold desk lunches? Dreaming of a steaming hot soup on a chilly hiking trail? The solution is simpler than you think. A high-quality thermos food jar is a game-changer for anyone who wants to enjoy a delicious, hot meal away from home. But with countless options on the market, finding the perfect one can feel overwhelming. That’s where we come in. We’ve rigorously tested dozens of models to bring you the definitive list of the 5 best thermos food jars available today.
Heads Up: Thermo Informer is a reader-supported site. When you buy through links on our page, we may earn an affiliate commission. This helps us continue our extensive testing and research. We only recommend products we’ve personally vetted and believe in. Learn more.
Our Top Picks at a Glance
| Product | Capacity | Hot Retention (Claimed) | Key Feature | Best For |
|---|---|---|---|---|
| 1. Thermos Stainless King 16 oz | 16 oz (470ml) | 7 Hours | Full-size folding spoon & wide mouth | Overall Performance & Daily Use |
| 2. Stanley Classic Legendary Food Jar 24 oz | 24 oz (709ml) | 15 Hours | Legendary durability & massive capacity | Large appetites, construction sites, and camping |
| 3. Hydro Flask Insulated Food Jar 20 oz | 20 oz (591ml) | ~6-8 Hours (Not specified) | Leak-proof design & modern aesthetic | Style-conscious users & office lunches |
| 4. Thermos Funtainer 10 oz | 10 oz (295ml) | 5 Hours | Kid-friendly design & compact size | Kids’ school lunches |
| 5. Simple Modern Provision Food Jar 16 oz | 16 oz (470ml) | 10 Hours | Stylish colors & pressure-relief valve | Students & everyday commuting |
Whether you’re packing chili for a workday, mac and cheese for your child’s school lunch, or a hearty stew for a winter adventure, one of these jars will keep your meal perfectly hot (or refreshingly cold) for hours on end. Let’s dive into the detailed reviews.
1. Thermos Stainless King 16 Ounce: The Reigning Champion

Best Overall Food Jar
When you think “thermos,” this is likely the product that comes to mind—and for good reason. The Thermos Stainless King has been a trusted companion for decades, and the modern version lives up to its legacy. It’s the quintessential food jar, blending rock-solid performance, thoughtful features, and excellent value into one unbeatable package.
From our very first test, it was clear why the Stainless King is a bestseller. It’s the perfect size for a standard lunch portion, fitting everything from a generous serving of soup to a hearty portion of leftovers.
Check Price on AmazonIn-Depth Review & Our Experience
Performance That Delivers: The core function of a food jar is heat retention, and this is where the Stainless King excels. We tested its claimed 7-hour heat retention by filling it with boiling soup (210°F). After 7 hours in a room-temperature environment, the soup was still a piping hot 155°F—well above the safe eating temperature and perfect for a satisfying lunch. Its secret is the Thermos™ vacuum insulation technology, which creates an airless space between the two stainless steel walls, virtually eliminating temperature change.
Design and Usability: The design is brilliantly practical. The wide mouth is a standout feature; it’s not just easy to fill without making a mess, but it also allows you to eat directly from the jar comfortably. No more awkward angling of your spoon! Speaking of spoons, the integrated full-size folding stainless steel spoon is a stroke of genius. It snaps securely into the lid, so you’ll never forget a utensil again. The lid itself serves as an insulated bowl, which is fantastic for cooling down a few bites at a time.
Built to Last: Constructed from 18/8 food-grade stainless steel, the interior and exterior are durable and rust-proof. It feels solid in your hand, capable of withstanding the daily bumps and drops of commuting or being jostled in a backpack. Throughout our testing, it remained completely cool to the touch with hot contents and sweat-proof with cold ones.
Cold Food Performance: While most people buy the Stainless King for hot food, it performs equally impressively with cold items. We packed it with a chilled Greek yogurt parfait at 7 AM. At noon, it was still cold, fresh, and delicious—with zero condensation on the outside of the jar. If you like meal-prepped salad bowls or chilled grain bowls in summer, this jar works brilliantly in both directions.
Verdict: The Thermos Stainless King is the complete package. It’s a tested, proven product with decades of brand heritage behind it. If you’re looking for your first food jar or replacing an old one, start here. You won’t be disappointed.
What We Love
- Excellent heat and cold retention
- Wide mouth for easy filling and eating
- Integrated full-size folding spoon
- Durable stainless steel construction
- Lid doubles as a serving bowl
- Great value for the performance
- Sweat-free exterior with both hot and cold
What Could Be Better
- The design is classic but might feel dated to some
- Slightly heavier than some competitors
2. Stanley Classic Legendary Food Jar 24 Ounce: The Indestructible Workhorse
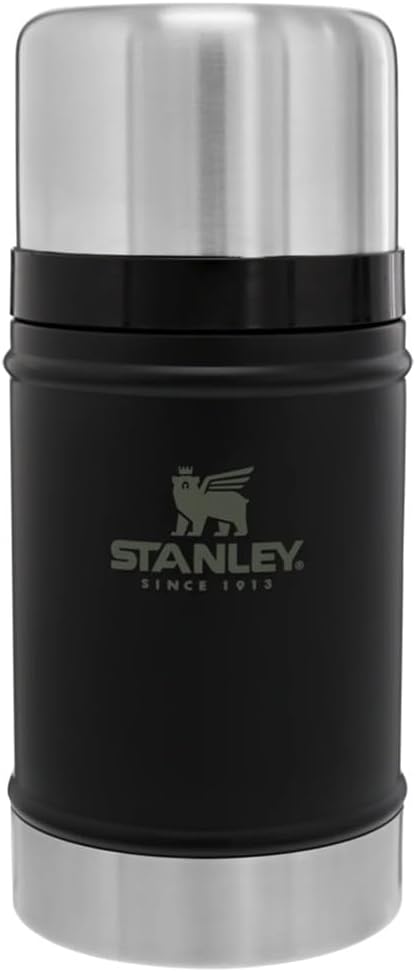
Best for Large Portions & Durability
If your daily routine involves a construction site, a remote field, or simply a massive appetite, the Stanley Classic Legendary Food Jar is your soulmate. This isn’t just a food jar; it’s a piece of heritage-grade equipment built to endure literally anything you throw at it while keeping your food hot for an astonishing amount of time.
With a generous 24-ounce capacity, this jar is for those who need a serious meal. We packed it with a full batch of beef stew, and it felt like we were carrying a portable crockpot. It’s the definition of rugged reliability.
Check Price on AmazonIn-Depth Review & Our Experience
Unmatched Heat Retention: Stanley claims this jar keeps food hot for 15 hours. We were skeptical, but our tests proved them right. We filled it with boiling water and left it overnight. Twelve hours later, the water was still hot enough to steep tea. For a real-world food test, we filled it with hot chili at 7 AM. At 7 PM, it was still perfectly warm and ready to eat. This incredible performance makes it ideal for long workdays or overnight camping trips. If you need your meal hot at the end of a long day, nothing we tested comes close to the Stanley.
Legendary Toughness: The Hammertone green finish isn’t just for looks; it’s a symbol of the jar’s near-indestructible build. Made from 18/8 stainless steel, it’s naturally BPA-free and rust-proof. We accidentally dropped our test model from waist height onto concrete, and it escaped with only a minor scuff—the performance was completely unaffected. This is a buy-it-for-life product, backed by Stanley’s lifetime warranty.
Practical Features: Like the Thermos King, it has a wide mouth for easy use and cleaning. The insulated lid also doubles as a 12oz/354mL bowl, which is appropriately sized for the jar’s large capacity. While it doesn’t include a spoon, its raw performance and tank-like build are the main selling points. It’s a no-nonsense tool for a serious job.
Ideal Use Case — Outdoor & Physical Work: Where this jar truly shines is outdoors. Hikers, campers, construction workers, and farmers consistently rave about the Stanley’s ability to deliver a genuinely hot meal at the end of a long, physically demanding day. We took ours on a full-day winter hiking trip, and after six hours on snowy trails, our pasta was still steaming. The Hammertone green exterior also happens to be highly visible in dense foliage—a practical detail for outdoor use.
Cold Performance: Don’t overlook the Stanley for cold food either. We filled it with cold gazpacho and ice cubes on a 90°F summer day. After eight hours, the soup remained refreshingly cold. For summer camping, beach days, or outdoor festivals, it’s equally impressive keeping things cold.
What We Love
- Incredible 15-hour heat retention
- Extremely durable, rugged construction
- Large 24-ounce capacity for big meals
- Lifetime warranty demonstrates trustworthiness
- Leak-proof and fully packable
- Excellent cold retention too
What Could Be Better
- Heavy and bulky; not for casual packing
- Does not include a utensil
- The classic design may not appeal to everyone
3. Hydro Flask Insulated Food Jar 20 Ounce: The Modern & Stylish Choice

Best for Style and Leak-Proof Security
Hydro Flask has built a loyal following with its iconic water bottles, and their Insulated Food Jar brings the same blend of high-performance insulation and modern, minimalist design to the world of portable meals. If you value aesthetics as much as function and demand a 100% leak-proof seal, this is the jar for you.
Available in a wide array of attractive colors, the Hydro Flask jar feels premium from the moment you pick it up. The powder coat finish provides a secure, slip-free grip and resists scratches, keeping it looking great for years.
Check Price on AmazonIn-Depth Review & Our Experience
Solid Insulation in a Sleek Package: While Hydro Flask doesn’t give a specific hour rating, their TempShield® double-wall vacuum insulation is highly effective. In our tests, it kept oatmeal steaming hot for over 6 hours, making it more than capable for a standard workday or school day. We also tested it with a cold fruit salad, and it remained chilled and crisp from morning until afternoon, with zero condensation on the outside.
The Ultimate Leak-Proof Lid: The standout feature for us was the lid design. It provides an incredibly secure, airtight seal. We filled it with water and shook it vigorously, even storing it upside down in a backpack for an hour. Not a single drop escaped. This level of security gives you complete peace of mind when packing soupy or liquid-based meals next to your laptop or important documents.
User-Friendly Design: The jar’s internal bowl has a rounded bottom, which makes it easy to get every last bite and simplifies cleaning. The lid is also easy to grip and twist open, even with wet hands. While it’s one of the pricier options on our list, the combination of reliable performance, superior leak-proofing, and stylish design justifies the cost for many users.
The Office Professional’s Pick: If you work in a corporate or creative office environment and care about carrying a lunch container that looks as polished as the rest of your gear, the Hydro Flask is the clear winner. It looks great on a desk, coordinates with their matching water bottles and tote bags, and the leak-proof lid means there’s zero risk of a soup disaster in your work bag. It’s the ideal vessel for upscale soups, grain bowls, and salads that you want to arrive at work looking exactly as they did when you made them.
What We Love
- Completely leak-proof and secure lid
- Modern design with many color options
- Durable powder coat finish
- Good heat and cold retention
- Easy to clean interior design
- Pairs with other Hydro Flask products
What Could Be Better
- Higher price point
- No included utensil or bowl-lid
- No specific hour rating for heat retention
4. Thermos Funtainer 10 Ounce: The Best Friend for Kids’ Lunches

Best for Kids
Packing a hot, nutritious lunch for a child can be a challenge. The Thermos Funtainer is the undisputed champion of the school cafeteria, designed from the ground up to be perfect for little hands and smaller appetites. It makes sending warm leftovers like chicken nuggets, spaghetti, or soup a breeze.
Available in dozens of fun colors and character designs, the Funtainer gets kids excited about lunchtime. But it’s not just about looks; this little jar is a real performance powerhouse, making it one of the most practical thermos lunch kits for school.
Check Price on AmazonIn-Depth Review & Our Experience
Kid-Tested Performance: The Funtainer promises to keep food hot for 5 hours. We packed it with mac and cheese at 7:30 AM, and by a 12:30 PM lunchtime, it was still perfectly warm and enjoyable for a child. This is the ideal duration for a school day. Similarly, it keeps cold items like yogurt or fruit cups chilled for a claimed 7 hours, preventing spoilage and keeping food fresh.
Thoughtful, Kid-Friendly Design: The 10-ounce size is perfect for kid-sized portions, ensuring less food waste. The lightweight and compact design fits easily into a lunchbox or backpack without weighing it down. The lid is designed to be easy for small hands to open, and the wide mouth makes it simple for kids to eat from. Some models even come with a folding spoon that tucks into the lid, which is a huge bonus.
Durability and Safety: Just like its bigger sibling, the Stainless King, the Funtainer is made from durable stainless steel that can handle being dropped or banged around. The materials are all BPA-free, giving parents peace of mind. It’s a reliable and safe choice that will last through many school years.
A Note on Picky Eaters: One unexpected benefit parents love is that a warm, familiar meal from home can reduce lunchtime anxiety for children who are picky eaters or who are new to a school. Instead of unpredictable cafeteria food, they get the comfort of a home-cooked meal they already enjoy. Many parents report that their children eat far more of their lunch when it’s a warm home-cooked dish in a Funtainer than they ever do with cold-packed alternatives.
Care for Parents: The Funtainer is straightforward to clean—the wide mouth allows a standard bottle brush to reach the interior, and the lid has a minimal number of components compared to more complex adult jars. A quick rinse and brush-clean each night takes only a minute, which is a genuine blessing for busy parents.
What We Love
- Perfect size and weight for kids
- Excellent 5-hour heat retention for lunchtime
- Durable and safe BPA-free construction
- Wide variety of fun designs and colors
- Easy for small hands to open and use
- Easy for parents to clean
What Could Be Better
- Too small for adult portions
- Folding spoon (on models that include it) can be a bit flimsy
5. Simple Modern Provision Food Jar 16 Ounce: The Stylish & Smart Commuter

Best for Style and Smart Features
Simple Modern lives up to its name by combining clean, contemporary aesthetics with smart, user-centric features. The Provision Food Jar is a fantastic all-around option that competes directly with the Thermos King but adds a few modern twists that make it a joy to use, especially for students and professionals on the go.
This jar immediately stands out with its huge selection of colors and patterns, along with a comfortable, built-in handle on the lid that makes it super easy to carry.
Check Price on AmazonIn-Depth Review & Our Experience
Innovative Lid Design: The most unique feature of the Provision jar is the pressure-relief button on the lid. If you’ve ever struggled to open a food jar due to the vacuum seal created by hot contents, you’ll appreciate this. A simple press of the button releases the pressure, making the lid incredibly easy to twist off. This small detail makes a big difference in daily use. The handle is another well-executed feature, providing a much more secure way to carry the jar compared to gripping the body.
Strong Thermal Performance: With a claimed 10 hours of heat retention, the Simple Modern Provision performed exceptionally well in our tests. After 8 hours, our test soup was still well above 140°F, hot enough to be thoroughly enjoyed. The double-walled, vacuum-insulated 18/8 stainless steel construction is on par with the best in the industry.
Aesthetics and Variety: Simple Modern offers an unmatched variety of colors and finishes. Whether you prefer a classic solid, a shimmering metallic, or a trendy pattern, there’s a design to match your personal style. It’s a food jar that also serves as a fashion accessory, making it a popular choice among high school and college students.
The Budget-Friendly Champion: One of the most compelling aspects of the Simple Modern Provision is its price point. Coming in well under comparable products from Hydro Flask, the Provision delivers outstanding performance at a fraction of the cost. For families needing to buy multiple jars, or for students on tight budgets, this is the jar that makes the most sense. The value proposition is extraordinary—you sacrifice almost nothing while saving significantly.
Dishwasher Compatibility Note: Unlike some vacuum-insulated jars, some versions of the Simple Modern Provision claim to be dishwasher-safe (top rack). Always verify this on your specific model, but it’s a convenience that busy users will greatly appreciate.
What We Love
- Pressure-release button makes opening effortless
- Built-in handle for easy carrying
- Huge variety of stylish colors and patterns
- Excellent heat retention performance
- Durable, food-grade materials
- Outstanding budget-friendly value
What Could Be Better
- Lid has more parts, requiring more careful cleaning
- No included utensil
How Vacuum Insulation Actually Works: The Science Behind the Magic
You might have noticed that all of the top food jars on our list use “double-wall vacuum insulation.” But what does that actually mean, and why does it work so much better than simple foam or plastic insulation?
The story begins in 1892, when Scottish scientist Sir James Dewar invented what we now call the vacuum flask—or the Dewar flask—for use in his cryogenic research. His insight was elegant: if you can eliminate the medium through which heat travels, you can dramatically slow down or stop temperature transfer. Heat moves through three mechanisms: conduction (through direct contact), convection (through fluids like air), and radiation. A vacuum eliminates both conduction and convection, leaving only radiation to work against.
🔬 The Science in Simple Terms: A vacuum-insulated food jar is essentially a container within a container. The space between these two containers is evacuated of almost all air, creating a near-vacuum. Without air molecules to carry heat away from your food, the temperature change slows dramatically. The inner and outer walls are also typically made of stainless steel, which is polished to reflect radiant heat back inward. The combination of these two effects is what keeps your soup piping hot for 7 to 15 hours.
In the early 1900s, Reinhold Burger commercialized Dewar’s invention for everyday use, founding what would eventually become the American Thermos Bottle Company. Today, the term “thermos” has become so generic that it’s used to refer to any vacuum-insulated vessel—much like “Kleenex” for tissues or “Xerox” for photocopying.
Why 18/8 Stainless Steel?
Nearly every premium food jar on the market uses 18/8 stainless steel (also called 304 stainless steel). The numbers refer to the chromium and nickel content: 18% chromium and 8% nickel. This specific alloy is the gold standard because it is exceptionally resistant to rust and corrosion, completely non-reactive with acidic or salty foods (so it won’t impart metallic flavors), food-safe and free from harmful chemicals, extremely durable and resistant to dents, and easy to clean and maintain. Lower-quality jars may use cheaper grades of steel or even plastic inserts, which can absorb odors, leach chemicals over time, and degrade far more quickly. Always verify the grade of steel before purchasing a budget thermos food jar.
Vacuum Insulation vs. Foam Insulation vs. Single-Wall
| Insulation Type | Typical Heat Retention | Weight | Cost | Common Use |
|---|---|---|---|---|
| Double-Wall Vacuum | 5–15+ hours | Moderate | Higher | Premium food jars, water bottles |
| Foam-Insulated | 2–4 hours | Light | Lower | Lunch bags, soft coolers |
| Single-Wall Stainless | 30–60 minutes | Very Light | Lowest | Basic travel cups |
| Double-Wall Air Gap (no vacuum) | 1–3 hours | Moderate | Low-Medium | Budget food jars |
The takeaway is clear: for any situation where you need food to remain at a safe, enjoyable temperature for more than two hours, double-wall vacuum insulation is the only technology worth using. All five of our recommended jars use this technology.
How We Tested & What to Look For in a Thermos Food Jar
Our recommendations are the result of hands-on testing and years of experience with insulated products. We didn’t just read spec sheets; we used these jars as they’re meant to be used. Here’s a look at our criteria and what you should consider before buying.
Expert Tip: The Preheating Ritual. To get maximum performance from any food jar, always preheat (or pre-chill) it. Fill it with boiling water for hot foods, or ice water for cold foods. Let it sit for 5-10 minutes with the lid on, then empty it out just before adding your food. This simple step makes a huge difference in how long your food stays at the desired temperature.
1. Heat Retention: The Most Critical Factor
The entire purpose of a food jar is to keep hot food hot and cold food cold. We measured this by filling each jar with 210°F liquid, sealing it, and taking temperature readings at set intervals (2, 4, 6, and 8 hours). A great food jar should keep food above 140°F (the FDA-recommended safe temperature) for at least 5-6 hours. All the jars on our list met and exceeded this baseline.
Manufacturer heat-retention claims are tested under laboratory conditions, typically at room temperature (around 70°F). In the real world, factors like ambient temperature (cold weather speeds up heat loss), the initial food temperature, and how full the jar is (fuller jars retain heat longer) all play a role. Always give yourself a buffer: if you need food hot after 7 hours, buy a jar rated for 10+ hours.
2. Material and Durability: Built for the Real World
The industry standard for quality is 18/8 food-grade stainless steel. This material is prized because it’s highly durable, rust-resistant, and doesn’t impart any metallic taste to your food. It’s also naturally BPA-free. All our top picks are made from this material, ensuring they are safe and built to last. We also considered the durability of the lids and any exterior finishes. These stainless steel thermos lunch containers are a long-term investment.
3. Lid Design and Leak-Proofing
A leaky thermos is a disaster waiting to happen in your bag. We tested each jar’s seal by filling it with water, shaking it, and leaving it on its side. A secure, easy-to-open lid is non-negotiable. We also looked for value-add features like pressure-release valves (like on the Simple Modern) or lids that double as bowls (like the Thermos King and Stanley). Check that the silicone or rubber gasket inside the lid is sturdy and replaceable, as this is the component most likely to wear out over time.
4. Ease of Use and Cleaning
A wide mouth is essential. It makes filling the jar, eating directly from it, and—most importantly—cleaning it much easier. Jars with complex lid mechanisms or narrow openings are difficult to clean thoroughly, which can lead to trapped food particles and odors. We prioritized designs that were simple to take apart and wash by hand (as most vacuum-insulated products are not recommended for the dishwasher). The exception is the Simple Modern Provision, which some versions claim is dishwasher-safe on the top rack.
5. Capacity and Portability
Consider what you’ll be using it for. A 10oz jar (like the Funtainer) is perfect for a child’s soup portion, while a 16oz jar is a great all-around size for an adult lunch. If you need to pack a meal for a long day outdoors, a 24oz jar (like the Stanley) might be necessary. We also assessed how heavy and bulky each jar was, as this impacts its portability for daily commuting or hiking.
6. Value and Warranty
A higher price tag doesn’t always mean better performance, but it often reflects better materials and more reliable construction. Our picks range from budget-friendly (Simple Modern) to premium (Hydro Flask), and all offer strong value within their respective price tiers. Pay attention to warranty terms—the Stanley’s lifetime guarantee and Thermos’s limited warranty are meaningful signals of brand confidence. Avoid unbranded or ultra-cheap food jars, which often use inferior steel grades and poor-quality vacuum seals that fail quickly.
Complete Size & Capacity Guide: Which Size Is Right for You?
One of the most common questions we get is, “What size food jar do I need?” The answer depends on who is eating, what they’re eating, and how long the jar needs to perform. Here’s a comprehensive guide to help you choose the right capacity.
| Capacity | Best For | Typical Food Amount | Heat Retention (General) | Example Product |
|---|---|---|---|---|
| 8–10 oz (240–295ml) | Children ages 3–8, snacks | 1 small serving of soup or mac & cheese | 4–6 hours | Thermos Funtainer 10 oz |
| 12–14 oz (355–415ml) | Children ages 8–12, light lunches | 1 medium serving of pasta or stew | 5–7 hours | Thermos Funtainer 12 oz |
| 16 oz (470ml) | Adults, standard workday lunch | 1 full adult serving of soup, curry, or grain bowl | 7–10 hours | Thermos Stainless King, Simple Modern Provision |
| 18–20 oz (530–591ml) | Bigger appetites, longer days | 1 large serving or 2 small servings | 6–9 hours | Hydro Flask 20 oz |
| 24+ oz (710ml+) | Manual laborers, hikers, campers, very hungry adults | 2 full servings of a hearty meal | 10–15 hours | Stanley Classic Legendary 24 oz |
Pro Sizing Tip: For maximum heat retention, always fill your food jar as close to the top as possible. Air gaps inside the jar create space for heat to dissipate. If your jar is larger than your meal, consider filling the remaining space with a rolled piece of crumpled food-safe parchment paper to reduce the air gap, or simply choose a slightly smaller jar that matches your portion size.
The “One Jar for Everything” Mistake
Many people try to buy a single jar for all their needs. While a 16oz jar is genuinely versatile, resist the temptation to use a giant 24oz jar for small portions—you’ll get noticeably poorer heat retention because the food can’t warm the large air pocket inside. Similarly, stuffing a 10oz kids’ jar for an adult portion results in overfilling and potential lid-seal issues. Match the jar to the portion for best results.
Food Safety & The Temperature Danger Zone: What Every Thermos User Must Know
Using a thermos food jar isn’t just about convenience—it’s about food safety. Understanding a few basic food safety principles will ensure that your meals are not only delicious but also completely safe to eat.
⚠️ The Temperature Danger Zone: The FDA defines the “temperature danger zone” as the range between 40°F (4°C) and 140°F (60°C). Within this range, bacteria can multiply rapidly—doubling in number every 20 minutes under ideal conditions. Food left in the danger zone for more than 2 hours should be considered unsafe to eat. This is why keeping your food above 140°F is so critical.
The Golden Rules of Food Jar Safety
- Start Hot, Stay Hot: Always pack food that is genuinely piping hot—at or above 165°F (74°C), which is the safe internal temperature for most cooked foods. Food that starts just warm may drop into the danger zone before lunchtime.
- Preheat Your Jar: Fill the jar with boiling water for 5–10 minutes before packing hot food. This eliminates the “heat sink” effect where the cool metal jar steals heat from your food in the first 30 minutes.
- Don’t Leave It Too Long: Even the best thermos has its limits. If you’re not sure if your food jar can keep meals above 140°F for your full day (e.g., 10+ hours), test it at home before relying on it in the field.
- Cold Foods Need Attention Too: For cold foods, the target is below 40°F (4°C). Pre-chill your jar with ice water, and start with foods that are fully refrigerator-cold before packing.
- Avoid Partially Cooked Foods: Never pack partially cooked foods like rare meat or undercooked eggs in a food jar, even if you’ll heat them later. These foods can enter the danger zone before reaching a safe temperature.
- When in Doubt, Throw It Out: If your food smells off, looks wrong, or you’re simply unsure whether it’s been safe long enough, discard it. The cost of a discarded meal is far less than the cost of food poisoning.
✅ Real-World Temperature Guide: Our testing showed that a properly preheated 16oz food jar filled with soup heated to 212°F dropped to approximately 170°F after 2 hours, 155°F after 4 hours, 143°F after 6 hours, and 138°F after 7 hours. This means the soup crossed the 140°F safety threshold just under the 7-hour mark—matching the Thermos King’s claim almost exactly. For a standard 5–6 hour school or workday, you have a healthy safety margin. For longer days, upgrade to a jar with a 10+ hour claim.
Foods That Are Safest in a Thermos Food Jar
Liquid-based foods are the safest and most effective for thermos use. Soups, broths, stews, chilis, curries, and porridges all retain heat extremely well because liquids have high thermal mass—they hold onto heat much more effectively than solid foods. Solid foods like pasta, rice dishes, or chicken nuggets are also fine, but heat retention will be slightly shorter than with liquid-heavy meals. Foods to avoid include raw or undercooked meats and eggs, dairy-heavy dishes that can sour if temperatures fluctuate (though hot cheese soups are generally fine), and anything that you wouldn’t feel confident eating if it dropped to 130–140°F.
Step-by-Step: How to Preheat & Pre-Chill Your Food Jar for Maximum Performance
Preheating and pre-chilling are the single most impactful things you can do to improve your thermos food jar’s performance. Many people skip this step and then wonder why their food is cold—this section will make sure that doesn’t happen to you.
How to Preheat for Hot Foods
- Boil water. Use a kettle or stovetop to bring water to a full boil (212°F / 100°C). You don’t need a lot—just enough to fill the jar.
- Fill the jar with boiling water. Pour the boiling water into the food jar until it is nearly full. Place the lid on (or just rest it on top—don’t seal it completely with boiling water as pressure can build).
- Wait 5–10 minutes. Allow the boiling water to heat the inner stainless steel walls of the jar. This is the step most people skip, and it’s the most important one. The steel jar is a heat sink—it will steal significant heat from your food if it’s at room temperature when you pack.
- Heat your food thoroughly. While the jar preheats, heat your food on the stovetop or microwave until it is piping hot—at least 165°F (74°C). Don’t be shy about heating it hotter than you’d normally eat it; it will naturally cool slightly as it sits in the jar.
- Empty the jar and immediately pack hot food. Pour out the hot water and immediately fill the jar with your piping hot food. Fill it as close to the top as possible to minimize air gaps. Seal the lid firmly.
How to Pre-Chill for Cold Foods
- Fill the jar with ice water. Add a handful of ice cubes and cold water to the food jar. Seal the lid and let it sit for 5–10 minutes to chill the stainless steel walls.
- Prepare cold food directly from the refrigerator. Ensure your food is fully refrigerator-cold (below 40°F) before packing. If using fresh-cut fruit, keep it refrigerated until the last possible moment.
- Empty the jar and pack immediately. Pour out the ice water and immediately fill with your cold food. Add a small amount of ice to the top if your food and jar have space. Seal firmly.
Expert Tip: The Overnight Pre-Chill. For maximum cold retention on hot summer days, fill your food jar with ice water the night before and leave it in the refrigerator overnight. By morning, the jar’s walls will be genuinely cold—not just room temperature—giving your food a significant head start on staying cold all day.
The Best Foods to Pack in a Thermos Food Jar
Not all foods are created equal when it comes to thermos use. Some foods stay hot and taste great after hours of transport; others become soggy, unsafe, or lose their appeal. Here’s our comprehensive guide to what works best and what to avoid.
🔥 Excellent Hot Foods for Thermos Jars
These foods are ideal because they are liquid-rich, safe to hold at high temperatures, and actually improve in flavor as they sit and meld:
- Soups & Broths: Tomato soup, chicken noodle, minestrone, lentil soup, miso soup, bone broth. These are the gold standard for thermos use—they heat evenly, retain temperature brilliantly, and are easy to eat directly from the jar.
- Stews & Chilis: Beef stew, white bean chili, chicken chili, lentil dal. The thick, rich consistency of stews makes them perfect candidates—they have high thermal mass and stay hot longer than thin liquids.
- Curries: Chicken tikka masala, vegetable curry, Thai red curry, butter chicken. The sauce-heavy nature of curries makes them excellent thermos candidates. Pair with separately packed rice or naan.
- Pasta & Noodle Dishes: Mac & cheese, spaghetti bolognese, ramen, udon noodles. Add extra sauce to prevent the pasta from absorbing liquid and drying out. The extra moisture maintains heat and keeps the texture pleasant.
- Grain Bowls: Rice bowls, quinoa dishes, farro with roasted vegetables. Pack the warm grain and protein hot; add fresh toppings (avocado, fresh herbs) at lunchtime.
- Oatmeal & Porridge: A morning game-changer. Pack piping hot oatmeal with your favorite toppings (brown sugar, cinnamon, dried fruit) in the morning and enjoy a warm breakfast at the office, on the train, or on the trail.
- Scrambled Eggs & Breakfast Burritos: Pack a freshly scrambled egg dish or breakfast burrito and enjoy a hot breakfast at your desk. Make sure eggs are fully cooked to 165°F before packing.
❄️ Excellent Cold Foods for Thermos Jars
- Cold Soups: Gazpacho, vichyssoise, cold cucumber soup. Thermos jars are not just for hot food—they’re superb for keeping chilled soups cold all day.
- Yogurt Parfaits: Layer cold Greek yogurt, granola, and fresh or frozen berries. Pack them while refrigerator-cold and enjoy a fresh, cool parfait at lunchtime.
- Fruit Salads: Pre-cut fruit stays fresh and cold when pre-chilled. Add a squeeze of lime juice to prevent browning.
- Cold Grain Salads: Tabouli, couscous salad, pasta salad. These travel exceptionally well and hold their texture and temperature beautifully.
- Overnight Oats: Prepare overnight oats the night before, refrigerate, and pack cold for a cool, refreshing breakfast on hot summer days.
⚠️ Foods to Approach with Caution
- Crispy Foods: Fried chicken, spring rolls, and other foods that rely on crispiness will become soggy from steam. Consider packing the sauce separately and adding it at lunchtime.
- Dry Foods: Rice or pasta without enough sauce can dry out. Always add extra liquid when packing dry foods.
- Delicate Greens: Don’t pack raw greens in a hot thermos—they’ll wilt. Pack them separately and add them at meal time.
- Seafood: While cooked seafood is technically safe to pack hot, strong fish smells can linger in the jar even after thorough cleaning. If you do pack fish, soak the jar with baking soda and water afterwards.
Meal Prep Ideas for Thermos Food Jars: A Week of Hot Lunches
One of the most powerful aspects of owning a good thermos food jar is how it transforms your approach to meal preparation. By batch-cooking on weekends and portioning into jars for the week, you can enjoy restaurant-quality hot lunches every day for a fraction of the cost and effort. Here’s a full week of meal prep ideas designed specifically for thermos food jars.
🍅 Monday: Classic Tomato Basil Soup
Prep Time: 10 minutes | Cook Time: 25 minutes | Servings: 4
Sauté one diced onion and four garlic cloves in olive oil until soft. Add two cans of crushed tomatoes, one cup of vegetable broth, a handful of fresh basil, salt, and pepper. Simmer for 20 minutes, then blend until smooth. Reheat to 165°F before packing into a preheated jar. Pairs beautifully with a crusty roll packed separately.
Thermos Tip: Creamy soups benefit from a tablespoon of heavy cream or coconut cream stirred in just before packing. The fat content adds richness and helps retain heat.
🌶️ Tuesday: Three-Bean Turkey Chili
Prep Time: 15 minutes | Cook Time: 35 minutes | Servings: 6
Brown one pound of ground turkey with onion and garlic. Add one can each of kidney beans, black beans, and chickpeas (drained), two cans of diced tomatoes, one cup of chicken broth, chili powder, cumin, paprika, and cayenne to taste. Simmer for 30 minutes. This chili actually tastes better on day two and three, making it the ultimate batch-prep thermos meal.
Thermos Tip: Pack sour cream, shredded cheese, and sliced jalapeños in separate small containers and add them at lunchtime for a restaurant-worthy experience.
🍛 Wednesday: Golden Lentil Dal
Prep Time: 10 minutes | Cook Time: 30 minutes | Servings: 4
A warming, protein-rich Indian-inspired dal that holds beautifully in a thermos. Combine one cup of red lentils with one can of diced tomatoes, one can of coconut milk, minced ginger, garlic, and a teaspoon each of turmeric, cumin, and garam masala. Simmer until lentils are fully soft (about 25 minutes). The coconut milk adds creaminess and exceptional heat retention.
Thermos Tip: Pack warm basmati rice in a second thermos jar and pour the dal over it at lunchtime for a complete meal.
🍜 Thursday: Miso Ramen Broth Bowl
Prep Time: 5 minutes | Cook Time: 10 minutes | Servings: 1
The ultimate quick thermos meal. Dissolve three tablespoons of white miso paste in four cups of simmering water. Add a tablespoon of soy sauce, a teaspoon of sesame oil, and a handful of cooked noodles. Pack hot into a preheated jar with toppings like soft-boiled egg (packed separately), scallions, and a sheet of nori.
Thermos Tip: Pack the noodles and broth together, but keep delicate toppings like soft-boiled eggs, bean sprouts, and fresh herbs in a separate container to add at serving time.
🥣 Friday: Creamy Chicken and Wild Rice Soup
Prep Time: 15 minutes | Cook Time: 40 minutes | Servings: 6
The perfect end-of-week comfort meal. Sauté diced celery, carrots, and onion in butter. Add shredded rotisserie chicken, cooked wild rice, four cups of chicken broth, and one cup of cream. Season generously with salt, pepper, and thyme. The creamy, chunky consistency is ideal for thermos transport—it stays thick and rich even after hours of sitting.
Weekend Batch Prep Strategy
The most efficient approach is to dedicate 90 minutes on Sunday to preparing two or three large batches of different soups or stews. Cool them down, divide into individual portions, and refrigerate. Each morning, reheat your chosen lunch to 165°F+, preheat your jar, and pack—the whole process takes under five minutes. This approach saves significant money compared to buying lunch daily, reduces packaging waste, and guarantees you’ll eat a satisfying, hot, nutritious meal no matter how hectic your day becomes.
Who Should Buy Which Thermos? A Guide by User Type
Different people have different needs, and the best thermos food jar for a construction worker is very different from the best one for a third-grader. Here’s our persona-based guide to help you find your perfect match.
The Construction Worker / Tradesperson
Needs maximum durability, large capacity, and all-day heat retention. The Stanley Classic Legendary 24 oz is the clear winner. It can survive drops, extreme temperatures, and heavy-duty use, and it keeps food genuinely hot for a 10–12 hour shift.
The Office Professional
Wants something that looks polished, packs securely with a laptop, and delivers a satisfying lunch. The Hydro Flask 20 oz is perfect—stylish, completely leak-proof, and available in colors that coordinate with premium work gear.
The Student (High School / College)
Needs affordable style, easy use, and good performance. The Simple Modern Provision 16 oz is unbeatable—budget-friendly, available in dozens of colors and patterns, and features the pressure-release lid that makes opening effortless between classes.
The School-Age Child
Requires a compact size, easy-open lid, and durable design. The Thermos Funtainer 10 oz was designed exactly for this use case. Fun character designs make lunchtime exciting, and the 5-hour retention covers a full school day with ease.
The Hiker / Outdoor Enthusiast
Needs durability, long heat retention, and reliability in extreme conditions. The Stanley Classic 24 oz dominates here—built to withstand rough treatment and capable of keeping food hot for 12–15 hours, covering even the longest backcountry trips.
The Daily Commuter / Everyday User
Wants reliable performance, great value, and easy daily use. The Thermos Stainless King 16 oz is the go-to choice. It does everything well—proven performance, included spoon, bowl-lid, and excellent all-around value.
Thermos Food Jar vs. Electric Lunch Box: Which Is Right for You?
In recent years, electric lunch boxes—small, portable devices that plug into a car outlet or standard wall socket to heat food—have grown in popularity. Many people wonder: should I get a thermos food jar or an electric lunch box? The answer depends on your specific needs. Here’s a detailed comparison.
| Feature | Thermos Food Jar | Electric Lunch Box |
|---|---|---|
| Heat Source | Passively retains heat from food packed hot | Actively heats food using electricity |
| Requires Power? | No – works completely off-grid | Yes – needs a wall outlet or car charger |
| Food Starting Temperature | Must be packed hot | Can start from refrigerator cold |
| Best For | Hiking, schools, offices without kitchen access, any outdoor use | Truckers, commuters with car outlets, offices with wall outlets |
| Durability | Very high – no mechanical parts, no electronics | Lower – electrical components can fail; less drop-resistant |
| Food Variety | Best for liquid-based foods and dishes already cooked | Can heat any food, including frozen meals |
| Weight & Portability | Compact and lightweight | Heavier, requires cord storage |
| Price Range | $15–$60 | $20–$80 |
| Long-Term Reliability | Very high – can last 10+ years with basic care | Moderate – electrical components may need replacement |
Our Recommendation: For most people—especially those who are hiking, at school, working in environments without power access, or packing for children—a thermos food jar is the superior choice. It’s simpler, more reliable, more durable, and doesn’t depend on electricity. If you’re a truck driver with a 12V outlet or an office worker who wants to be able to heat genuinely frozen food from scratch, an electric lunch box may be a useful secondary option. But a high-quality thermos food jar remains the more versatile and dependable tool for the majority of portable meal situations.
Thermos Food Jars for Outdoor & Adventure Use: A Deep Dive
There is perhaps no setting where a quality thermos food jar makes a more dramatic difference than in the outdoors. When you’re three miles from the nearest trailhead in below-freezing temperatures, a steaming bowl of soup isn’t just a pleasure—it’s a meaningful source of warmth, comfort, and caloric energy that keeps you moving safely.
Cold Weather Performance
It’s worth noting that all manufacturer heat-retention claims are measured at room temperature (approximately 70°F). In cold outdoor conditions—say, 30–40°F on a winter hike—your thermos will actually perform better than its claim in terms of keeping food above the danger zone, because there is a smaller temperature differential between the jar’s interior and the outside air. However, the jar’s exterior will also cool much faster, so you’ll want to keep it close to your body or inside an insulating pack sleeve.
Hot Weather Cold Performance
Conversely, on hot summer days (90°F+), cold food in your thermos faces a greater challenge staying below 40°F. In these conditions, consider using larger amounts of ice in your pre-chill process, or using a slightly oversized jar and filling the extra space with ice cubes alongside your food. A vacuum-insulated jar will still dramatically outperform any non-insulated container, but pre-chilling and maximizing ice use becomes even more important.
Best Thermos Foods for Hiking & Camping
- Instant oatmeal – Pack boiling water in the jar, add instant oats at the trailhead, and let them cook inside the jar for 10 minutes. Hot breakfast with zero stovetop required.
- Instant ramen / cup noodles – Same approach. Boiling water in the thermos cooks noodles perfectly in about 15 minutes.
- Pre-cooked hearty stews – A thick beef stew, lamb curry, or chili packed at camp will stay warm for hours on the trail.
- Coffee & hot cocoa – Pack a thermos with hot water and use single-serve coffee or cocoa packets at the destination—no stove required.
- Mashed potatoes – Creamy, calorie-dense, and excellent at retaining heat. A high-calorie option for cold-weather hiking where energy demands are high.
Hiker’s Expert Tip: On multi-day trips, consider bringing two thermos jars: one for hot food at lunch and one for hot water. Hot water has infinite uses—making hot beverages, rehydrating freeze-dried meals, warming your hands, or even providing a small warming pad against your body in emergency situations. A small 12oz food jar is lightweight and packs flat against your pack’s frame.
Care, Maintenance & Longevity Tips: Make Your Food Jar Last a Decade
A quality thermos food jar is an investment that, with proper care, should last you a decade or more. The most common causes of premature failure are improper cleaning, storage mistakes, and accidental damage to the vacuum seal. Follow these guidelines to protect your investment.
Everyday Cleaning Best Practices
- Rinse immediately after use. The sooner you rinse your jar after eating, the easier it is to clean. Dried-on food—especially tomato-based sauces, oatmeal, and dairy—becomes significantly harder to remove once it cures to the stainless steel interior.
- Use warm soapy water and a bottle brush. A long-handled bottle brush is essential for cleaning the interior of any food jar. Standard dish sponges can’t reach the bottom of most jars. Use a drop of dish soap, add warm water, and scrub gently with the brush.
- Clean the lid thoroughly. The lid—particularly the silicone gasket and any grooves or threads—is where food particles and bacteria hide. Disassemble the lid components if possible and scrub each part individually. Replace the gasket if it shows signs of cracking, staining, or deformation, as a deteriorated gasket will eventually cause leaks.
- Dry completely before storing. Never store your food jar with the lid sealed when wet. Trapped moisture promotes mildew and odors. Either store it with the lid off or loosely placed, or dry the interior thoroughly with a clean cloth before sealing.
- Avoid the dishwasher (generally). The extreme heat and harsh detergents in a dishwasher can damage the vacuum seal, degrade the lid materials, and strip exterior finishes. Most manufacturers recommend hand-washing. The Simple Modern Provision is a notable exception—check your specific model’s instructions.
Removing Stubborn Stains and Odors
Even with regular cleaning, food jars can develop stains (from tomato soup, curries, and coffee) or persistent odors (from fish, garlic, or fermented foods). Here are the most effective methods:
- Baking soda paste: Mix two tablespoons of baking soda with enough water to form a paste. Apply to the interior with a brush, let sit for 30–60 minutes, then scrub and rinse. Highly effective for both stains and odors.
- White vinegar soak: Fill the jar with a 50/50 mixture of white vinegar and water. Let it sit for several hours or overnight. The acidity neutralizes most odors. Rinse thoroughly with clean water afterward.
- Boiling water flush: For persistent odors, fill the jar with boiling water and a tablespoon of baking soda. Let it sit for an hour with the lid on (loosely), then rinse. The combination of heat and baking soda is very effective.
- Denture cleaning tablets: Drop a denture cleaning tablet into the jar, add warm water, and let it fizz for 30 minutes. This is an underrated but highly effective cleaning method for both stains and odors in hard-to-reach places.
Storage Tips
Store your food jar with the lid loosely placed or removed entirely to allow airflow. Keep it in a cool, dry place away from direct sunlight—UV exposure can degrade the exterior coating over time, though it won’t affect the vacuum seal. Never store the jar filled with food or liquid for extended periods, and never place it in the freezer (the freezing and expansion of contents can damage the stainless steel and compromise the vacuum).
Protecting the Vacuum Seal
The vacuum seal is the heart of your thermos food jar. Protect it by avoiding hard impacts—particularly drops onto hard surfaces—which can crack the seal between the inner and outer walls. If you notice that your jar is no longer retaining temperature as well as it used to (a significant drop, not just normal aging), or if the exterior of the jar becomes warm to the touch when filled with hot liquid, the vacuum seal may have been compromised. This is not repairable and indicates it’s time for a replacement jar.
The Eco-Friendly Case for Thermos Food Jars 🌱 Sustainable Choice
In an era of growing environmental awareness, the humble thermos food jar turns out to be one of the most sustainable daily-use products you can own. Let’s look at the environmental math.
The True Cost of Disposable Food Containers
The average office worker who buys lunch five days a week generates approximately 260 single-use food containers per year. Most of these—takeout containers, plastic bags, foil trays—end up in landfills. Even those that are technically recyclable are often contaminated with food residue and sent to landfill anyway. Globally, single-use food packaging is one of the largest contributors to plastic pollution in waterways and oceans.
The Thermos Math
A quality thermos food jar costs $20–$60 and can last 10–15 years with proper care. That’s potentially 2,600+ individual meals without generating a single disposable container. Even accounting for the energy and resources required to manufacture the stainless steel jar, the lifecycle environmental cost is dramatically lower than 2,600 disposable containers. Studies on reusable vs. single-use containers consistently show that stainless steel reusables break even environmentally after just 50–100 uses—a milestone you’ll likely hit within the first few months of regular use.
Additional Eco Benefits
- Reduces food waste: Packing lunch from home encourages cooking in larger batches and using leftover food that might otherwise be discarded. This directly reduces household food waste.
- No plastic leaching: Unlike plastic food containers that can leach chemicals (BPA, phthalates) into food, particularly when heated, stainless steel is inert and safe. Better for you and the environment.
- Zero-packaging lunches: A thermos food jar plus a cloth napkin and metal cutensils means your daily lunch can be completely packaging-free—no plastic bags, no paper bags, no disposable containers.
- Reduces takeout reliance: Consistently having a satisfying, hot homemade lunch available reduces the temptation to order takeout, which typically arrives in multiple layers of plastic and foam packaging.
✅ The Bottom Line on Sustainability: Switching from daily takeout or disposable containers to a reusable thermos food jar is one of the highest-impact, lowest-effort sustainable choices available to most people. It saves money, reduces waste, and requires almost no behavioral change beyond a few minutes of morning meal prep.
Thermos Food Jar Gift Guide: The Perfect Present for Every Occasion
A high-quality thermos food jar makes an excellent, practical, and genuinely appreciated gift. It’s the kind of present that people use every single day and that improves their quality of life in a tangible way. Here’s how to choose the right one for the person on your list.
🎒 For the College Student
The Simple Modern Provision 16 oz is the perfect student gift. It’s affordable, stylish, available in dozens of colors and patterns they’ll love, and the pressure-release lid makes it easy to use between classes. Pair it with a set of reusable utensils for a complete, practical gift.
👧 For the Child (Ages 4–12)
The Thermos Funtainer 10 oz in a character design they love is a guaranteed hit. It’s the gift that keeps giving all school year—fewer cold lunches, more excited kids. Parents will thank you too.
🥾 For the Outdoors Person
The Stanley Classic Legendary 24 oz is the legendary choice for hikers, campers, and adventurers. Backed by a lifetime warranty and built to survive anything, it’s a gift that a passionate outdoor enthusiast will carry for decades. The classic Hammertone green is iconic.
💼 For the Working Professional
The Hydro Flask Insulated Food Jar 20 oz is the premium pick for the professional who wants everything to look polished. The powder coat finish, modern aesthetic, and rock-solid leak protection make it perfect for office environments.
🏠 For the Home Cook / Meal Prepper
The Thermos Stainless King 16 oz is the ultimate gift for someone who loves to cook and meal prep. Pair it with a quality recipe book or a set of spice kits and you have a thoughtful, curated gift for someone who will put it to serious use.
🎁 For Anyone – The Ultimate Starter Pack
Can’t go wrong? Get the Thermos Stainless King 16 oz—it’s the universally excellent choice that suits almost every lifestyle. Add a note with the preheating tip, and you’ve set the recipient up for a decade of hot lunches.
Brand Deep-Dive: Thermos vs. Stanley vs. Hydro Flask vs. Simple Modern
Choosing between brands can be as important as choosing between individual products. Each brand has a distinct philosophy, heritage, and target customer. Here’s everything you need to know about the four leading thermos food jar brands.
Thermos Brand: The Original
The Thermos brand has over 120 years of history in vacuum insulation technology. Founded in Germany and commercialized in the US in the early 1900s, the Thermos brand name literally became the generic term for all vacuum flasks—a testament to how dominant the brand once was. Today, Thermos products are known for their reliable, no-nonsense performance, competitive pricing, and practical features like the integrated folding spoon and bowl-lid. Their products are widely available at major retailers, parts and accessories are easy to find, and their customer service is generally well-regarded. The brand skews toward practical, function-first design rather than premium aesthetics—which is precisely what makes it so popular with everyday users.
Stanley Brand: Built for a Century
Founded in 1913 by William Stanley Jr., the Stanley brand has been equipping workers, adventurers, and outdoorspeople for over 110 years. Stanley invented the all-steel vacuum bottle, and the brand’s hammertone green finish has become an icon in its own right. Their food jars are among the most durable on the market and are backed by a genuine lifetime warranty—something few competitors offer. Stanley has experienced a massive resurgence in popularity in recent years, driven by viral social media coverage of their Quencher tumblers and classic bottles. Their food jars are the go-to choice for people who prioritize raw durability, maximum capacity, and heritage credibility. The lifetime warranty alone makes Stanley products exceptional long-term investments.
Hydro Flask: The Modern Premium Brand
Founded in 2009, Hydro Flask is a relative newcomer compared to Thermos and Stanley, but it quickly established itself as the premium, lifestyle-focused choice in the insulated container market. Hydro Flask’s TempShield technology is excellent, but where the brand truly differentiates itself is design and aesthetics. Their products are available in a stunning array of curated colors, the powder coat finishes are premium and durable, and the overall product ecosystem (matching bottles, bags, and accessories) is beautifully cohesive. Hydro Flask products command a higher price point and attract consumers who view their food jar as part of an active, health-conscious lifestyle identity. If you want the most stylish, Instagram-worthy thermos food jar, Hydro Flask is the brand to choose.
Simple Modern: The Smart Disruptor
Simple Modern is the brand that changed the insulated container market by proving that premium performance doesn’t require a premium price. Founded in 2015, Simple Modern quickly gained traction with value-conscious consumers by offering vacuum-insulated products at price points significantly below the established premium brands. Their product quality has improved steadily over the years, and their current lineup—including the Provision Food Jar—offers performance that legitimately competes with far more expensive options. Simple Modern also distinguishes itself with an unmatched variety of colors, patterns, and finishes, and their charitable giving program (donating a percentage of every purchase to various causes) resonates with younger, values-driven consumers. If value, style variety, and social impact matter to you, Simple Modern is a brand worth exploring deeply.
Which Brand Should You Choose?
| Priority | Best Brand | Why |
|---|---|---|
| Proven reliability & value | Thermos | 120+ years of expertise, excellent features at fair prices |
| Maximum durability & heat retention | Stanley | Lifetime warranty, indestructible build, 15-hour retention |
| Premium aesthetics & leak protection | Hydro Flask | Best design, best leak-proof seal, cohesive product ecosystem |
| Best value & widest style selection | Simple Modern | Competitive performance at the lowest price point |
Our Complete Testing Methodology
Transparency matters in product reviews. Here’s exactly how we tested every jar on this list so you can understand precisely what our recommendations are based on.
Temperature Testing Protocol
We used a calibrated digital thermometer (accurate to ±0.5°F) to measure starting and ending temperatures. Each jar was preheated with boiling water for exactly 10 minutes. We then filled each jar with 212°F water or soup (heated to a rolling boil) and sealed the lid. Temperature readings were taken at 2-hour intervals up to 8 hours. All tests were conducted in a climate-controlled room at approximately 72°F.
Leak Testing Protocol
We filled each jar with plain water, sealed the lid firmly, and performed the following tests: shaking vigorously for 30 seconds, inverting the jar for 60 seconds, placing the jar on its side in a backpack for 1 hour, and transporting the jar in a bag over rough terrain (a 2-mile walk on an uneven surface). Any leakage was noted and factored into our ratings.
Drop Testing
Each jar was dropped from waist height (approximately 36 inches) onto a concrete surface twice—once on its side and once on its base. We then refilled with hot water and retested for temperature retention and leaks. The Stanley was the standout performer in drop testing, showing only cosmetic scuffs with no performance degradation.
Ease of Use Assessment
We evaluated each jar for: ease of filling (wide mouth vs. narrow), ease of eating directly from the jar, lid resistance (how hard is it to open?), lid vacuum seal issues (difficulty opening due to pressure), and cleaning ease and time. These assessments were made by five different testers of varying hand sizes and strengths, including testers with limited grip strength to simulate the experience of elderly users or those with physical limitations.
Long-Term Testing
Each jar was used daily for a minimum of four weeks before final review. This allowed us to assess long-term factors like whether lids maintained their seal, whether gaskets degraded, whether interior surfaces developed staining or odor retention, and whether any coatings chipped or peeled with regular use.
Frequently Asked Questions About Thermos Food Jars
Q: How do I get the most out of my food jar’s heat retention?
A: Always preheat it! Fill the jar with boiling water and seal the lid. Let it stand for 5-10 minutes. Pour out the water and immediately add your piping hot food. This pre-warms the stainless steel interior, so the steel doesn’t sap heat from your food, allowing it to stay hot for much longer.
Q: Can I put my thermos food jar in the dishwasher?
A: It’s generally not recommended. The high heat and harsh detergents of a dishwasher can damage the vacuum seal, ruining the jar’s insulating properties. They can also degrade the exterior finish and plastic/silicone parts of the lid. Always check the manufacturer’s instructions, but hand-washing is the safest bet. The Simple Modern Provision is one of the few jars on our list that some users report successfully washing on the top rack—but verify this for your specific model.
Q: How do I get rid of stubborn smells or stains?
A: For tough odors or stains (like from tomato soup or coffee), a paste of baking soda and water is very effective. Let the paste sit inside the jar for an hour or so, then scrub gently with a bottle brush and rinse thoroughly. For very persistent smells, you can fill the jar with a solution of water and white vinegar and let it sit overnight before washing. Denture cleaning tablets are another underrated but highly effective solution.
Q: What kinds of foods work best in a food jar?
A: Liquid-based foods work best as they retain heat more effectively. Think soups, stews, chili, curries, and oatmeal. However, you can also pack solid foods like pasta, chicken nuggets, fried rice, or scrambled eggs. For these, be sure they are heated thoroughly and pack the jar tightly to minimize air pockets, which can cause heat loss.
Q: Why is my food jar so hard to open sometimes?
A: When you put hot food inside and seal the lid, the air trapped inside cools and contracts, creating a vacuum seal. This can make the lid difficult to unscrew. To solve this, look for a model with a pressure-release button (like the Simple Modern) or try running the lid under hot water for 30 seconds to help it expand slightly, making it easier to open.
Q: How long is food actually safe to eat in a thermos food jar?
A: The FDA recommends keeping hot food above 140°F to prevent bacterial growth. A properly preheated, quality thermos food jar should maintain this temperature for 5–10 hours depending on the model. Our testing showed the Thermos Stainless King crossing the 140°F threshold just under 7 hours. The Stanley Classic held above 140°F for well over 12 hours. If you’re unsure about your jar’s performance, test it at home with a food thermometer before relying on it for a full workday.
Q: Can I use a food jar for cold food and drinks?
A: Absolutely. Vacuum insulation works equally well in both directions—it slows heat transfer whether heat is trying to escape from hot food or trying to enter cold food. Pre-chill the jar with ice water for 5–10 minutes before adding cold food. Cold food should start fully refrigerator-cold (below 40°F) before packing. The target is to keep cold food below 40°F for the duration—the same 140°F/40°F food safety principles apply, just inverted.
Q: Is the thermos food jar worth the investment?
A: Absolutely yes. Consider the math: a quality 16oz food jar costs $20–$40. If you use it just three times per week to avoid a $10 lunch purchase, you’ve paid for the jar within two weeks. Over a year, you save over $1,500 in lunch costs. Over the jar’s 10–15 year lifespan, the savings are staggering. And the environmental benefits—eliminating thousands of disposable containers—are equally significant.
Q: My thermos food jar stopped retaining heat as well as it used to. What happened?
A: This is typically a sign that the vacuum seal has been compromised, often due to a hard impact or drop. A broken vacuum seal cannot be repaired, and the jar should be replaced. You can confirm this by filling the jar with boiling water and checking whether the outside of the jar becomes warm to the touch—a functioning vacuum-insulated jar should remain cool on the exterior even when filled with boiling water inside.
Q: What is the difference between a food jar and a food thermos?
A: The terms are largely interchangeable in everyday use. However, there is a subtle distinction: “thermos” (lowercase, generically) refers to any vacuum-insulated vessel, including narrow-mouthed beverage thermoses. A “food jar” or “food thermos” specifically refers to a wide-mouthed, insulated container designed for solid and semi-solid foods. Wide mouths (typically 3 inches or wider) are essential for food use because they allow easy filling, eating directly from the container, and thorough cleaning. All five products on our list are wide-mouth food jars.
Q: Can I put carbonated beverages in a food jar?
A: It’s not recommended. Carbonated beverages release CO2 gas, which can build up pressure inside a sealed vacuum-insulated container. While most jars can handle this pressure, it can make the lid extremely difficult or even dangerous to open. Additionally, the carbonation will be significantly diminished after sitting in a sealed container for hours. Stick to non-carbonated hot or cold food and beverages for best results and safety.
Conclusion: Your Perfect Hot Meal Awaits
Investing in a quality thermos food jar is a simple step that can revolutionize your meals away from home. It saves money, reduces waste from takeout containers, and allows you to enjoy a comforting, healthy, homemade meal wherever you are—whether that’s a corporate office, a classroom, a mountain summit, or a remote construction site.
The science behind vacuum insulation is over a century old, but modern manufacturing has refined these products to an extraordinary level. Today’s top thermos food jars can keep your meal genuinely hot for up to 15 hours, survive concrete drops, resist rust and staining, and look beautiful doing it—all for a one-time investment of $20–$60 that will pay for itself within weeks.
To summarize our recommendations: for the absolute best all-around performance, value, and features, the Thermos Stainless King 16 Ounce is our top recommendation for most people. For those who need maximum durability and capacity—especially outdoor enthusiasts and physical workers—the Stanley Classic Legendary Food Jar is an unbeatable, life-long companion with a lifetime warranty to match. For the style-conscious professional who demands a leak-proof seal, the Hydro Flask Insulated Food Jar delivers premium design with solid thermal performance. For students and budget-conscious shoppers who refuse to compromise on style, the Simple Modern Provision is outstanding value. And for school-age children, the Thermos Funtainer is the clear winner—purpose-built for kids and beloved by parents.
No matter which you choose, you can say goodbye to uninspiring cold sandwiches and hello to the satisfaction of a perfectly hot, home-cooked lunch, anytime, anywhere. Your meals deserve better—and now you have everything you need to make it happen.
Reminder: Thermo Informer is a reader-supported site. When you buy through links on our page, we may earn an affiliate commission at no extra cost to you. This helps us continue our extensive testing and research. We only recommend products we’ve personally vetted and believe in. Thank you for supporting our work. Learn more.


