Home Improvement · DIY Tutorial
How to Hide Thermostat Wires on Your Wall
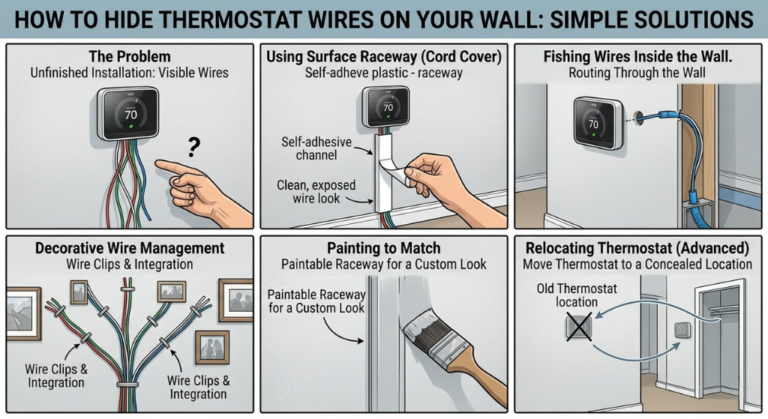
A complete visual step-by-step guide to every method — from quick cable raceways to a fully concealed in-wall wire run. No more ugly wires ruining your wall.
Why Are Thermostat Wires Exposed in the First Place?
Understanding the problem before you solve it — including why your home’s wiring may look different from your neighbor’s.
If you’ve recently installed a new thermostat, moved into a home, or are simply noticing the bundle of colored wires dangling down your wall for the first time — you’re not alone. Exposed thermostat wires are one of the most common aesthetic complaints homeowners and renters have about their HVAC setup. But understanding why they’re exposed is the first step to knowing which hiding method will work best for you.
Thermostat wires — technically called “low-voltage wiring” because they carry only 24 volts, compared to the 120V or 240V of regular household circuits — run from your HVAC system’s control board up through the wall (or along the wall surface) to your thermostat. In older homes built before the 1970s and 80s, it was common practice to surface-mount these wires along the baseboard or wall surface without any covering because low-voltage codes didn’t require them to be concealed inside walls. To learn more about what a thermostat actually is and how wiring evolved, see our detailed overview.
In newer construction, wires are typically run inside the wall cavity during the build phase before drywall is installed — which is why you may not see any exposed wires in a recently built home. But if your home was built earlier, or if someone replaced the thermostat without taking the time to route the new wires properly, you’re left with a wire bundle on display.
The Most Common Reasons Thermostat Wires Are Exposed
- Old home construction: Pre-1970s homes frequently had thermostat wires surface-mounted from the factory. The wires may have always been visible and were simply accepted as a given.
- Thermostat replacement without proper routing: When someone swaps a thermostat — especially when upgrading to a new smart thermostat — the installer sometimes pulls extra wire out from behind the wall to give themselves slack to work with, then doesn’t tuck it back in.
- Lack of C-wire requiring an added adapter wire: Many older thermostats only used 2–4 wires. Modern smart thermostats often require a C-wire (common wire) for continuous power. When an installer adds this wire, it sometimes runs along the wall surface rather than through it.
- Wire extension to relocate thermostat: If someone wanted to move the thermostat to a different spot on the wall, they may have spliced and extended the wire, leaving a length of wire exposed between the old location and the new one.
- Baseboard heater systems: In homes with electric baseboard heaters, thermostat wires often run along — or even inside — the baseboard trim, but transitional sections can remain exposed.
Whatever the reason, the fix is surprisingly simple once you understand your options. The five methods in this guide cover every scenario from a quick 20-minute renter-safe fix to a professional-grade permanent concealment job.
Understanding Your Thermostat Wires Before You Hide Them
Know what you’re working with — wire color codes, conductor counts, and what each wire does — before you start hiding anything.
Before you grab a cable raceway or start cutting drywall, spend five minutes identifying the wires you’re dealing with. This matters for two reasons: first, so you know how many wires you have (which affects what size raceway or cover you need), and second, so that if you accidentally disconnect one while routing, you know how to reconnect it correctly. Our complete thermostat wiring guide goes into much deeper technical detail if needed.
Standard Thermostat Wire Color Codes
Thermostat wires use a standardized (but not universal) color coding system. Here’s what each color typically means in a conventional forced-air HVAC system:
| Wire Color | Terminal Label | Function | Notes |
|---|---|---|---|
| Red | R, Rh, Rc | 24V power supply from transformer | Always present. Rh = heating; Rc = cooling |
| Green | G | Fan control | Triggers the air handler blower fan |
| White | W, W1, W2 | Heat call | Signals furnace / heat to turn on |
| Yellow | Y, Y1, Y2 | Cooling / compressor | Activates the A/C compressor |
| Blue / Black | C | Common wire (return path) | Needed for smart thermostats that require continuous power |
| Orange | O/B | Heat pump reversing valve | Only present in heat pump systems |
How Many Conductors Do You Have?
Thermostat wire is sold in bundles called “multi-conductor” cable. The most common configurations are:
- 18/2 (2 conductors): Very old systems with just heating. Very rare today.
- 18/4 (4 conductors): Basic heating and cooling systems with fan control — no C-wire.
- 18/5 (5 conductors): The most common in homes from the 1990s–2000s. Includes a C-wire.
- 18/8 (8 conductors): Modern multi-stage or heat pump systems with more control functions.
The number of conductors matters for your raceway or cord cover selection. A 5-conductor bundle is thicker than a 2-conductor bundle. Most cable raceways designed for thermostat wiring will easily accommodate up to 8 conductors of 18-gauge wire.
The C-Wire Problem and Wire Visibility
One of the most common reasons for newly exposed wires is the addition of a C-wire (common wire) when upgrading to a smart thermostat that requires Wi-Fi connectivity. Many homes built before 2010 don’t have a C-wire run to the thermostat location. Installers solve this a few ways:
- Using a spare conductor already in the cable: If you have an 18/5 cable but only 4 wires are connected, the unused fifth wire can serve as the C-wire — no new wire needed.
- Running a new wire alongside the existing bundle: This is where the new exposed wire comes from. An installer runs a new wire from the furnace control board up to the thermostat, sometimes just taped alongside the existing bundle on the wall surface.
- Using a C-wire adapter (like a Common Maker): This device connects at the furnace and doesn’t require any new wire runs — check our C-wire adapter comparison guide for details.
If a new C-wire was run alongside your existing thermostat wires and left exposed, now is the perfect time to group all wires together and conceal them using any of the five methods below.
Which Method Is Right for Your Situation?
Answer a few quick questions about your home and situation to find your best method.
I’m a Renter
Can’t drill or make permanent modifications. Need a fully reversible solution that leaves no damage behind.
→ Use Method 1 or Method 3I Own My Home & Want Permanent
Willing to cut into drywall for the cleanest, most professional result. No wires visible at all — ever.
→ Use Method 2 (in-wall fish)I Need It Done Today
No time to shop for specialized tools. Want a fix with materials from any hardware store, done in under 30 minutes.
→ Use Method 1 (raceway)I Want It to Look Decorative
The cover itself should add to the décor, not just hide a problem. Guests shouldn’t even notice there’s a thermostat.
→ Use Method 4 (art/frame)Long Wire Run Across Room
The wire has to travel more than a few feet — along a wall, around corners, past baseboard heaters or furniture.
→ Use Method 5 (baseboard)Brick, Tile, or Plaster Walls
Can’t fish wires through a solid wall. Need a surface-mounted solution that adheres without drilling into masonry.
→ Use Method 1 or Method 3Here is a quick overview of all six methods so you can pick the best one for your situation, skill level, and wall type.
| Method | Difficulty | Cost | Best For | Renter Safe? |
|---|---|---|---|---|
| Cable Raceway | Easy | $10–25 | Quick fix, any wall | ✅ Yes |
| In-Wall Wire Fish | Advanced | $30–80 | Permanent, cleanest look | ❌ No |
| Cord Cover Strip | Easy | $8–20 | Straight wire runs | ✅ Yes |
| Wall Art / Frame | Easy | $15–40 | Renters, decorative look | ✅ Yes |
| Baseboard Routing | Medium | $15–35 | Long wire runs along floor | ⚠️ Partly |
Cable Raceway Channel
The fastest, easiest, and most renter-friendly method. A plastic channel sticks to the wall and hides the wires inside.
-
1Measure the wire run From the bottom of the thermostat to the floor (or to wherever the wire disappears). Add 4 inches for overlap. Cut the raceway channel to length with scissors or a utility knife.
-
2Mark a straight vertical line on the wall Use a level and pencil to mark a perfectly straight vertical guide directly below the thermostat. This ensures the raceway runs straight — a crooked raceway looks worse than exposed wires.
-
3Peel and stick the raceway base to the wall Remove the adhesive backing from the channel base. Press firmly along your marked line, starting from the bottom of the thermostat and working downward. Hold for 30 seconds.
-
4Lay the wires inside the channel Feed each thermostat wire gently into the open channel. Spread them flat so none overlap — overlapping wires create a visible bump under the cover.
-
5Snap the cover onto the base Press the raceway cover strip onto the base channel. It should click firmly shut. Run your finger along the full length to ensure complete closure.
-
6Paint to match your wall (optional but recommended) Most cable raceways are paintable. Use the same wall paint on the raceway for a near-invisible finish. Let fully dry before snapping the cover on.
Cable Raceway on Different Wall Types
Cable raceways work on almost every wall surface, but the adhesive performance varies. Here’s what to know for each wall type:
- Painted drywall: The best surface for raceway adhesive. Clean thoroughly with a dry cloth and press firmly for 60+ seconds for maximum hold.
- Wallpaper: Adhesive-backed raceways can pull wallpaper off when removed. Use small screw anchors instead of the adhesive backing, or use removable command-strip-style adhesive.
- Brick or stone: Adhesive won’t hold well on rough masonry. Use a masonry anchor and small screw through the raceway base channel instead. This is a permanent installation but can be removed later with a bit of effort.
- Wood paneling: Adhesive works well. You can also use a small brad nail through the raceway channel base into the panel for added security without damaging the surface significantly.
- Tile: Clean the tile surface with rubbing alcohol first for best adhesion. Adhesive raceways on tile will stay put for years if properly applied.


Run Wires Inside the Wall
The cleanest possible result — wires completely disappear. Requires cutting into drywall and using a fish tape tool.
-
1Turn off the HVAC system at the breaker Safety first. Switch off the breaker controlling your heating/cooling system. Confirm the thermostat display goes dark before touching any wires.
-
2Use a stud finder to map the wall cavity You need a clear, stud-free path from behind the thermostat down to baseboard level. Mark stud locations with tape so you know exactly where to route the wire.
-
3Remove the thermostat and install a low-voltage bracket Unscrew the thermostat from the wall to expose the wiring. Install a low-voltage mounting bracket in the opening — this creates a clean finished hole to feed wires through.
-
4Cut a small exit hole at baseboard level Directly below the thermostat opening (in the same wall cavity, between the same two studs), cut a small 1-inch hole at baseboard level using a drywall saw.
-
5Fish the wire through the wall cavity Feed the fish tape down through the thermostat opening. Guide it to the exit hole at the bottom. Tape the thermostat wires securely to the fish tape hook, then pull them through carefully.
-
6Reconnect the thermostat and patch the exit hole Reconnect the thermostat wires at the top. Route the wire bundle behind the baseboard at the exit point. Patch and spackle the exit hole, sand smooth, and paint to match.
What If There’s a Fire Block in the Wall?
In many homes built after the 1990s, there is a horizontal “fire block” or “fire stop” — a horizontal piece of lumber installed between studs at roughly the mid-point of the wall height. This is a fire safety measure designed to slow the spread of fire through wall cavities. Unfortunately, it also blocks your fish tape.
If you feel resistance when fishing your tape and can’t get it to go all the way through, you’ve hit a fire block. Solutions include:
- Drill through the fire block: Using a long 5/8″ or 3/4″ flexible drill bit (sold specifically for this purpose), drill through the fire block from an access hole cut in the wall at that height.
- Route around the obstacle: If the fire block is too difficult to drill through, cut a small access hole at the fire block location, feed the wire manually through, patch, and continue fishing from the new access hole.
- Switch methods: If your wall has fire blocks and you don’t want to drill, Method 1 (cable raceway) or Method 5 (baseboard routing) may be a better option for your home.


Flat Cord Cover Strip
Ultra-thin, super-flat adhesive strips that press directly onto the wall and hide the wire in a nearly flush profile.
-
1Clean the wall surface where the strip will go Wipe the wall below the thermostat with a dry cloth. The adhesive backing on cord cover strips needs a clean, dust-free surface to stick firmly and stay put long-term.
-
2Measure and cut the strip to length Measure from the thermostat’s wire exit point to the floor (or baseboard). Cut the strip with scissors — most are easy to cut cleanly with standard household scissors.
-
3Peel backing and press firmly to the wall Remove the adhesive liner and press the strip flat against the wall. For very long runs, work from top to bottom, smoothing as you go to prevent bubbles or misalignment.
-
4Feed the wires into the channel Lay each thermostat wire flat inside the open channel. The low-profile design means the wire lies almost completely flat against the wall surface.
-
5Press the cover over the channel Snap or press the cover strip closed. Paint over the strip with wall paint if desired for an even cleaner finish.


Hide Wires Behind Wall Art or a Frame
The most decorative solution — use a hinged picture frame or wall art panel to cover both the thermostat and its wires completely.
-
1Choose a frame large enough to cover the thermostat and wire run The frame should be at least 4 inches wider and taller than the thermostat itself. A tall, narrow frame (portrait orientation) works best to cover a vertical wire drop.
-
2Attach hinges to one side of the frame Mount two small cabinet hinges to the left or right edge of the frame. The hinges allow the frame to swing open when you need to adjust the thermostat — without removing it from the wall.
-
3Mount the hinged edge to the wall beside the thermostat Screw the free side of each hinge into a stud (or use drywall anchors) beside the thermostat. Position so the frame swings fully across the thermostat when closed.
-
4Route wires behind the frame before closing Gather the thermostat wires and lay them flat between the wall and the frame. The shallow gap between the frame back and the wall is enough to conceal most thermostat wire bundles.
-
5Add a small magnetic catch to keep it closed Attach a tiny magnetic cabinet catch to the far edge of the frame and a corresponding strike plate to the wall. This keeps the frame neatly closed without needing a visible latch.
Choosing the Right Art for Your Thermostat Cover
The art you choose matters more than most people think. The goal is for the frame to look as if it belongs there — not like something covering something else. A few guidelines:
- Match your wall trim color: A white frame on a white wall, or a wood-tone frame on a room with wood accents, disappears into the room. Contrasting frames draw the eye — which defeats the purpose. See our guide on choosing the best wall color behind your thermostat for color matching tips.
- Go portrait orientation: A vertical frame covers the thermostat body and the wire run below it in a single sweep. Landscape frames work but require the wires to be hidden separately.
- Botanical prints and abstract art: These work universally because they read as intentional décor in almost every room style — unlike a framed photo, which can look out of place on a wall with nothing else nearby.
- Depth matters: Make sure your frame sits proud of the wall by at least the depth of your thermostat. Most modern smart thermostat bases are only 3/4″ to 1.5″ thick — even a slim frame with 1″ of depth will clear them easily.


Route Wires Along the Baseboard
Run the thermostat wire along the baseboard trim to hide it at floor level, then bring it back up inside the wall or behind furniture.
-
1Plan the wire route from thermostat to HVAC Map the shortest path from the thermostat down the wall, along the baseboard, and to the HVAC air handler. Sketch it out — you want the fewest corners and the most hidden path possible.
-
2Use a flat adhesive cord cover along the vertical wall section From the thermostat down to the baseboard, use a flat cord cover strip (Method 3) to keep the vertical section tidy. This is usually only 10–20 inches and is easy to paint over.
-
3Tuck wire behind the baseboard or use cable clips Carefully flex the top of the baseboard trim away from the wall slightly (it will spring back) and tuck the wire into the gap. Alternatively, use self-adhesive cable clips spaced every 12 inches along the baseboard face.
-
4Handle corners with corner raceway pieces At each corner where the wall meets another wall, use a corner raceway fitting to route the wire cleanly. These snap together with the baseboard-level raceway and keep corners looking intentional.
-
5Bring the wire back up the wall at the HVAC location At the HVAC air handler, route the wire back up the wall using another short section of cord cover. Connect to the HVAC control board and restore power to test.


Hiding Wires When Installing a Smart Thermostat
Smart thermostat upgrades are the most common reason new wires appear on walls. Here’s how to handle them cleanly.
Upgrading to a smart thermostat is one of the best ways to reduce energy bills and improve home comfort. But the installation process often leaves homeowners with newly exposed wires they didn’t have before — or a messy bundle that wasn’t neatly handled during the swap. This section covers the specific wire-hiding challenges that come with smart thermostat installations.
Why Smart Thermostats Create More Wire Visibility
Several things happen during a smart thermostat installation that can create exposed wires:
- The old thermostat had a larger wall plate: Many older thermostats — especially the big round Honeywell models — had a mounting plate that was wider than the thermostat itself. This plate hid the hole in the wall where wires entered. Modern slim smart thermostats have smaller footprints, which can expose the wall hole and the wires coming out of it.
- A C-wire adapter adds a new wire: Devices like the Nest Power Connector or Ecobee’s PEK adapter sometimes require an additional wire run from the furnace. This wire may not be concealed.
- Extra wire was pulled for slack: Professional installers sometimes pull 8–12 inches of extra wire from the wall hole to give themselves room to work. They don’t always push it back in afterward.
- Mounting location changed: If you moved the thermostat to a new position for better accuracy — away from a sunny window or drafty door — a wire extension may now run across the wall surface.
Understanding how smart thermostat connectivity works (Wi-Fi, Zigbee, Z-Wave) and the power requirements that create C-wire demand can help you anticipate and prevent wire exposure issues before they happen.
The Cleanest Smart Thermostat Installation: A Wire-Hiding Workflow
If you’re installing a new smart thermostat and want zero exposed wires from day one, follow this sequence:
- Step 1 — Check for a C-wire before buying: Open your current thermostat and look for a wire connected to the “C” terminal. If one is present, great — you likely won’t need any extra wires. If not, check whether your existing cable has an unused spare conductor that can serve as a C-wire.
- Step 2 — Decide on a C-wire solution before running any new wire: If you genuinely need a new C-wire, consider a power-stealing option or an adapter at the furnace (like the Ecobee PEK or Nest’s Power Connector) before running a new wire along the wall.
- Step 3 — Install the thermostat base plate first, tuck wires, then mount: Before snapping the thermostat display onto its base, use this moment to tuck any extra wire back into the wall hole and use a small piece of low-voltage cover plate to neaten the hole edge.
- Step 4 — Use a cable raceway immediately if wires are exposed: Don’t leave the job with exposed wires “for now.” A cable raceway takes 20 minutes and costs under $15. Do it while the tools are out and the ladder is up.
Smart Thermostat Placement and Wire Management
Where you place a smart thermostat significantly affects both its accuracy and the complexity of wire management. Key placement principles:
- Interior walls only: Exterior walls are colder in winter and can make the thermostat read the room as cooler than it is, causing the system to overheat. If your thermostat is currently on an exterior wall, this could be why your thermostat shows the wrong temperature — and relocation might involve a new wire run that needs to be concealed.
- 5 feet from the floor: The standard installation height for thermostats is approximately 52–60 inches from the floor. This puts it at roughly eye level and in a zone that accurately represents average room temperature.
- Away from heat/cold sources: Keep the thermostat away from sunny windows, supply air vents, exterior doors, kitchens, and other rooms with temperature fluctuations. Smart thermostats with remote sensors (like the ecobee SmartSensor) can help compensate if placement is constrained.
- Near a stud (for stable mounting): Mounting into a stud gives the thermostat a solid, permanent installation. When you’re running wires anyway for concealment, you have the opportunity to ensure the thermostat is mounted firmly.
Features like adaptive learning, geofencing, and home/away automation all depend on the thermostat accurately reading the room — so proper placement (and thus, a clean wire run that doesn’t disturb the wall cavity’s air sealing) is more important than it might seem.
How Wire Routing Affects Thermostat Accuracy
The way your wires run through or along your wall can actually impact how well your thermostat reads room temperature.
Most homeowners think of wire hiding as a purely cosmetic task — but the way wires are routed can affect thermostat performance in two important ways.
1. Air Drafts Through the Wall Hole
The hole in the drywall where your thermostat wires enter is a pathway for cold air from inside the wall cavity to reach the thermostat sensor. This is especially a problem in cold climates: wall cavities are significantly cooler than room temperature in winter, and even a small draft of cold air reaching the thermostat can make it think the room is colder than it is — causing the furnace to run longer than needed.
When running wires inside the wall (Method 2), always seal around the wire entry point with fire-rated foam sealant or a low-voltage putty pad. This is a 2-minute step that can meaningfully improve accuracy. If you’re using a surface raceway (Method 1), the hole is already sealed by the thermostat base plate — but check that the plate is firmly seated against the wall with no visible gap.
A thermostat that consistently reads the wrong temperature is one of the most common complaints homeowners have. See our diagnostic guide on why your thermostat shows the wrong room temperature and our thermostat not reaching set temperature flowchart for full troubleshooting.
2. Wire Length and Signal Quality
Thermostat wires carry low-voltage signals (24V AC). In most homes, the wire run from the HVAC control board to the thermostat is 25–100 feet. Within this range, signal quality is excellent and wire length has no meaningful effect on performance.
However, if you’re significantly extending the wire — particularly for a baseboard routing job (Method 5) that adds 30–50 feet of additional length — there are a few things to know:
- 18 AWG wire is adequate for runs up to 100 feet: Standard 18-gauge thermostat wire handles the 24V control signals cleanly up to 100 feet total distance. Beyond 100 feet, some installers prefer 16 AWG wire for extra reliability.
- Splices need to be done correctly: If you’re extending the wire, use wire nuts or lever connectors — never just twist wires together and wrap with tape. Loose connections can cause intermittent heating/cooling issues and are one reason your thermostat might not start the furnace.
- C-wire extensions need a matching gauge: When extending or adding a C-wire alongside the existing bundle, match the wire gauge to the original cable. Mixing 18 AWG and 22 AWG in the same circuit can cause voltage drop issues.
Apartment and Condo-Specific Considerations
If you rent or live in a condominium, wire hiding has some extra constraints worth knowing before you start:
- Check your lease before any drilling: Even small drywall anchors technically require landlord permission in most leases. Adhesive-only methods (raceways with peel-and-stick backing) are your safest bet. Review our apartment-safe options in Methods 1 and 3.
- Condo HOA rules may apply: In condos, the drywall itself may be considered common-area property. Always check HOA rules before cutting into walls, even for a small fish-tape hole.
- Who owns the thermostat wires? In a rental, the thermostat and its wiring are typically part of the HVAC system, which is the landlord’s responsibility to maintain. If wires are exposed and creating an eyesore, you can request that your landlord address it — or ask permission to address it yourself using a reversible method.
- Leave everything reversible: If you use Command strips or no-drill adhesive raceways, document the wall condition before installation with photos. This protects your security deposit and demonstrates you made a reversible modification.
Common Problems After Hiding Thermostat Wires
What to check if your HVAC stops working correctly after you’ve rerouted or concealed the thermostat wiring.
In the vast majority of cases, hiding thermostat wires is a purely cosmetic project that has zero effect on how your HVAC system operates. But occasionally, problems can arise — usually because of a loose connection made during the wire-routing process. Here’s a systematic way to troubleshoot if your heating or cooling isn’t working after a wire-hiding project.
Problem: Thermostat Display Goes Dark or Unresponsive
If the thermostat screen goes blank after you’ve routed the wires, the most likely cause is an accidentally disconnected wire at the thermostat terminals. This is especially common with the R-wire (power) or the C-wire (common). Steps to fix:
- Turn off the HVAC at the breaker before touching anything.
- Remove the thermostat from its base plate and inspect all terminals. Look for any wire that looks loose, pulled out, or not fully seated in its terminal screw.
- Re-seat each wire firmly. Each terminal screw should be snug against the wire without over-tightening (which can nick the wire).
- Restore power and test. If the display is still dark, check the HVAC control board for a blown fuse — a short during wire manipulation can blow the 3-amp fuse on most furnace boards.
For more detailed thermostat power issues, see our guide on why your thermostat is not charging and thermostat low battery and fading display diagnostics.
Problem: Heat or AC Won’t Turn On
If the display works but calling for heat or cooling produces no response from the HVAC equipment, check the following:
- Verify the correct wires are in the correct terminals: When routing wires, it’s easy to accidentally swap two wires in similar colors (white and yellow, for instance). Pull up a photo of your original wiring configuration and verify each wire matches its terminal. See our thermostat wiring guide for a complete terminal-by-terminal reference.
- Check for a tripped HVAC breaker: Working with wires sometimes causes brief shorts that trip a breaker. Go to your breaker panel and look for the HVAC breaker — it should be fully in the ON position. A tripped breaker sits between ON and OFF.
- Inspect the HVAC control board fuse: Most furnace and air handler control boards have a 3-amp automotive-style blade fuse. If it’s blown (the metal strip inside is broken), replace it with the same rating. If the new fuse also blows immediately, there’s a short somewhere in the wiring circuit that needs to be found before proceeding.
If the furnace won’t turn on after resolving these checks, see our detailed guide on why the thermostat doesn’t start the furnace and furnace won’t turn on but fan works.
Problem: Thermostat Reads Temperature Incorrectly After Routing
If the thermostat is now reading 3–5°F above or below the actual room temperature, the most likely culprit is air drafts through the wire hole. This almost always shows up after an in-wall wire fish (Method 2) if the hole wasn’t sealed. Apply fire-rated foam sealant or putty pad around the wire at the wall entry point, let it cure, and recheck. For a full diagnosis of temperature reading issues, see why your thermostat shows the wrong room temperature.
Problem: HVAC Keeps Cycling On and Off Rapidly (Short Cycling)
Rapid on/off cycling (short cycling) after a wire project usually indicates an intermittent connection — typically a wire that’s barely making contact at a terminal. The vibration from the system starting up breaks the connection, the system shuts off, then gravity pulls the wire back into contact and the cycle repeats. Fix: Turn off at breaker, remove the thermostat, and firmly tighten every terminal screw. Strip a small additional length of wire insulation if the exposed copper is corroded or too short to make solid contact. Related reading: why your thermostat keeps switching from heat to cool.
When to Call a Professional Instead of DIY
Thermostat wire hiding is almost always a DIY job — but here are the situations where it’s worth calling in a pro.
Thermostat wires are low-voltage Class 2 wiring, which means you don’t need an electrician’s license to work on them in most jurisdictions. The vast majority of wire-hiding jobs described in this guide are straightforward DIY projects that any homeowner or renter can complete in under an hour. However, there are specific situations where calling a licensed HVAC technician is the smarter move:
Call a Professional If…
- You discover the wiring doesn’t match any standard color code: Older homes sometimes have non-standard color coding from the factory or from previous DIY modifications. If you open the thermostat and the wire colors don’t match anything in our guide above, a professional can identify the wiring with a multimeter and confirm safe connections before you reroute anything.
- Your home has line-voltage thermostat wiring (120V or 240V): Electric baseboard heater thermostats in some homes use line-voltage wiring — full 120V or 240V circuits — instead of 24V low-voltage. These wires are significantly more dangerous to work with and require a licensed electrician. If the wires going to your thermostat are thick (like standard household wiring) rather than the thin multi-strand cable described in this guide, stop and call a pro. See our line voltage vs low voltage 2-minute test to identify which you have.
- The thermostat wires run through an attic, crawlspace, or finished ceiling: Running new wires through these spaces requires knowledge of insulation, vapor barriers, and code requirements that vary by jurisdiction. A professional ensures the routing is code-compliant.
- The in-wall fish requires going through a fire-rated assembly: Some walls between units in condos or townhomes are fire-rated assemblies. Penetrations through fire-rated walls have specific sealing requirements under building codes. A licensed contractor knows how to maintain the fire rating when routing wires.
- After hiding wires, the HVAC stops working and you can’t identify the problem: If you’ve gone through the troubleshooting steps above and the system still isn’t working correctly, it’s time to call an HVAC technician. Attempting further DIY fixes on a non-functioning system risks turning a small wire connection problem into a more expensive repair. For cost context, see our HVAC system replacement cost guide.
Frequently Asked Questions
Quick answers to the most common questions about hiding thermostat wires.
Pick Your Method & Get It Done
Every method here solves the same problem — just at different skill levels and budgets. Renters: go with Method 1 (raceway) or Method 4 (hinged frame). Homeowners wanting a permanent fix: Method 2 (in-wall fish) is the gold standard. Whatever you choose, a clean, wire-free wall takes under an hour and costs under $25 for most homes.


