Hiking Hydration Gear: The Ultimate Guide to Staying Hydrated on Any Trail
Dehydration is the #1 performance killer on the trail. This guide cuts through the clutter to show you the exact gear and strategies to drink smarter, hike stronger, and stay safe.
1. Why Hydration is Critical: More Than Just Thirst
Water regulates body temperature, lubricates joints, transports nutrients, and removes waste. On the trail, even mild dehydration (1-2% body weight loss) reduces endurance, impairs decision-making, and increases fatigue. Severe dehydration leads to heat exhaustion, cramps, and dangerous situations. Proper hydration isn’t a convenience—it’s a safety protocol for every hike.
The Science: Your body loses water through sweat, respiration, and urine. At high altitude or in dry climates, respiratory loss increases dramatically. Understanding vacuum insulation technology can help you choose gear that keeps your water at the ideal temperature, encouraging you to drink more.
2. Calculate Your Water Needs: A Simple Formula
A generic “drink lots” isn’t a plan. A solid baseline is 0.5 to 1 liter of water per hour of moderate activity. Adjust for: Heat & Sun: Add 0.5-1L extra per day. Altitude: Add 1-2L extra per day. Personal Sweat Rate: Weigh yourself before and after a training hike; each pound lost is ~16oz of fluid to replace. Always plan to carry more than you think you’ll need.
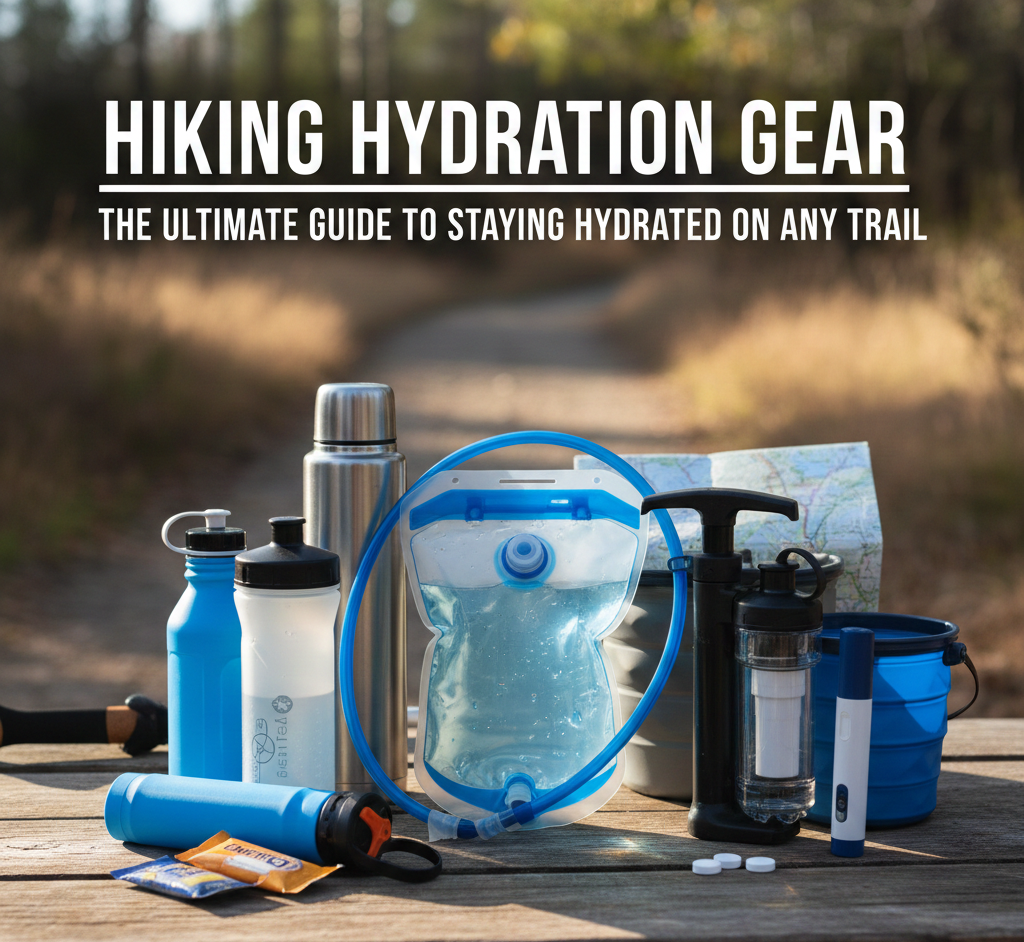
3. Hydration Bladder Systems: Hands-Free Drinking
Hydration bladders (reservoirs) like those from CamelBak, Osprey, or Platypus are ideal for consistent sipping. They fit in your pack’s dedicated sleeve, with a tube routed over your shoulder. Look for features: Quick-Connect Tubes for easy refilling, Bite Valves that don’t leak, and Wide-Mouth Openings for easy cleaning and adding ice. Capacities range from 1.5L (short hikes) to 3L+ (all-day adventures).

4. Insulated Water Bottles: Temperature Control
For day hikes where you want cold water or hot tea, a double-wall vacuum-insulated bottle is key. Brands like Hydro Flask, Klean Kanteen, and Yeti keep liquids cold for 24+ hours. A wide-mouth bottle is easier to fill, clean, and add ice to. A narrow-mouth bottle is better for drinking while moving. For a deep comparison, see our analysis of Hydro Flask vs Klean Kanteen for 24-hour ice retention.
🛒 Shop Insulated Bottles5. Water Filters & Purifiers: Sourcing from Nature
For long hikes or backpacking, carrying all your water is impossible. A reliable water filter or purifier is essential safety gear. Pump Filters are powerful but slower. Gravity Filters (like Platypus GravityWorks) are great for groups. Squeeze Filters (Sawyer Squeeze) are lightweight and popular. UV Purifiers (SteriPEN) kill viruses but don’t remove sediment. Know the water sources on your route.
6. Electrolyte Management: Replenish What You Lose
Sweat loses salt (sodium, potassium). Drinking only plain water on long, sweaty hikes can lead to hyponatremia (dangerously low sodium). Integrate electrolytes: use drink mixes (Liquid IV, Nuun), electrolyte tablets, or salty snacks. A good rule: if you’re hiking for over 2 hours or sweating heavily, add electrolytes to at least one liter of your water.
7. Pack Integration & Access: Drink Without Stopping
Your hydration system must work seamlessly with your pack. For bladders, ensure your pack has a dedicated internal sleeve and a port for the tube. Route the tube under your pack strap for secure, easy access. For bottles, use side pockets that you can reach without taking your pack off. Practice grabbing and replacing your bottle while walking before you hit a tricky section of trail.
8. Cold Weather Hydration: The Freeze Factor
In freezing temps, hydration systems can freeze. Tricks: Insulate the Tube: Use an insulated tube cover or make your own with foam. Bladder Placement: Keep the bladder inside your pack, close to your body to use your body heat. Use an Insulated Bottle: Carry a vacuum-insulated bottle with a wide mouth—it won’t freeze shut like a narrow thread. Drink Warm Fluids: Start with warm water or tea. An insulated bottle is critical here; learn about what vacuum insulation in a thermos really means for performance.
9. Desert & Hot Weather Tips: Extreme Conditions
In arid environments, water is scarce and sweat evaporates instantly, masking fluid loss. Carry a Massive Capacity: Use a 3L bladder plus two 1L bottles. Pre-Hydrate: Drink 1L of water in the hours before your hike. Cover Up: Wear light, long layers to reduce evaporative loss. Know Your Sources: Cache water or know reliable springs. Plan to drink 1 liter per hour during peak heat.
10. Multi-Day Trek Systems: Capacity & Redundancy
For backpacking trips, you need a hybrid system: a high-capacity bladder (3L) for camp water, a water filter for refills, and a durable, lightweight bottle (like a Smartwater bottle) for mixing electrolytes and as a backup. Never rely on a single container; redundancy is safety. A reliable thermos for camping can also be invaluable for hot meals and drinks that boost morale.
11. Cleaning & Maintenance: Prevent Mold & Funky Taste
Hydration gear gets nasty if neglected. After every hike: empty all water, detach tubes, and let everything air dry completely. Monthly, clean with a bottle brush and a solution of baking soda, vinegar, or dedicated cleaning tablets (e.g., CamelBak Cleanz). Store your bladder and bottles dry and with lids off. A clean system tastes better and is safer.
12. Essential Hiking Hydration Gear Checklist
For Day Hikes: 2-3L Hydration Bladder OR two 1L insulated bottles. Electrolyte packets. Optional: Collapsible cup.
For Long/Remote Day Hikes: 3L Bladder, 1L Insulated Bottle, Water Filter, Electrolytes.
For Backpacking: 3L Bladder, 1-2 Lightweight Bottles, Water Filter/Purifier, Electrolytes, Repair Kit for bladder.
All Conditions: Knowledge of your route’s water sources.
Final Thought: The best hiking hydration gear is the system you’ll actually use consistently. Test your setup on short local trails before a big adventure. Staying hydrated is the simplest way to ensure every hike is a great one. For keeping more than just water at the perfect temp, explore the best options for soup on the trail.
Hiking Hydration Gear: Your Questions Answered
Is a hydration bladder better than water bottles for hiking?
It depends. Bladders promote consistent sipping and are hands-free, great for steady hydration on technical terrain. Bottles are easier to monitor how much you’ve drunk, simpler to clean, and won’t spring a leak in your pack. Many experienced hikers use a combination: a bladder for water and a bottle for electrolytes.
How do I prevent my hydration bladder tube from freezing?
1) Insulate the tube with a cover. 2) After drinking, blow air back into the tube to clear water from the valve. 3) Store the bladder inside your pack, not in an external sleeve. 4) In extreme cold, consider switching to an insulated bottle kept inside your jacket.
How much water should I carry for a 3-hour hike?
For a moderate 3-hour hike in mild weather, plan for 1.5 to 3 liters. Start with 2 liters as a safe baseline. Always err on the side of carrying more, especially if the trail is steep, sunny, or has no water sources.
What’s the best way to clean a hydration bladder?
Rinse with warm water after each use. Periodically, fill it halfway with a mixture of warm water and baking soda or dedicated cleaning tablets. Scrub with a bottle brush, rinse thoroughly, and hang to dry completely with the opening wide open.
Do I need a water filter for day hikes?
If your route has reliable, treatable water sources and you’re comfortable with the weight, a lightweight filter (like the Sawyer Mini) provides safety and flexibility, allowing you to carry less water. On trails with no water, a filter is unnecessary.
Are insulated water bottles worth the weight for hiking?
Absolutely in hot or cold extremes. In heat, cold water is more palatable and encourages drinking. In cold, it prevents freezing and allows for warm drinks. The motivational and safety benefits far outweigh the slight extra weight for most hikers.
What are the signs of dehydration on the trail?
Early signs: Thirst, dry mouth, decreased urine output (dark yellow urine), fatigue. Advanced signs: Dizziness, headache, confusion, rapid heartbeat, cessation of sweating. If you experience advanced signs, stop, seek shade, and rehydrate immediately.
Can I use a regular plastic bottle for hiking?
Yes, a durable single-wall bottle (like a Nalgene or Smartwater bottle) is a classic, lightweight choice. The downside is it offers no temperature control—water gets hot in the sun and can freeze in winter. It’s a simple, reliable option for mild conditions.
How often should I drink while hiking?
Don’t wait for thirst. Aim for 3-4 large sips every 15-20 minutes. If using a bladder, take a sip whenever you think of it. Setting a timer can be helpful until drinking regularly becomes a habit.
What’s the difference between a water filter and a purifier?
Filters physically remove bacteria, protozoa, and sediment. Purifiers also kill viruses, which are smaller and can pass through some filters. In most U.S. backcountry, a filter is sufficient. For international travel or downstream of heavy human/animal activity, a purifier is recommended.


