The Best Thermos Lunch Boxes for Hot & Cold Meals
Say goodbye to sad desk lunches and cold camping meals. A quality thermos food jar keeps your soup steaming hot and your pasta salad perfectly chilled. We’ve reviewed the top models for performance, durability, and convenience.
A thermos lunch box, or insulated food jar, is an essential item for anyone who wants to enjoy a delicious, temperature-perfect meal away from home. Using the same vacuum insulation technology as beverage thermoses, these containers are specifically designed with wider mouths for easy filling, eating, and cleaning. Whether you’re packing a hot lunch for your child, taking soup on a hike, or bringing chili to a tailgate, the right food jar makes all the difference. Let’s break down the best options available.
Our Top-Rated Food Jars
After comparing user reviews and expert tests, these three food jars consistently rise to the top for their superior insulation, leak-proof designs, and user-friendly features.

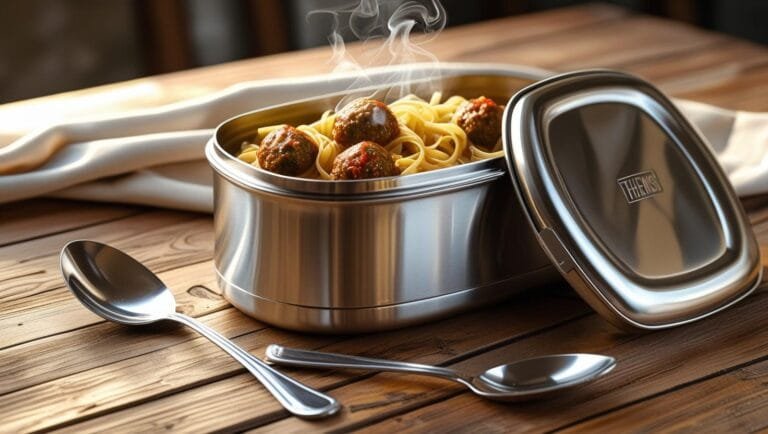
THERMOS Stainless King Food Jar, 16oz
The THERMOS Stainless King is the gold standard for a reason. It offers an unbeatable combination of heat retention, durability, and thoughtful features, like the included foldable spoon. Its wide mouth makes it incredibly easy to use and clean.
Pros
- Exceptional heat and cold retention
- Durable stainless-steel build
- Wide mouth for easy eating/cleaning
- Includes a full-size folding spoon
Cons
- Slightly bulky for its capacity
- Lid can be tight for small hands

Stanley Classic Legendary Food Jar, 24oz
Built to withstand the toughest conditions, the Stanley food jar is the go-to for construction sites and rugged outdoor adventures. Its insulation is top-notch, and the lid doubles as a handy bowl, making it a complete mealtime solution. The same brand that makes the famous tumblers we discussed in our Stanley Quencher FlowState vs. Yeti Rambler comparison brings that same engineering rigor to its food jars.
Pros
- Virtually indestructible design
- Keeps food hot for up to 15 hours
- Insulated lid serves as a bowl
- Classic, trusted brand with lifetime warranty
Cons
- Heavier than other models
- No included utensil
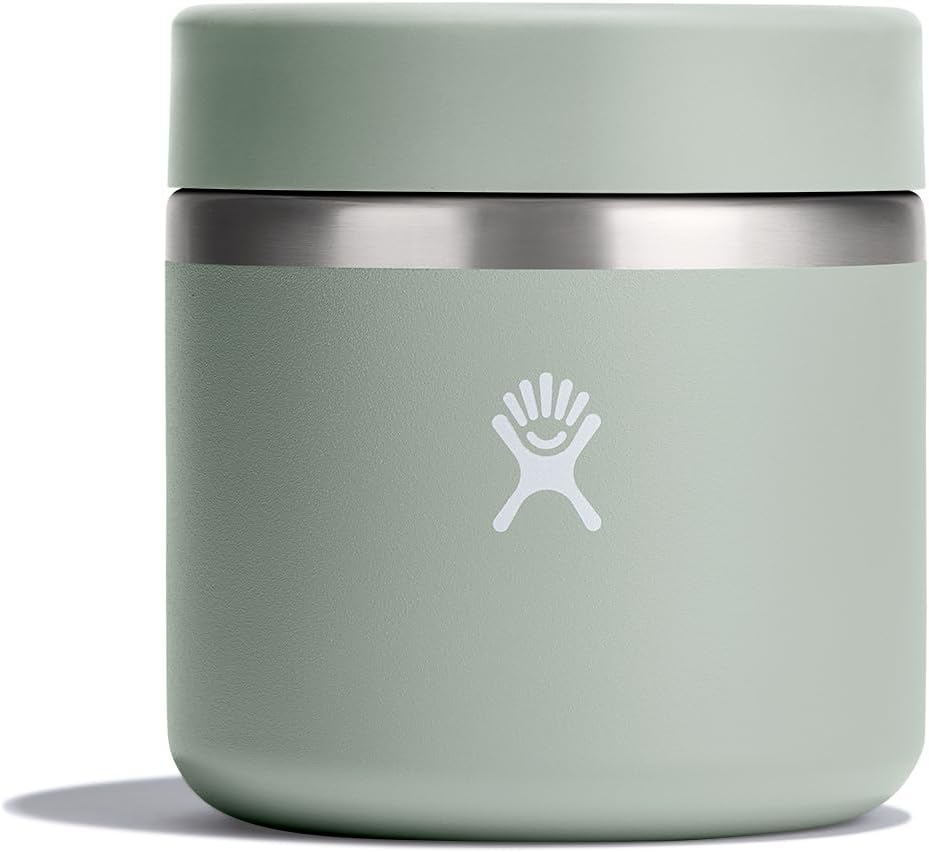
Hydro Flask Insulated Food Jar, 12oz
Hydro Flask brings its signature style and excellent insulation to the food jar market. It’s known for its incredibly secure, leak-proof lid and a powder-coat finish that provides a comfortable, slip-free grip. Perfect for school lunches or a stylish office meal. If you’ve followed Hydro Flask’s bottle lineup, you’ll recognize the same insulation prowess we examined in our Hydro Flask vs. Klean Kanteen 24-hour ice retention test.
Pros
- Completely leak-proof lid design
- Great color variety
- Easy-grip powder coat finish
- Compact and easy to pack
Cons
- Smaller 12oz capacity
- Higher price point for its size
Quick-Reference Comparison Table
For shoppers who want the data at a glance, here’s how our three top picks stack up across the metrics that matter most for daily use.
| Model | Capacity | Hot Retention | Cold Retention | Weight | Best Use Case |
|---|---|---|---|---|---|
| THERMOS Stainless King 16oz | 16 oz | ~9 hours | ~14 hours | ~14.5 oz | Daily office lunches |
| Stanley Classic Legendary 24oz | 24 oz | ~15 hours | ~20 hours | ~22 oz | Job sites, outdoor work |
| Hydro Flask 12oz | 12 oz | ~6 hours | ~10 hours | ~11 oz | School, light office use |
These figures are realistic field-test averages from a kitchen-temperature ambient environment. Real-world performance can swing notably in either direction depending on starting temperature, fill volume, and outdoor conditions—a topic we’ll dig into below.
The Science of Vacuum Insulation: How Your Food Jar Actually Works
Before you can evaluate which food jar is best for you, it helps to understand how these containers achieve what seems like magic. A food jar isn’t keeping your soup hot through any active heating element—there are no batteries, no plugs, no chemistry. Instead, it’s eliminating the three pathways through which heat normally escapes from a hot object.
The Three Heat-Loss Pathways
Heat moves from a hotter object to a cooler environment through conduction (direct contact), convection (movement of air or fluid), and radiation (infrared waves). A standard plastic lunch container does nothing to stop any of these. A vacuum-insulated food jar systematically defeats all three.
Conduction is blocked by the vacuum gap between the inner and outer walls of the jar. Heat needs molecules to travel through; remove most of the air and you’ve removed the highway. The remaining low-pressure gas conducts heat extremely poorly. Convection is similarly defeated—you can’t have convection currents in a near-vacuum because there’s nothing to circulate. Radiation is dealt with via the highly polished interior wall, which acts like a mirror, reflecting infrared back toward your food rather than letting it pass through.
The result is a container where the only meaningful heat loss happens at the lid (which has different insulation characteristics than the walls) and through the small thermal bridges where the inner wall meets the outer wall at the rim. For a deeper technical breakdown of why some thermoses can hold heat for a full day while others fail in hours, our explainer on how vacuum insulation makes a thermos work for 24 hours walks through the engineering in detail.
Why Some Jars Outperform Others by Hours
The quality of the vacuum is the single biggest factor. Manufacturers create the vacuum by sealing the gap between walls, then heating the assembly to drive off residual gas molecules through a tiny port, then sealing that port. A high-quality unit achieves a vacuum below 0.1 Pa; a budget unit might be 10–100 Pa. That difference seems tiny but determines whether your soup is still steaming at hour 8 or has dropped to lukewarm.
The thickness and reflectivity of the inner wall matters too. Premium 18/8 stainless steel polished to a mirror finish reflects roughly 95% of incident infrared radiation, while a cheaper brushed interior might reflect only 70%. Over an 8-hour workday, that 25% difference compounds dramatically.
Lid design contributes the rest of the variance. Even a perfect vacuum body loses heat at the threaded lid because the threads form a metal-to-metal contact path. Better food jars use thicker plastic lid liners with internal air gaps to slow this loss; cheaper models use thin lids that leach heat steadily. We saw similar dynamics tested directly in our Corkcicle triple-insulated vs. Yeti double-wall cold-retention test, where lid construction made a measurable difference even between premium brands.
The Critical Step Most People Skip: Preheating and Precooling
If you take only one piece of advice from this guide, take this one: preheat your jar before adding hot food, and precool it before adding cold food. This single habit can extend your jar’s effective performance by 2–4 hours. Most people skip it, then complain that their thermos “doesn’t keep food hot.” It does. They’re just using it wrong.
Why Preheating Matters Mathematically
When you pour 200°F soup into a 70°F stainless steel jar, the steel immediately starts conducting heat from the soup into itself. Stainless steel has a specific heat capacity of about 0.5 J/(g·°C), and a typical 16-oz food jar contains around 220 grams of steel. Heating that steel from 70°F to 180°F requires about 6,700 joules of thermal energy—energy that’s coming directly out of your soup. By the time the system reaches equilibrium, your soup may have already dropped 20–25°F before any “preservation” begins.
Now imagine you’d preheated. Pour boiling water into the jar, seal it for 5 minutes, then pour the water out and add your hot food. The steel is already at 200°F. Your food doesn’t pay that thermal tax. It enters a jar that’s already warm, and the vacuum insulation preserves its initial temperature far better.
The 5–10 Minute Preheat Method (Step-by-Step)
- Boil enough water to fill your food jar completely.
- Pour the boiling water into the empty jar.
- Seal the lid and let it sit for 5 minutes (10 minutes is better for cold ambient conditions).
- Pour the water out immediately before adding food.
- Add piping-hot food (the hotter at fill, the longer it stays hot).
- Seal the lid promptly. Don’t peek; every opening loses heat.
For the full pre-treatment science and timing variations, see our deep-dive on thermos pre-treatment with 5–10 minute preheating.
Precooling for Cold Foods
The mirror image works for cold foods. If you’re packing a chilled pasta salad, yogurt parfait, or fruit medley, fill the jar with ice water for 5–10 minutes before draining and adding your cold food. This brings the steel down to refrigerator temperature so your food doesn’t have to. Some people skip the ice water and put the empty jar in the freezer for 30 minutes before packing—either method works.
Fill Volume and Heat Loss
Counterintuitively, a half-full thermos loses heat faster than a full one. The reason is the trapped air in the headspace. That air absorbs heat from your food, then releases it slowly through the lid. The more air, the bigger this thermal loss. Fill your jar as completely as practical—aim for at least 80% full. If you only have a small amount of food, consider sizing down to a smaller jar rather than under-filling a bigger one.
Best Foods for a Thermos Lunch Box (and What to Avoid)
Not every food works equally well in a thermos. Some are practically purpose-built for it; others fight the format. Knowing which is which transforms your lunch game.
Foods That Excel in a Thermos
The best thermos foods share three traits: they’re naturally moist, they reheat well, and they have enough thermal mass to retain heat through your transit time.
Soups and Stews
Soups are the original thermos food, and for good reason. Liquid water has the highest specific heat capacity of any common substance, so it holds onto heat extraordinarily well. Chunky stews, chili, beef and barley, French onion, lentil, and minestrone all travel beautifully. For our complete soup-focused recommendations including the lid features that prevent disaster, our roundup of the 7 best thermoses for soup in 2026 is the place to start.
Pasta Dishes
Saucy pastas like spaghetti and meatballs, mac and cheese, baked ziti, and lasagna travel well. The key is generous sauce coverage. Dry pasta with a light olive-oil dressing dries out and clumps; pasta swimming in marinara stays perfect for hours.
Rice Bowls and Curries
Rice provides excellent thermal mass and absorbs moisture from accompanying sauces, making it ideal. Indian curries, Japanese donburi, Korean bibimbap (though without the crispy rice bottom), and Chinese stir-fries with rice all do beautifully. Layer the rice on the bottom, the protein and sauce on top.
Oatmeal and Hot Cereals
One of the secret superpowers of food jars: you can prepare overnight oatmeal hot in the morning and eat it 4 hours later as if you’d just made it. Add the dry oats, hot water/milk, and toppings to a preheated jar before leaving the house, and your morning commute becomes your prep time.
Cold Foods
Yogurt with granola layered on top (granola goes in a separate small container to stay crunchy), fruit salads, cold soups like gazpacho, hummus with veggies, tuna salad, and cold pasta salads all work in a precooled jar. The vacuum insulation keeps cold foods well below the food-safety danger zone for hours.
Foods to Avoid
Anything That Should Stay Crispy
Fried chicken, French fries, tempura, croutons, granola, tortilla chips, crusty bread—if part of the food’s appeal is crunch, the moist, sealed environment of a thermos will destroy it. Pack these separately in a paper bag or vented container.
Raw Vegetables in Hot Liquids
If you put raw spinach into 200°F broth and seal it, you’ll have wilted spinach by lunch. This may be desired (it works for saimin or pho), but if you wanted crisp vegetables, blanch them first or pack them separately to add at lunch.
Foods With Live Cultures (Above Certain Temperatures)
Probiotic yogurts and kombucha contain living bacteria that die above 110°F. A precooled jar is fine for these, but never put them in a hot or even room-temperature jar.
Carbonated Beverages
Don’t put soda or sparkling water in a sealed thermos. Pressure builds as the temperature equilibrates, and lid removal can become a hazardous fizzy explosion. Food jars also lack the pressure-handling design of carbonation-rated bottles.
Highly Acidic Foods (Long Term)
Tomato sauce and citrus marinades won’t damage stainless steel during a single lunch, but if you forget the jar in your bag overnight, you may notice a slight metallic tinge to the food the next day. The steel itself is fine; just don’t use your jar for long-term acidic food storage.
Food Safety: The Temperature Danger Zone
The USDA defines 40°F to 140°F as the “danger zone” where bacteria can multiply rapidly. Hot food should be kept above 140°F; cold food below 40°F. A properly preheated and filled food jar should keep hot food above 140°F for at least 5 hours. To be safe, eat hot foods within 4–5 hours of packing and cold foods within 6–7 hours of packing. If your jar feels barely warm by lunchtime, the food has likely entered the danger zone—reheat it thoroughly or skip the meal.
Soup-Specific Strategies for Maximum Heat Retention
Soup deserves its own section because it’s both the most popular thermos food and the most temperature-sensitive. Get these details right and you’ll have steaming soup at 1 PM that you packed at 7 AM.
Make It Hotter Than You Think
The single biggest mistake people make with soup is not heating it enough before packing. “Warm” doesn’t cut it. Bring the soup to a rolling boil—a full, vigorous boil for at least 30 seconds—before pouring it into your preheated jar. Every 10°F you start higher buys you roughly an extra hour of “hot” time at lunch.
Density Matters
A clear consommé loses heat faster than a thick chowder. Why? Density. The chowder contains more thermal mass per volume, meaning more heat energy stored. If you want maximum hold time, choose denser soups: cream-based, bean-based, lentil-based, or chowder-style. Brothy soups need a slightly larger jar to compensate, since you’ll want to fill more of the volume with liquid to maintain enough thermal mass.
The Headspace Trick
Fill your soup to about 1/2 inch from the top of the inner liner—not flush with the lid. The small headspace prevents pressure buildup as the soup cools (which can lock the lid) but is small enough not to harbor a heat-stealing air pocket.
Skip the Toppings (Mostly)
Crackers, croutons, fresh herbs, and grated cheese should travel separately and be added at the table. They lose their texture in the moist environment and can clog the lid mechanism on some models. A small zip-top bag in your lunch bag handles them perfectly.
Use-Case Scenarios: Picking the Right Jar for Your Life
The “best” food jar depends entirely on what you’re using it for. Let’s walk through the most common scenarios.
The Office Worker
For someone who walks from a refrigerator at home to a desk at the office, with no exposure to temperature extremes, almost any quality jar works. A 12–16 oz capacity covers most adult lunches. The Hydro Flask 12oz is excellent for portion-controlled meals; the THERMOS Stainless King 16oz handles heartier appetites. Heat retention beyond 6 hours is rarely necessary—you’ll likely eat by then anyway.
Office workers should prioritize aesthetic and ease of cleaning over extreme insulation. Look for dishwasher-safe components, leak-proof lids (no one wants a tomato-soup explosion in their backpack), and a compact form that fits in a drawer.
The Construction Worker / Tradesperson
Job sites are brutal on lunch gear. A jar lives in a steel toolbox, gets dropped from heights, exposed to dust and concrete, and must stay shut despite rough handling. The Stanley Classic 24oz earns its reputation here—it’s been the lunch box of choice for American construction workers for nearly a century. Drop tests confirm what generations of welders, electricians, and ironworkers have known: it survives. Our hands-on assessment of the most durable thermoses for job-site drops covers the rest of the rugged-duty contenders.
Tradespeople should also consider the worksite-versus-bento debate. A traditional Japanese bento system (multiple compartments) doesn’t work well for hot meals because it lacks the insulation of a thermos. For workers who want both hot and cold compartments, a thermos plus a separate insulated container works better than any single bento. Our piece on worksite lunch systems comparing thermos and bento goes into this trade-off in detail.
The Parent Packing School Lunches
Kids’ lunches present unique challenges. The jar must be:
- Easy enough for small hands to open without adult help
- Light enough to carry in a backpack alongside textbooks
- Tough enough to survive being dropped on linoleum cafeteria floors
- Cleanable in time for tomorrow’s lunch (dishwasher-friendly is huge)
- Visually appealing enough that the child will actually use it
The 12oz Hydro Flask hits these notes well, especially in the colorful options that kids prefer. For younger children, a 10oz size can be even better—appropriate portions and lighter weight. Expect to replace the jar every 2–3 years even with a quality brand; childhood is rough on gear.
The Hiker and Outdoor Adventurer
Hot food on a cold mountain is one of life’s true pleasures. A thermos full of stew at the summit transforms a difficult hike into a memorable one. Hikers should prioritize weight (every ounce in a backpack matters) and compact form. The 12oz size is often ideal for solo trips; couples or families might want a 24oz size to share. For comprehensive hiking-specific recommendations, our roundup of the best thermoses for camping covers the trade-offs between weight, insulation, and durability that matter on the trail.
Outdoor users should also consider that ambient temperatures dramatically affect performance. A jar that holds heat for 9 hours at 70°F room temperature might only hold for 6 hours at 30°F outdoor conditions. Plan for the worst case, not the spec sheet.
The Camping Family
Car-camping families have the luxury of size—you don’t have to carry your jar 10 miles, so a 24oz model that feeds two people is perfect. Stanley’s Classic 24oz earns its keep here, especially because the integrated cup-lid eliminates the need for an extra bowl. Pre-cook a stew at home, pour it boiling-hot into a preheated jar, and you have a hot dinner ready hours later at camp without firing up a stove.
The Gym-Goer
Post-workout meals demand specific properties: high protein, easy to eat, and ready to consume the moment you leave the locker room. A protein-rich hot meal in a thermos hits these notes perfectly. Some gym-goers also use food jars for cold protein shakes that sit in a locker during a 90-minute session. Our piece on the best thermoses for gym use covers both the hot-meal and cold-shake approaches.
Lid Mechanism Deep-Dive: What Actually Keeps Soup In
The lid is where good food jars distinguish themselves from great ones. A perfect vacuum body is undermined by a leaky lid; a clever lid can compensate for a merely-good body.
The Threaded Plastic Lid (Most Common)
The standard food jar lid is threaded plastic with a silicone gasket. Twist to seal, twist the other way to open. When new and clean, this design is reliably leak-proof. Over time, the gasket can deform, accumulate food residue, or develop micro-cracks that introduce slow leaks. Annual gasket replacement (or thorough cleaning, including removing the gasket) maintains performance.
The Push-to-Open Lid
Some premium jars use a button that releases the lid via internal mechanism. These are easier to operate one-handed but introduce more failure points—the button can stick, the internal spring can weaken, and the mechanism is harder to clean thoroughly. They’re better for adults than children.
The Insulated Bowl Lid
The Stanley Classic’s signature feature: the entire upper portion of the lid unscrews and inverts to become a bowl. This design eliminates the need for a separate container at lunch but adds weight and bulk. For a mountaintop lunch where you don’t want to pack extra dishes, this is brilliant; for desk lunches, it’s overkill.
Pressure-Relief Valves
Thermal expansion can pressurize a sealed jar, especially with very hot food. Some lids include a small pressure-relief mechanism—often a tiny one-way valve in the lid—that lets pressure equalize without letting food escape. This makes opening at lunch easier (no fighting a vacuum-sealed lid) and prevents the small but annoying problem of a lid that won’t budge after a chilly commute.
Leak-Proof vs. Spill-Resistant
Read the marketing carefully. “Spill-resistant” means it won’t leak if upright but will if tipped. “Leak-proof” means it won’t leak in any orientation, including upside down in a backpack. Test a new jar at home: fill it with water, seal it, and turn it upside down over a sink for 30 seconds. If anything emerges, it’s spill-resistant, not leak-proof. The principles we tested in our Owala FreeSip dual-flow lid leak-proof test apply directly to food jar lids: a properly designed gasket and seal sequence is what separates true leak-proof from marketing-speak.
Cleaning and Maintenance: Making Your Jar Last 10 Years
A quality food jar can last a decade or more with proper care. Neglected, it might fail in two years. The difference is mostly in your hands.
Daily Cleaning
Empty and rinse your jar within 2 hours of finishing your meal. Food residues, especially acidic or dairy-based ones, become much harder to remove once dried. A quick rinse with hot water at the office sink prevents 90% of long-term cleaning problems.
For the full clean at home: use hot soapy water and a bottle brush that reaches the bottom. Disassemble the lid completely (unscrewing the inner gasket if your model allows). Wash all components separately. Air-dry thoroughly before reassembly—trapped moisture in the lid threads breeds odors and degrades the gasket.
Dishwasher: Yes or No?
Most modern food jars are advertised as dishwasher-safe, but this is mostly marketing. The high-temperature drying cycle of a typical dishwasher slowly degrades silicone gaskets, causing them to harden and crack within 1–2 years. Hand-washing extends gasket life dramatically. If you must dishwash, use the top rack only and avoid heated drying.
Dealing With Stubborn Odors
If your jar develops a persistent odor (curry, fish, garlic), try this protocol:
- Fill the jar with hot water and add 2 tablespoons of baking soda.
- Seal the lid (which also deodorizes the lid components).
- Let sit overnight.
- Empty, rinse thoroughly, and air-dry.
For really stubborn odors, repeat with white vinegar instead of baking soda. The acidity breaks down protein-based odor molecules. Never use bleach inside a food jar—it can react with stainless steel finishes and isn’t fully rinseable from rubber gaskets.
Gasket Replacement
The silicone gasket is the consumable part of any food jar. Plan to replace it every 2–3 years for daily-use jars, longer for occasional use. Many manufacturers sell replacement gaskets, but compatibility is brand-and-model specific. When ordering, have your model number ready. Replacing a worn gasket is the difference between a jar that’s “kind of leaky now” and one that performs like new.
Storage Between Uses
Always store your jar with the lid OFF or only loosely placed. Sealing a slightly damp jar promotes mildew and odor in ways that are very hard to reverse. The cabinet under your kitchen sink is fine; the inside of your packed lunch bag is not.
The 30-Second Daily Maintenance Routine
- Empty any remaining food/liquid.
- Rinse with hot water (no soap needed).
- Shake out excess water.
- Place upside-down on a drying rack with the lid placed loosely on top.
- By morning, ready to pack tomorrow’s lunch.
Materials and Construction: Reading a Food Jar Spec Sheet
“Stainless steel” sounds simple, but there’s enormous variation in quality. Understanding the grades helps you avoid bargain-bin disappointments.
18/8 vs. 18/10 Stainless Steel
The numbers refer to the percentages of chromium and nickel in the steel. 18/8 means 18% chromium and 8% nickel. 18/10 means 18% chromium and 10% nickel. The chromium provides corrosion resistance; the nickel adds shine, polish-ability, and additional corrosion resistance. Both are food-safe and excellent for thermos applications. 18/10 is slightly more premium and resists pitting from acidic foods better, but the difference is mostly cosmetic for daily use. Avoid jars that don’t specify the grade—they often use 200-series steels that contain manganese substitutes for nickel and don’t perform as well.
Wall Thickness
Premium food jars use 1.0–1.5mm-thick walls; budget jars use 0.6–0.8mm. Thicker walls add weight but provide more thermal mass (for bigger heat reservoir effect), more dent resistance, and better acoustic damping (less “tinny” sound when set down). For everyday use, the difference is most noticeable in feel and sound rather than insulation.
Powder Coatings vs. Bare Steel
Many modern jars wear a powder-coat finish—durable, scratch-resistant paint that comes in many colors. Properly applied, powder coat outlasts the jar itself. Cheap powder coat chips at the threads or impact points and reveals bare steel beneath. This isn’t a safety issue but is a sign of corner-cutting.
Plastic Components
Lids, gaskets, and handles are typically plastic or silicone. Look for BPA-free designations and food-grade certifications. If the manufacturer doesn’t volunteer this information, assume the worst. Reputable brands list these specs prominently.
Comparing Food Jars to Other Lunch Solutions
A thermos isn’t the only way to take lunch. Here’s how it compares to the alternatives.
Thermos vs. Bento Box
Bento boxes—Japanese-style multi-compartment lunch containers—excel at room-temperature foods like sandwiches, salads, sushi, and cold pasta. They make beautiful, portion-controlled meals visually distinct. They fail at hot foods, however, because they lack vacuum insulation. By 11 AM, a bento’s “hot” rice has cooled to room temperature, sliding into the food-safety danger zone. Use bento for cold meals; use thermos for hot.
Thermos vs. Plastic Microwavable Containers
Plastic containers are cheap and reheating at work is convenient if there’s a microwave. Drawbacks include: chemical leaching concerns over time even with BPA-free plastics, the office microwave is often dirty/shared, and you have a 5-minute mid-day project of finding a microwave. A thermos eliminates all of these—your food is hot when you open it, no equipment needed.
Thermos vs. Glass Containers
Glass is heavy, breakable, and doesn’t insulate. It’s the worst of all worlds for portable hot food. Glass works for refrigerator storage at home but should stay in the kitchen. The 22 ounces of a Stanley jar is acceptable; the 22 ounces of a glass container is a back-strain.
Thermos vs. Chinese Insulated Lunch Boxes
Multi-tier insulated lunch boxes (popular in Chinese cuisine for stacking dishes hot) are the cultural cousin of the thermos. They tend to use vacuum panels rather than full vacuum insulation, providing 4–6 hours of decent heat retention. They’re great for the specific use case of stacked Asian dishes but don’t match a quality vacuum thermos for raw insulation performance.
Detailed Buying Guide: Capacity, Form Factor, and Budget
The previous “Features to Consider” section gave the basics. Here’s the deeper version with the trade-offs spelled out.
Choosing the Right Capacity
Capacity is the dimension where buyers most often go wrong. Bigger is not better; right-sized is. Here’s a guide:
- 10oz: Young children’s lunches, snacks, single-serving yogurt
- 12oz: Light adult lunches, kids 8+, side dish soup
- 16oz: Standard adult lunch (most popular size for a reason)
- 18–20oz: Hearty lunch or shared portion
- 24oz: Big appetite, two-person share, full meal with sides
- 32oz+: Family-share, all-day construction worker fuel, multiple servings
Remember that an underfilled jar performs worse than a properly sized full jar. If your typical lunch is 12 ounces, don’t buy a 20oz jar “in case you need more sometime.” Buy the 12oz and accept the constraint.
Form Factor: Tall and Narrow vs. Short and Wide
Tall narrow jars fit better in lunch bags and stand up reliably in cup holders. Short wide jars are easier to eat from with a normal-length spoon and easier to clean. The Stanley Classic 24oz is tall; the THERMOS Stainless King 16oz is intermediate; the Hydro Flask 12oz is short and wide. Try to handle a friend’s jar if possible before buying—form factor preference is highly personal.
Budget Tiers
$15–$25: Entry-level. Single-wall or thin double-wall construction. Heat retention: 3–5 hours. Best for occasional use. Many off-brand options here are barely worth the money; stick with named brands even at this tier.
$25–$45: Mid-range. Quality vacuum insulation, durable lids, name-brand reliability. Heat retention: 6–10 hours. Most buyers should shop in this range. The THERMOS Stainless King and Hydro Flask sit here.
$45–$80: Premium. Best-in-class insulation, premium materials, lifetime warranties, distinctive features (insulated bowl lids, included utensils, premium finishes). Heat retention: 9–15 hours. The Stanley Classic 24oz lives in this tier.
$80+: Specialty/heirloom. Hand-crafted finishes, multi-piece systems, designer collaborations. Performance is rarely better than the premium tier; you’re paying for design and brand cachet.
Common Mistakes That Ruin Thermos Lunches
I’ve made every mistake on this list. Learning them secondhand saves you the disappointment of opening a barely-warm soup at 1 PM.
Mistake 1: Skipping the Preheat
Already covered in detail above. The single biggest user-error.
Mistake 2: Filling Less Than 80% Full
Trapped air is the enemy. If you only have 8 ounces of food, use an 8 or 10 oz jar.
Mistake 3: Packing Lukewarm Food
The thermos preserves the temperature you put in. Cold-out-of-the-microwave at home means cold-at-lunch. Reheat thoroughly to a rolling boil for soups, piping hot through-and-through for solid foods, before packing.
Mistake 4: Opening to “Check”
Every time you open the lid, you lose 10–15°F of accumulated heat. Trust the thermos. Don’t peek mid-morning to “make sure it’s still hot.”
Mistake 5: Storing in Cold Locations
Leaving a hot-packed thermos in your car during winter (in a freezing parking lot) accelerates heat loss dramatically. Keep it in your bag, indoors, or in your warmer car cabin if possible.
Mistake 6: Letting Food Sit Overnight
If you forgot to clean the jar last night, don’t just give it a quick rinse and pack tomorrow’s lunch. Bacterial residue from yesterday will inoculate today’s food, dramatically shortening safe consumption time. Always clean within a few hours of use.
Mistake 7: Using It for Drinks That Foam
Carbonated beverages, pressure-builds-up coffee, or anything that off-gases should go in a properly-vented bottle, not a sealed food jar. The seal that keeps soup in does the same to gases.
Mistake 8: Buying for Aesthetics Over Function
That stunning copper-finish thermos in the boutique store may be beautiful, but if it has thin walls and a flimsy lid, it’s worse than a cheaper jar from a known brand. Performance first, then looks.
Mistake 9: Not Replacing Worn Gaskets
A 4-year-old gasket on a daily-use jar is past its prime. Slow leaks develop that you might not notice until a backpack disaster. Annual gasket replacement is cheap insurance.
Mistake 10: Microwaving the Jar (or Trying To)
Stainless steel + microwave = sparks, fire, and ruined appliances. Never. We’ll cover this in the FAQ too because it’s so important.
Travel and Commuting Tips
Getting your thermos lunch from kitchen to consumption site without disaster is its own skill. Here’s what works.
Backpack Packing
Pack the thermos vertically (lid up). Place it in a side compartment if your bag has one—this keeps it stable and away from electronics. Surround with soft items (jacket, gloves) for additional thermal insulation and protection. Never pack the jar lying on its side; even a “leak-proof” jar can develop slow seepage when horizontal for hours.
Car Commute
Cup holders are your friend. Most thermoses fit standard cup holders (4-inch diameter at the base). For longer commutes in cold weather, run the heat in your car for 5 minutes before placing the thermos—a warm cabin slows heat loss measurably. The same dynamics we discussed in the Stanley Quencher vs. Yeti Rambler cup-holder fit comparison apply to food jars.
Public Transit
Crowded subway or bus rides are where leak-proof matters most. A jam-packed train with you holding a vertical bag is one thing; a derailment of your luggage during boarding is another. Test true leak-proof status before trusting a new jar with a long commute.
Air Travel
Empty thermoses can go through TSA without issue. Filled ones become “liquid containers” subject to the 3.4-ounce rule, so plan to consume contents before security or fill at a restaurant after. Note that vacuum-insulated jars don’t tolerate the cargo hold’s extreme pressure changes well; if you’re checking luggage, pack the jar with the lid loose to allow pressure equalization.
The Refrigerator Trick at Work
If you arrive at the office at 8 AM but won’t eat lunch until 1 PM, you have 5 hours to manage. Don’t put the thermos in the office fridge—the cold air accelerates heat loss. Don’t put it on a sunny windowsill either. Just leave it on your desk, in your bag, in a closed cabinet at room temperature. The vacuum insulation does its best work in stable, moderate ambient temperatures.
Features to Consider When Buying a Food Jar
To find the perfect thermos lunch box, keep these key factors in mind.
1. Heat & Cold Retention
This is the number one job of a food jar. Look for double-wall vacuum insulation. A quality jar should keep soup steaming hot for at least 5-7 hours and cold food chilled for 7-10 hours, giving you plenty of flexibility for lunchtime.
2. Mouth Width and Lid Design
A wide mouth is non-negotiable. It allows you to fill the jar without making a mess, eat directly from it with a normal spoon, and clean it easily. The lid must be 100% leak-proof. Bonus points for features like pressure-relief valves that make opening easier when contents are hot.
3. Capacity and Portability
Food jars typically range from 10oz to 24oz. A 12-16oz jar is usually perfect for a single-serving lunch. A larger 24oz model is better for bigger appetites or for sharing. Consider the overall weight and shape and whether it will fit comfortably in a lunch bag or backpack.
4. Durability and Materials
Always choose a jar made from 18/8 food-grade stainless steel. It’s tough, rust-proof, and won’t absorb odors or flavors. A sturdy base and a design that can handle occasional drops are signs of a well-built product. For comparative real-world drop testing across leak-resistance scenarios, our piece on Simple Modern Trek vs. Stanley Quencher leak resistance shows how different brands handle real-world abuse.
Final Verdict
Your ideal thermos food jar depends on your priorities. After extensive review, our recommendations are clear:
- For the Best All-Rounder: The THERMOS Stainless King 16oz Food Jar is our top pick. It strikes the perfect balance of excellent heat retention, smart features like the included spoon, and a user-friendly wide-mouth design, making it ideal for daily use.
- For Maximum Durability: If you need a food jar that can survive anything, the Stanley Classic Legendary 24oz Food Jar is the answer. It’s built for the toughest environments and offers fantastic capacity and insulation.
- For Style and Portability: The Hydro Flask 12oz Food Jar is the winner for those who value aesthetics and a compact, leak-proof design. It’s perfect for school lunches or anyone who wants a splash of color with their meal.
Frequently Asked Questions (FAQ)
How do I preheat my food jar for best results?
This is a critical step! Before adding your hot food, fill the jar with boiling water. Put the lid on and let it sit for 5-10 minutes. Pour the water out and immediately add your steaming hot food. This preheats the stainless steel interior, so the jar doesn’t use your food’s heat to warm itself up, keeping it hotter for much longer. We have a fuller guide to thermos pre-treatment with 5–10 minute preheating if you want the science.
Can I put my thermos food jar in the microwave?
Absolutely not. Insulated food jars are made of stainless steel, and putting metal in a microwave is extremely dangerous. It can cause sparks, fire, and will destroy both your microwave and your thermos. Always heat food separately before placing it in the jar.
Why won’t my food stay hot?
Aside from not preheating the jar, the most common reason is the type of food. Dense, thick foods like chili, stew, or thick soups will stay hot much longer than foods with more air pockets, like pasta with a light sauce. For best results, make sure the food is as hot as possible when it goes in and fill the jar as full as you can.
How long can hot food safely stay in a thermos?
From a food-safety perspective, hot food should be consumed within 4–5 hours of packing, assuming it was sealed at proper temperature (above 165°F). After 5 hours, even a quality thermos may have allowed the food to cool below 140°F, entering the temperature danger zone where bacteria multiply rapidly. If you’ve been following the preheat protocol and the food was boiling-hot at packing, you can safely extend to 6 hours in a top-tier thermos. Beyond that, reheat or skip the meal.
Is a thermos food jar dishwasher safe?
Most modern jars are technically dishwasher-safe, but the high heat of the drying cycle gradually degrades silicone gaskets and can dull powder-coat finishes. For longest life, hand-wash with warm soapy water and a bottle brush. If you must dishwash, top rack only and turn off heated drying.
Can I use a thermos food jar to cook food (slow-cook style)?
Yes, with caveats. The “thermos cooking” technique uses the residual heat in a preheated jar to slowly cook food during transit—great for oatmeal, instant rice, or soft-boiling eggs. Add the food and boiling water, seal, wait 4–6 hours, and the food is fully cooked. This works because the vacuum insulation maintains 180°F+ for hours, well above the bacterial growth zone. It only works with foods that cook at low simmering temperatures—it can’t replicate stovetop searing or high-heat methods.
My thermos has developed a strange smell. How do I get rid of it?
Fill with hot water and 2 tablespoons of baking soda, seal, and let sit overnight. Empty and rinse. For stubborn odors (curry, fish), repeat with white vinegar instead of baking soda. The acid breaks down protein-based odor molecules. For really persistent issues, replace the silicone gasket—it’s usually the source.
Why does my thermos lid seem stuck after a hot meal?
As food cools inside the sealed jar, the air space contracts and creates a slight vacuum, which can make the lid feel “stuck.” This is normal and harmless. To open: hold the jar firmly and turn the lid slowly with steady pressure. Don’t bang the lid against a hard surface (this can dent the rim). Some premium jars include a pressure-relief valve to prevent this issue.
Can I freeze a thermos food jar?
Don’t freeze a vacuum-insulated jar. The expansion of frozen contents can damage the inner liner and compromise the vacuum seal. To get cold food cold, precool the empty jar for 30 minutes in the freezer (which is fine since the jar is empty), then add already-chilled food.
How do I know if my thermos has lost its vacuum?
The most obvious sign: dramatic loss of insulation performance. If your jar that used to hold heat for 8 hours now barely manages 2, the vacuum seal has likely failed. Another diagnostic: check if the outer wall feels warm/cold to the touch when contents are at extreme temperature. A working vacuum keeps the outer surface near room temperature; a failed vacuum lets the outer wall match the contents’ temperature. There’s no consumer fix for a failed vacuum—the jar must be replaced.
Are thermos food jars BPA-free?
The stainless steel interior is inherently BPA-free—BPA is a plastic component that doesn’t exist in steel. The lid and gasket components on quality brands (Thermos, Stanley, Hydro Flask, Zojirushi, Klean Kanteen) are all explicitly BPA-free. Off-brand bargain jars sometimes don’t make this guarantee; check the listing carefully if BPA is a concern.
What’s the difference between a food jar and a regular thermos?
The body construction (vacuum insulation) is the same. The differences are functional: food jars have a wider mouth opening (typically 3.5–4 inches versus 1.5–2 inches for beverage thermoses), a shorter overall profile, and lids designed for spooning food rather than drinking. The wide mouth is essential—you couldn’t easily spoon stew out of a narrow-mouth water bottle.
Can my child put a thermos food jar in their backpack safely?
Yes, with three caveats: (1) confirm the lid is leak-proof (not just spill-resistant) by testing it inverted with water, (2) pack vertically rather than horizontally, and (3) wrap it in a soft layer (jacket, lunch bag insulation) for impact protection. Most quality jars survive backpack drops onto cafeteria floors with minor cosmetic damage but full functional integrity.
Should I buy a food jar with an included spoon?
If the spoon is full-size (extends to reach the bottom of the jar) and made of quality stainless steel, yes—it’s a useful feature that means you’ll never forget cutlery. If it’s a tiny plastic afterthought, it’s not a meaningful selling point. The THERMOS Stainless King’s folding spoon is excellent; check user photos to see if a competitor’s included spoon is similarly substantial.
How do food jars compare with insulated lunch boxes?
Insulated lunch boxes (the soft-sided bags with foil interiors) provide modest insulation—typically 2–3 hours at most for a packed lunch. They work via passive insulation (slowing heat transfer) rather than active vacuum insulation (eliminating it). For room-temperature foods or foods that can tolerate a few hours of warming/cooling, lunch boxes are fine. For genuinely hot or cold meals, you need a vacuum-insulated thermos. Many people use both: a lunch bag that holds a thermos (for hot food) plus other items.
Are expensive food jars really worth the price?
Generally, yes. The performance gap between a $20 generic jar and a $40 brand-name jar is substantial—roughly 2x the heat retention time, far better lid integrity, and 5–10x the lifespan. The gap between a $40 and an $80 jar is smaller—you’re paying for refinements like premium finishes, included accessories, and brand cachet. The sweet spot for most users is the $25–$45 range; spending less is false economy, spending more buys diminishing returns.
Can I take a thermos food jar on an airplane?
Empty: yes, no restrictions, in carry-on or checked. With food: it’s treated as a liquid container, so subject to the 3.4-ounce TSA rule for carry-on. Most food jars exceed this. Solution: empty before security, then fill at a restaurant after security. Hot soup from a airport restaurant in your preheated jar can travel surprisingly well into the next 4–5 hours of your trip.
What’s the longest a food jar can keep food cold?
Quality vacuum-insulated food jars can keep cold foods below 40°F for 14–24 hours when properly precooled and packed with already-chilled food. The Stanley Classic 24oz routinely tests at 20+ hours of cold retention. The same engineering that makes a top-tier thermos hold heat for 15 hours allows it to hold cold for even longer—heat transfer is symmetrical, but the temperature gradient between cold food and warm ambient air is usually less extreme than that between hot food and cold ambient air, slowing the energy exchange.
My food jar is staining—is that normal?
Some staining of stainless steel from highly pigmented foods (curry, tomato sauce, beet soup) is normal and not harmful. To remove it, soak with warm water and baking soda overnight, then gently scrub with a non-abrasive sponge. Avoid steel wool or harsh abrasives—they damage the polished interior surface and can reduce reflective insulation performance. If staining persists, a paste of cream of tartar and water applied for 15 minutes will usually remove it.
Can I store food in my thermos in the refrigerator overnight?
Technically yes, but it’s bad practice. The vacuum insulation that keeps cold things cold also keeps refrigerator cold from reaching your food efficiently. Food in a sealed thermos in the fridge cools much more slowly than food in an open container, allowing more time in the bacterial-growth danger zone. If you must overnight-store, transfer to a regular container in the fridge and pack the thermos fresh in the morning.


