- What This Guide Covers
- Types of Thermostats
- Reading an Analog Thermostat
- Reading a Digital Thermostat
- The Two Key Numbers
- Heat, Cool, Auto & Fan Modes
- Symbols & Indicator Lights
- Programmable Schedules
- Smart Thermostat Displays
- Heat Pump Settings
- When Readings Don’t Match
- Energy-Saving Settings
- FAQs
- Conclusion
How to Read a Thermostat: Understanding Every Display, Dial, and Setting

Reading a thermostat correctly means understanding both what you set — and what your system is actually doing.
What This Guide Actually Covers
Your thermostat is the brain of your entire HVAC system. Every number, symbol, mode setting, and blinking indicator carries specific meaning — and misreading even one of them can leave you shivering in winter, sweating in summer, or quietly running up an electricity bill you didn’t expect. Yet most homeowners only ever learn maybe 20% of what their thermostat’s display is actually communicating.
This guide covers the entire picture. Whether you’re trying to decipher the rotating dial on a 1970s bimetallic thermostat, decode the dual-number display on a mid-range Honeywell, parse the schedule screens on a 7-day programmable unit, or interpret the energy dashboards on a modern Nest or ecobee — you’ll find a clear, plain-English explanation of every element you’re looking at.
We’ll cover analog thermostats, digital non-programmable thermostats, programmable thermostats, and smart Wi-Fi thermostats. We’ll decode every mode (Heat, Cool, Auto, Fan, Em Heat, Aux Heat), every symbol (the snowflake, the flame, the leaf), every indicator light, and every common error message. We’ll also walk through what to do when the number on your thermostat doesn’t match the temperature your room actually feels like — a frustratingly common scenario with a surprisingly logical explanation.
By the time you finish this guide, you’ll be able to walk up to virtually any thermostat in any home, hotel, or office, and immediately understand exactly what it’s telling you and what it’s doing. Let’s start from the very beginning.
Types of Thermostats and How Their Displays Differ
Before you can read a thermostat accurately, you need to know which type you’re dealing with. Each generation of thermostat communicates differently, with its own display conventions, physical controls, and vocabulary. Here’s the essential overview:
Analog / Mechanical Thermostats
These are the oldest and simplest type. They use a physical sensing element — usually a bimetallic strip or coil that expands and contracts with temperature changes — to open or close an electrical circuit. The display is not digital at all: it’s a printed temperature scale on a face plate, with a rotating dial or pointer you physically move to your desired temperature. There are no icons, no LCD, no mode buttons. Reading one means understanding the relationship between the physical pointer and the printed scale.
Digital Non-Programmable Thermostats
These replaced analog thermostats in the 1980s and 90s. They use an LCD or LED screen to display current and set temperatures, usually with simple push-button controls. Mode switches (Heat/Cool/Off) and fan settings (Auto/On) are typically physical slide switches or large push buttons. These thermostats are straightforward to read, but their display conventions — especially the placement and meaning of the two temperature numbers — confuse many homeowners.
Programmable Thermostats
These added scheduling capability, letting you set different temperatures for different times of day and days of the week. Their displays often have more going on: clock displays, day-of-week indicators, active period labels (Wake, Leave, Return, Sleep), and schedule screens accessible through menus. Reading the display means not only understanding the current temperatures but also knowing which period of the schedule you’re currently in.
Smart / Wi-Fi Thermostats
Modern smart thermostats like the Nest, ecobee, Honeywell Home T9, and Amazon Smart Thermostat have full-color touchscreens or large digital displays packed with information. They show current temperature, setpoint, humidity, system status, weather forecasts, energy usage history, and more. Reading a smart thermostat requires understanding a richer visual language — including app-mirrored displays you can also read remotely on your smartphone.
| Thermostat Type | Display Type | Temperature Shown | Mode Control | Scheduling |
|---|---|---|---|---|
| Analog / Mechanical | Printed scale + pointer | Set temp only | Physical lever or switch | None |
| Digital Non-Programmable | LCD numbers | Set + current temp | Physical switch or button | None |
| Programmable | LCD with menu screens | Set + current + schedule | Button or switch | 7-day / 5-2 / 5-1-1 |
| Smart / Wi-Fi | Color touchscreen or large LCD | Set + current + humidity + status | Touchscreen menu | Advanced / AI-learning |

Honeywell Home RTH7560E — Best Entry-Level Digital Thermostat
Clear dual-temperature display, simple mode switches, and an intuitive 7-day schedule interface — ideal for learning thermostat fundamentals.
View on Amazon →Reading an Analog Thermostat: Dials, Levers, and Scales
Analog thermostats look simple, but there are actually several elements to understand — including some hidden ones inside the housing that many homeowners don’t know exist.
The Temperature Dial and Pointer
The most obvious feature of an analog thermostat is the rotating dial or wheel. Around the perimeter (or face) of this dial, you’ll see a printed scale with temperature values — typically ranging from 50°F to 90°F in the United States, or 10°C to 32°C in metric countries. The pointer or marker in the center (or attached to a fixed housing) indicates your current temperature setting. To read your set temperature on an analog thermostat, simply look at where the pointer aligns with the scale.
On some analog thermostats (like the classic Honeywell Round T87), the entire outer ring rotates and you set the temperature by rotating the ring until your desired temperature aligns with a fixed marker at the top or bottom. On others, a central dial turns while the scale remains fixed on the housing. The principle is the same either way: pointer meets scale = your set temperature.
The Heat/Cool Lever or Switch
Most analog thermostats have a small physical switch or lever, usually labeled Heat / Off / Cool. This is your system mode selector. Slide it to Heat and the thermostat will call for heating when the room drops below your set temperature. Slide it to Cool for air conditioning. The Off position disables the HVAC entirely. On simple single-stage analog thermostats (heating only), this may just be an On/Off switch.
The Fan Switch
Some analog thermostats also have a separate fan switch, labeled Auto / On. In the Auto position, the fan only runs during active heating or cooling cycles. In the On position, the fan blows continuously. We’ll cover the full meaning of these modes in a dedicated section below.
The Hidden Anticipator Lever
Inside the cover of many classic analog thermostats — particularly the Honeywell Round — is a small arc-shaped metal bar with markings and a moveable clip. This is the heat anticipator, and it’s one of the most misunderstood components in home HVAC history. The anticipator controls how long the heating cycle runs before the thermostat switches off, preventing temperature overshoot. It’s calibrated to match your furnace’s specific current draw (in amps). You don’t need to adjust it in normal use, but if your heating system short-cycles frequently or overshoots the setpoint by several degrees, the anticipator may need recalibration. The scale on the arc shows amperage values, not temperatures.
Reading Temperature in Celsius vs. Fahrenheit
In North America, analog thermostats are almost universally scaled in Fahrenheit. In Europe and most of the rest of the world, they use Celsius. Some models print both scales on the same face. If your dial only shows one scale and you want to convert: °C × 9/5 + 32 = °F, or (°F − 32) × 5/9 = °C. A comfortable home temperature of 68–72°F equals approximately 20–22°C.
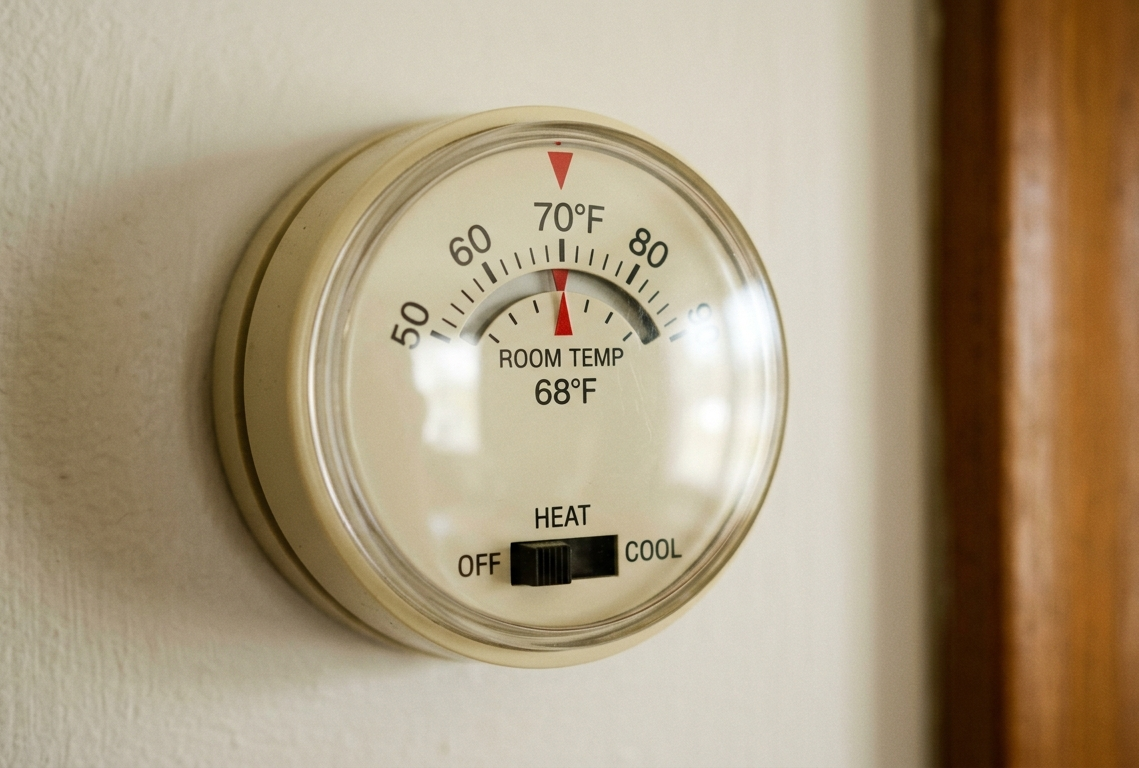
Reading a Digital Non-Programmable Thermostat
Digital thermostats replaced analog ones in most homes through the 1990s and 2000s. They’re still widely used today, and while they’re more informative than their analog predecessors, their displays introduce a new layer of information that trips people up: you’re now seeing two different temperatures at once.
The LCD Display Layout
A typical digital thermostat LCD shows several pieces of information at once. Learning to separate them visually is the key skill. Here’s a generalized breakdown of what you’ll see:
The larger, more prominent number on most digital thermostats is the current room temperature — the actual temperature the thermostat’s sensor is reading right now. The smaller or secondary number is your set temperature (also called the setpoint or target temperature) — the temperature you want the room to reach. Some brands reverse this layout (set temperature large, current temperature small), so always check which label accompanies which number.
Understanding the Mode Display
At the top or bottom of the LCD, you’ll typically see the active system mode displayed as text: HEAT, COOL, OFF, or sometimes AUTO. This is what you’ve selected via the mode switch. If the system is actively running, you’ll also see an indicator — often a lit indicator light, a blinking flame icon, or the words Heat On or Cool On. If the mode shows HEAT but there’s no “Heat On” active indicator, the system is in standby: the room is warm enough that it doesn’t need to run yet.
Why Buttons on a Digital Thermostat Work the Way They Do
Digital non-programmable thermostats typically have Up (▲) and Down (▼) buttons to adjust the set temperature, a Mode button to cycle through Heat/Cool/Off, and a Fan button to toggle Auto/On. Each button press changes one setting on the display. On some models, holding the Mode button or pressing a combination of buttons accesses a setup or calibration menu — useful if you ever need to recalibrate the temperature display (more on this in the troubleshooting section).
The Two Key Numbers: Current Temperature vs. Set Temperature
This is the single most important concept to master when reading any thermostat. If you remember nothing else from this guide, remember this: your thermostat almost always shows you two different temperatures, and they mean very different things.
The Set Temperature (Setpoint)
The set temperature — also called the setpoint, target temperature, or desired temperature — is the number you control. It’s the temperature you’re asking your HVAC system to reach and maintain. On an analog thermostat, you set it by rotating the dial. On a digital or smart thermostat, you set it using the Up/Down buttons or by touching the screen. Your system will run (heating or cooling) until the room reaches this number, then shut off and wait until the room drifts away from it again.
The Current Temperature (Room Reading)
The current temperature is what the thermostat’s internal sensor is measuring right now in the room where the thermostat is installed. This is a live reading. As your HVAC runs and the room heats or cools, this number changes. The thermostat constantly compares this reading to your setpoint to decide whether to run or rest.
This is also where issues can arise — because the thermostat is only reading the temperature at its location, not in every room of your home. If your thermostat is installed in a drafty hallway, above an air vent, near an exterior door, or in direct sunlight, its current temperature reading will be skewed. To understand the full picture of how thermostats sense temperature and why they sometimes get it wrong, see our deep dive on thermistors and temperature sensing in smart thermostats.
What Happens When the Numbers Are Close
Most thermostats don’t trigger the HVAC system the instant the room temperature deviates even 0.1°F from the setpoint — that would cause the system to cycle on and off constantly, which is damaging and inefficient. Instead, thermostats use a temperature differential (also called deadband or hysteresis) — typically 1°F on each side of the setpoint — before triggering a run cycle.
This means if your setpoint is 70°F, the system typically won’t call for heat until the room drops to 69°F, and won’t turn off the heat until the room reaches 71°F. This is why you might see your thermostat reading 69°F and your setpoint at 70°F without the heat kicking on immediately — it may be in the deadband zone. Smart thermostats often have tighter differentials (as small as 0.5°F) thanks to more precise sensors.
| Scenario on Display | What It Means | System Action |
|---|---|---|
| Current 68° / Set 70° / Mode: HEAT | Room is below setpoint in heat mode | System should be running (or about to start) |
| Current 72° / Set 70° / Mode: HEAT | Room is above setpoint in heat mode | System idle — heating done, waiting for room to cool |
| Current 75° / Set 72° / Mode: COOL | Room is above setpoint in cool mode | System should be running (or about to start) |
| Current 70° / Set 72° / Mode: COOL | Room is below setpoint in cool mode | System idle — cooling done, waiting for room to warm |
| Current 70° / Set 70° / Any mode | Room is exactly at setpoint | System off (within deadband) or just finishing cycle |
If you notice your current temperature and set temperature are significantly different — say, 5°F or more apart — but the system doesn’t seem to be running, there may be a deeper issue. Our thermostat not reaching set temperature diagnostic flowchart walks through every possible cause step by step.

Google Nest Learning Thermostat (4th Gen) — Clearest Smart Display
Mirror display shows current temp, setpoint, humidity, and system status at a glance. Learns your schedule automatically and shows energy history on your phone.
View on Amazon →Heat, Cool, Auto, Off, and Fan Modes — Decoded
Every thermostat has a mode selector of some kind. On analog thermostats it’s a physical lever. On digital and smart thermostats it’s a button or touchscreen option. Understanding what each mode does — and what the thermostat’s display shows when each mode is active — is essential for reading your thermostat correctly.
HEAT Mode
When your thermostat is set to HEAT, it monitors the current room temperature and sends a signal to your heating system (furnace, boiler, heat pump in heating mode) whenever the room drops below your setpoint. The thermostat display will show HEAT as the active mode. When heating is actively running, you’ll often see an additional indicator — Heat On, a flame icon (🔥), or an illuminated indicator light. When heating is in standby (room is already warm enough), the display shows HEAT mode but no active indicator.
COOL Mode
In COOL mode, the thermostat calls for air conditioning when the room rises above your setpoint. The display shows COOL as the active mode. When the AC is actively running, you’ll see Cool On, a snowflake icon (❄), or an indicator light. One important nuance: when you switch to COOL mode, most thermostats build in a 5-minute delay before allowing the system to start. This protects the compressor from restarting too quickly. If your display shows “Cool On” but you hear nothing, wait 5 minutes before diagnosing a problem.
AUTO Mode (Heat-Cool / Auto-Changeover)
AUTO mode — sometimes labeled Heat-Cool or Auto-Changeover — lets the thermostat automatically switch between heating and cooling based on room temperature, without you manually switching modes seasonally. In AUTO mode, you set both a heat setpoint and a cool setpoint. When the room drops below the heat setpoint, the heat runs; when it rises above the cool setpoint, the AC runs. This is particularly useful in climates with significant temperature swings within a single day.
When reading a thermostat in AUTO mode, you’ll see two set temperatures displayed: a lower number (heat setpoint) and a higher number (cool setpoint). Some thermostats display them simultaneously; others cycle between them on screen. The gap between the two setpoints is called the deadband — in AUTO mode, this is usually required to be at least 3–5°F to prevent the system from rapidly switching between heating and cooling.
OFF Mode
In OFF mode, the thermostat sends no signals to the HVAC system. Nothing runs (unless you have the fan set to ON manually). The display will typically show OFF or simply stop showing an active mode indicator. Off mode does not mean emergency shutoff — it’s a normal operational setting for mild weather when you don’t need heating or cooling.
FAN: AUTO vs. FAN: ON
Separate from the system mode (Heat/Cool/Off) is the fan setting. These are two distinct controls that many people conflate. The fan switch has two positions:
- FAN: AUTO — The blower fan in your air handler or furnace only runs during active heating or cooling cycles. This is the default, energy-efficient setting. The fan stops when the system reaches your setpoint and the cycle ends.
- FAN: ON — The blower fan runs continuously, 24/7, regardless of whether the system is heating or cooling. This increases air circulation and filtration but adds to electricity use (blower motors typically consume 300–750 watts).
On your thermostat’s display, you’ll see FAN AUTO or FAN ON indicated — sometimes as text, sometimes as a fan icon with a small modifier. When the fan is actively running (in either setting), many thermostats show a Fan On indicator or a rotating fan icon.
✅ Benefits of FAN: ON
- More consistent air circulation throughout the home
- Continuous filtration of airborne particles
- Reduces hot and cold spots between rooms
- Useful in allergy seasons
❌ Drawbacks of FAN: ON
- Significantly higher electricity use (300–750W continuously)
- Faster air filter clogging
- Can circulate unconditioned air in mild weather
- Increased wear on blower motor bearings
Thermostat Symbols, Icons, and Indicator Lights — Complete Reference
Modern digital and smart thermostats use a visual language of icons and indicator lights that can feel cryptic at first. Here’s a complete reference guide to every symbol you’re likely to encounter on a thermostat display.
| Symbol / Icon | What It Means | Notes |
|---|---|---|
| ❄ (Snowflake) | Cooling / AC mode active or selected | Solid = mode active; blinking = in delay before starting |
| 🔥 (Flame) | Heating mode active or selected | Some brands use a sun icon instead for heat |
| ☀ (Sun) | Heating mode or “high temperature” indicator | Varies by brand — check manual for confirmation |
| 🌿 (Leaf) | Eco / energy-saving mode (Nest) or Eco+ mode | System is using reduced energy target to save money |
| Fan icon (spinning) | Fan is currently running | May animate or simply light up to indicate fan is on |
| 🔋 (Battery) | Battery status or low battery warning | Flashing battery = replace batteries soon |
| Wi-Fi / Signal bars | Wi-Fi connection status | Only on smart thermostats; bars show signal strength |
| 💧 (Droplet) | Humidity reading or humidifier/dehumidifier status | Shows relative humidity % on premium models |
| ⚠ (Warning triangle) | Error or alert condition | Paired with error code — check manual or app |
| 🔒 (Lock icon) | Keypad lock is active | Temperature adjustments are locked out |
| EM / Em Heat | Emergency Heat mode (heat pumps only) | Bypasses heat pump; uses backup heat element |
| AUX / Aux | Auxiliary heat is active | Heat pump + backup heat running together |
| WAIT / Delay | Compressor delay protection | Normal 5-minute protection after recent shutdown |
| Hold / Perm Hold | Schedule is overridden by a manual hold | Thermostat won’t change temperature automatically |
| Run Schedule | Programmed schedule is active and controlling temp | Normal operating mode for programmable thermostats |
Blinking vs. Solid Indicators
On most thermostats, a blinking symbol or text means something different from a solid one. A blinking Heat On or Cool On usually indicates the compressor protection delay is active — the system wants to run but is waiting the required 5 minutes before starting. Once the delay clears, the indicator becomes solid and the system starts. A blinking warning triangle or error code, however, indicates a real fault condition that needs attention.
Reading a Programmable Thermostat: Schedules, Periods, and Hold Functions
Programmable thermostats add a time dimension to everything you’ve learned so far. They’re designed to automatically change your setpoint throughout the day according to a schedule you’ve programmed. Reading the display on a programmable thermostat means understanding not just what temperature is set right now, but which scheduled period you’re in and how the schedule is structured.
Programming Schedules: 7-Day, 5-2, and 5-1-1
Programmable thermostats come in three main schedule types, and the type affects what you see on the display:
- 7-Day Programming: Each day of the week has its own independent schedule. Maximum flexibility. The display usually shows the current day of the week (Mon, Tue, Wed, etc.) alongside the time and current period. These are the most common type today.
- 5-2 Programming: Monday through Friday share one schedule; Saturday and Sunday share another. Simpler but less flexible. The display shows “WEEKDAY” or “WEEKEND” instead of individual days.
- 5-1-1 Programming: Weekdays share a schedule, Saturday has its own, and Sunday has its own. A middle-ground option for those with predictable weekday routines but variable weekend habits.
The Four Daily Periods
Most programmable thermostats divide each day into four named periods, each with its own temperature setpoint and start time. Reading the display means identifying which period is currently active:
- WAKE: The morning period. The thermostat starts heating or cooling before you get up, so the home is comfortable when you wake. Typically starts 6–7 AM.
- LEAVE (or “Away”): The daytime period when the home is typically empty. The thermostat uses an energy-saving setback temperature. Typically starts 8 AM.
- RETURN (or “Home”): The evening period. The thermostat pre-conditions the home before you return. Typically starts 6 PM.
- SLEEP: The overnight period. Usually a slightly cooler setpoint, as lower temperatures promote better sleep. Typically starts 10 PM.
On the display, you’ll see the current period name alongside the current and set temperatures. Knowing you’re in the LEAVE period explains why your setpoint might be 62°F even though you’re home — the thermostat thinks nobody should be there.
Hold Functions: Temporary Hold and Permanent Hold
The hold functions are where many programmable thermostat users get confused. When you press the Up or Down button on a programmable thermostat to change the temperature manually, the thermostat doesn’t necessarily abandon the schedule permanently. Instead, it enters one of two hold modes:
- Temporary Hold: Your manual temperature adjustment stays in effect until the next scheduled period change, at which point the schedule resumes automatically. The display typically shows “HOLD” or “TEMPORARY HOLD” alongside the temperature you’ve set. This is useful when you’re home during a normally empty period.
- Permanent Hold (or “Hold Indefinitely”): Your manual temperature stays in effect indefinitely, overriding the entire schedule until you actively cancel it. The display shows “PERMANENT HOLD” or “PERM HOLD.” This is useful when you’re away for an extended time and want to lock in a setback temperature.

ecobee SmartThermostat Premium — Best Information-Rich Display
Shows temperature, humidity, air quality, occupancy, and energy usage simultaneously. Remote sensors average readings across multiple rooms for more accurate comfort.
View on Amazon →Reading a Smart Thermostat Display: The Full Visual Language
Smart thermostats represent the most information-dense category of thermostat displays. Where a digital thermostat might show you two numbers and a mode label, a smart thermostat shows you a dashboard — current temperature, humidity, system status, weather, energy usage, occupancy, and more, all simultaneously. Learning to read this display fluently takes a little practice, but the information it provides is genuinely useful.
The Nest Thermostat Display
The Google Nest thermostats are known for their distinctive circular design and minimalist display. The 4th generation Nest uses a mirror-like display that blends into the wall when not in use. Here’s how to read it:
- Center large number: The current room temperature.
- Small number below or inside: The set temperature (your target).
- Display color / glow: The Nest uses color to communicate mode. An orange glow indicates heating is active; a blue glow indicates cooling is active; white or no glow means the system is idle.
- Leaf icon (🌿): Appears when you’ve selected a setpoint that Nest considers energy-efficient based on your home’s patterns. It’s positive reinforcement for energy-saving choices.
- Time: Displayed on screen during idle states.
- Nest app: The full schedule, energy history, and home/away status are visible in the Nest app on your smartphone — much more readable than the thermostat face itself.
The ecobee Display
ecobee thermostats use a square touchscreen with a more explicitly informational layout:
- Large center temperature: Current room temperature (averaged across any connected SmartSensors).
- Set temperature: Shown above or below the current reading, depending on mode.
- Humidity reading: Displayed as a percentage (e.g., 45%) usually in the corner.
- System status bar: Shows whether heating, cooling, fan, or humidifier is actively running.
- Occupancy: The premium model shows occupancy status from its built-in radar sensor.
- Weather icon: Small weather display from your local forecast, usually in a corner.
One thing that distinguishes ecobee from most other smart thermostats: when you use ecobee SmartSensors in multiple rooms, the temperature displayed on the main screen is a weighted average of all the rooms currently set as “participating” in the comfort profile. This means the number on screen may not match the temperature at the thermostat itself — it reflects the comfort of the rooms that matter most in that moment.
Honeywell Home Smart Thermostat Displays
Honeywell Home thermostats (T6 Pro, T9, T10 Pro) use a clean, rectangular LCD with clearly labeled sections. The T9 and T10 Pro also support remote room sensors that provide comfort-based average temperatures. Their displays consistently show: current temperature (large, top-center), set temperature (smaller, below or in corner), mode indicator (Heat/Cool/Off/Auto), fan status, current day and time, and any active hold status.
Reading the Smart Thermostat App Display
For smart thermostats, the physical thermostat display is often just the preview — the full reading experience happens in the app. The smartphone app shows everything the physical display does, plus energy reports, historical temperature graphs, geofencing status, maintenance reminders, and schedule visualizations. If you want to fully understand what your smart thermostat is telling you, spending time in its app is essential. The app’s main screen typically mirrors the physical thermostat’s current reading and setpoint at the top, then offers tabs or scrolling sections for schedule, history, and settings below.
Heat Pump Thermostat Readings: Aux Heat, Em Heat, and Reversing Valve
Heat pump systems add unique settings and indicators to thermostats that can be genuinely confusing if you don’t understand how heat pumps work. This section demystifies every heat-pump-specific reading.
How a Heat Pump Thermostat Differs
Heat pumps can both heat and cool a home by moving heat rather than generating it. In winter, the heat pump extracts heat from outdoor air and moves it inside. In summer, it reverses the process, pumping heat from inside to outside. The thermostat controls this reversal via a wire connected to the outdoor unit’s reversing valve (usually the O or B terminal). Because heat pumps work differently from furnaces, their thermostats have additional settings you won’t find on conventional heating-only systems.
AUX HEAT (Auxiliary Heat)
When your thermostat displays AUX or Aux Heat, it means the backup heating element (usually electric resistance strips inside the air handler) has activated alongside the heat pump. This happens automatically when:
- The outdoor temperature drops below the heat pump’s efficient operating range (typically below 35°F–40°F)
- The room temperature is more than 3–5°F below the setpoint (a “temperature recovery” situation)
- The heat pump alone cannot maintain the setpoint in extremely cold conditions
Seeing Aux Heat occasionally in cold weather is completely normal. Seeing it constantly — especially when temperatures are above 40°F — may indicate your heat pump is undersized, has a refrigerant issue, or has a defrost control problem worth investigating.
EM HEAT (Emergency Heat)
Em Heat (Emergency Heat) is a mode you manually activate. It completely disables the heat pump and runs only the backup electric resistance heat. This exists for situations where the heat pump itself is broken or iced over and needs service. Running Em Heat is very expensive — electric resistance heat is typically 2–3 times more costly to operate than a heat pump. Never leave Em Heat on as a long-term solution. If you’ve switched to Em Heat, call for heat pump service promptly. Your thermostat display will prominently show “EM HEAT” or “EMERGENCY HEAT” when this mode is active, often with an indicator light.
O/B Terminal and Reversing Valve
If you ever look at the wiring behind your heat pump thermostat, you’ll see terminals labeled O and/or B. These connect to the outdoor unit’s reversing valve — the component that switches the heat pump between heating and cooling modes. The O terminal energizes the valve in cooling mode (most common in North America, used by Carrier, Trane, Lennox, Rheem, and most brands). The B terminal energizes the valve in heating mode (used by some older Bosch and Amana/Goodman heat pumps). This distinction matters when replacing a thermostat — wiring a heat pump to the wrong O/B terminal setting causes the system to heat when you want cooling and cool when you want heat. Your thermostat’s display will look normal, but the system will behave backwards — a confusing problem if you don’t know about reversing valves.
| Display Message | What’s Happening | Normal? | Action Needed? |
|---|---|---|---|
| AUX (Aux Heat) | Heat pump + backup heat running together | Yes, in cold weather | Monitor frequency; frequent AUX above 40°F needs attention |
| EM HEAT (Emergency Heat) | Heat pump bypassed; only backup heat running | Only if heat pump broken | Call for service promptly; very expensive to run long-term |
| DEFROST | Heat pump running a defrost cycle (outdoor coil) | Yes, in cold/humid weather | None — a 5–15 min defrost cycle is normal |
| COOL (when you want heat) | Reversing valve wired backward | No | Check O/B setting in thermostat setup menu |
When Your Thermostat Readings Don’t Match Reality
One of the most common complaints homeowners have is a disconnect between what the thermostat says and what they experience. The thermostat reads 72°F but the room feels like 65°F. The system shows “Heat On” but no warm air is blowing. The setpoint is 70°F but the furnace never runs. These discrepancies are frustrating — but they’re almost always explainable and fixable once you know where to look.
Why the Temperature Reading Can Be Wrong
The thermostat measures temperature only at its own location. If it’s poorly placed, the reading will be inaccurate for the rest of the house. Common culprits include:
- Direct sunlight on the thermostat: Even a few minutes of direct sun can drive the reading 5–10°F above actual room temperature.
- Supply vent directly below: Heated or cooled air blowing directly onto the thermostat skews its reading dramatically.
- Exterior wall placement: Thermostats on exterior walls can be influenced by outdoor temperatures through the wall insulation.
- Near a kitchen or fireplace: Heat from cooking or a wood stove creates localized hot spots that the thermostat misreads as the entire home’s temperature.
- Low battery: As batteries weaken, the thermostat’s power supply to the temperature sensor becomes unstable, causing voltage drift and inaccurate readings. This is a surprisingly common cause of seemingly random thermostat misbehavior.
Reading the Thermostat When the System Won’t Run
If your thermostat reads a temperature that should trigger a heating or cooling cycle, but nothing happens, read the display carefully for these clues before calling a technician:
- “WAIT” or blinking indicator: Normal compressor delay. Wait 5 minutes.
- Mode is OFF: The system mode may have been accidentally switched to OFF.
- Hold temperature matches room temperature: A hold may have locked in a temperature that’s already being met.
- Low battery indicator: Weak batteries cause unreliable thermostat operation. Replace immediately.
- Schedule conflict: You may be in a “Leave” schedule period with a setback temperature the room has already met.
For a thorough step-by-step approach, our 10-minute thermostat diagnosis checklist walks you through every scenario methodically.
Calibrating Your Thermostat’s Temperature Reading
If you confirm your thermostat is reading temperature inaccurately (by comparing it to a calibrated thermometer in the same location), most digital and smart thermostats allow a temperature offset calibration — typically adjustable in ±3°F (±2°C) increments through the setup or advanced menu. This doesn’t fix a physical placement problem, but it corrects for minor sensor drift. On Honeywell thermostats, the calibration option is usually found in the Installer Setup menu. On Nest, it’s in Settings → Equipment → Temperature correction. On ecobee, it’s under Main Menu → Settings → Temperature Correction.
When the Display Is Blank or Unresponsive
A blank thermostat display is alarming but usually straightforward to diagnose. The most common causes are:
- Dead batteries: Replace immediately. Even thermostats with C-wire power often use batteries as backup.
- Tripped circuit breaker: Check your electrical panel for a tripped breaker labeled “HVAC,” “Air Handler,” or “Furnace.”
- Tripped furnace switch or disconnect: The power switch near your furnace (looks like a light switch) may have been accidentally switched off.
- Blown fuse on furnace control board: A 3-amp fuse on the furnace’s control board protects the thermostat circuit. If this blows, the thermostat loses power entirely.
If you’ve replaced the batteries, checked the breaker, and verified the power switch — and the display is still blank — it’s time to look more carefully at the wiring and the furnace control board. Our detailed guide on thermostat wiring covers how to safely check connections and identify common wiring faults.

Amazon Smart Thermostat — Best Value Smart Thermostat
Includes a C-wire adapter, large easy-to-read display, and Alexa integration. An excellent first smart thermostat with a clear, simple interface.
View on Amazon →Reading Energy-Saving Thermostat Settings and What They Mean
Many thermostats — particularly smart models — include energy-saving features that affect how the thermostat operates and what it displays. Understanding these settings helps you use them intentionally rather than accidentally fighting against them.
Setback Temperatures: What They Are and Why They Work
A setback temperature is a reduced (or elevated, for cooling) setpoint used when the home is unoccupied or everyone is asleep. The energy savings come from running the HVAC system less during periods when nobody needs a comfortable living space. When your thermostat is in a setback period and displaying a lower temperature setpoint than you’d normally select, that’s intentional — not a malfunction.
The recommended setback for winter heating is 7–10°F below your normal comfort temperature for 8 hours or more per day — enough to noticeably reduce heating bills. For cooling, raising the setpoint by 7–10°F when away yields similar savings. A well-programmed schedule with appropriate setbacks can save 10–15% on annual HVAC energy costs according to Department of Energy data.
Smart Recovery / Early Start
Many programmable and smart thermostats have a feature called Smart Recovery, Adaptive Recovery, Intelligent Start, or Early Start. This feature tracks how long your HVAC system takes to heat or cool your home by the required amount, and begins running the system early — before a scheduled period starts — so the home reaches the target temperature exactly when the period begins, rather than after.
When Smart Recovery is active, your thermostat may start heating or cooling before the scheduled period time, which can look confusing on the display — you see the system running but it seems “early.” The display on some models will show “Smart Recovery” or “Adaptive Recovery” text to explain why the system started early.
Eco Mode, Eco Temperatures, and the Leaf Icon
Smart thermostats often include an Eco or Away mode that uses wider temperature limits — typically a minimum of 40–50°F in winter and a maximum of 76–80°F in summer — to prevent extreme temperatures without running the system much. When the thermostat reads Eco mode on the display, it’s using these wider limits instead of your normal comfort setpoints.
On Nest thermostats, the Eco mode is indicated by the green leaf icon. Ecobee uses an “Eco+” setting that combines geofencing, weather forecasting, and utility pricing data to automatically optimize when and how much to run the system. The ecobee display shows these adjustments as comfort profile changes in the schedule view.
Geofencing and Auto Home/Away
Many smart thermostats can automatically switch between home and away setpoints based on your phone’s location — a feature called geofencing. When geofencing is active and the thermostat detects you’ve left home, it switches to eco/away temperatures without requiring you to manually adjust anything. The display may show “Away” or “Eco” mode, and the smart thermostat’s app typically shows a location indicator confirming why the mode changed. Understanding this reading prevents the frustration of coming home to a cold house and wondering why the thermostat “changed itself.”
| Feature Name | What It Does | Display Indicator |
|---|---|---|
| Setback / Away Temp | Uses reduced target temp when home is empty | Lower set temp + “Away” or “Leave” label |
| Smart Recovery | Starts heating/cooling early to hit temp on time | “Smart Recovery” text or early system activation |
| Eco Mode (Nest) | Wide temperature limits; uses heat/cool sparingly | Leaf icon (🌿) on display |
| Eco+ (ecobee) | Auto-adjusts schedule using weather + utility rates | “Eco+” label in comfort profile section |
| Geofencing / Auto Away | Switches to away setpoint when you leave | “Away” or “Eco” mode; location icon in app |
| Ventilation / Fan Cycling | Runs fan periodically for fresh air exchange | “Ventilation On” or fan icon with timer display |
For a deeper dive into how thermostat schedules and smart learning algorithms compare in real-world energy savings, the comparison of smart vs. programmable thermostats: AI learning vs. schedule efficiency is worth reading alongside this guide.
Reading Thermostat Wiring Terminals: What Each Letter Means
When you remove your thermostat from the wall, you’ll see wires connected to labeled terminals on the back plate. While most homeowners never need to understand these in depth, knowing the terminal labels helps you read compatibility information, understand why your thermostat works the way it does, and diagnose wiring-related issues that affect your display and system behavior.
Thermostat terminals use a standardized letter coding system developed decades ago and still in use today. Here’s what each letter means:
| Terminal | Full Name | Function | Notes |
|---|---|---|---|
| R / Rh | Red / Red Hot | 24V power from furnace transformer | Always required; the power supply wire |
| Rc | Red Cooling | 24V power from AC/cooling transformer | Used in split systems with separate transformers |
| C | Common | Completes 24V circuit back to transformer | Required for smart thermostats; many older homes lack it |
| W / W1 | White / Heat Stage 1 | Calls for first-stage heating | Connects to furnace W terminal |
| W2 | White 2 / Heat Stage 2 | Calls for second-stage heating | Used in 2-stage furnaces; auxiliary heat on heat pumps |
| Y / Y1 | Yellow / Cooling Stage 1 | Calls for first-stage cooling | Activates AC compressor |
| Y2 | Yellow 2 / Cooling Stage 2 | Calls for second-stage cooling | Used in 2-stage AC systems |
| G | Green / Fan | Calls for blower fan to run | Active when FAN: ON is selected or during heating/cooling |
| O | Orange / Reversing Valve (cooling) | Energizes heat pump reversing valve in cool mode | Most common in North America |
| B | Blue / Reversing Valve (heating) | Energizes heat pump reversing valve in heat mode | Less common; used by some older systems |
| E | Emergency Heat | Activates emergency heat on heat pump systems | Bypasses heat pump; runs backup heat only |
| L | Fault / Status | Sends fault signal from heat pump to thermostat | Some thermostats display error codes from this signal |
The C wire (common wire) deserves special mention because it directly affects what your thermostat display can do. Smart thermostats require a steady 24V power supply to maintain their Wi-Fi connection, large color touchscreen, and active sensing capabilities. The C wire provides this continuous power. Thermostats without a C wire must either “power steal” from existing wires (which can cause display dimming, connectivity issues, or HVAC short-cycling) or use battery power (which limits smart features and requires frequent battery replacement). If you notice your smart thermostat’s display frequently dimming or disconnecting, a missing C wire is often the culprit.
Switching Between Celsius and Fahrenheit on Your Thermostat
If your thermostat is displaying temperatures in the wrong unit — Celsius when you expect Fahrenheit, or vice versa — this is a simple configuration setting, not a fault. The process for switching varies by thermostat type.
On most digital and programmable thermostats, the Celsius/Fahrenheit setting is buried in the installer or advanced settings menu. You typically access it by pressing and holding a button combination (often “Up + Down” simultaneously for 5 seconds, or “Mode + Fan” for 3 seconds) to enter the setup mode. Look for a setting labeled “TMP” (temperature unit), “°F/°C,” or “Units.” Toggle it to your preferred unit and exit the menu.
On smart thermostats: Nest’s unit setting is in the thermostat’s Settings menu → Display → Temperature unit. ecobee’s is in Main Menu → Settings → Temperature Unit. Honeywell Home models find it in the installer setup sequence (hold Menu button during startup on some models).
Reading Thermostat Error Codes and Warning Messages
When your thermostat detects a system problem, it communicates this through error codes, warning messages, or unusual display behaviors. Learning to read these messages can save you a service call — or at minimum help you give your HVAC technician useful information before they arrive.
Common Error Codes and Their Meaning
Error codes vary significantly by brand, but several categories of problems are universal:
- Low battery warning: Usually shown as a battery icon, “LO BAT,” or “BATT.” On digital thermostats, replace AA or AAA batteries. On some models, low battery causes display dimming, erratic temperature readings, or relay failure. Always replace batteries at the first warning — don’t wait until the display goes blank.
- Communication error: Smart thermostats show Wi-Fi disconnection (Wi-Fi icon with an X, or “No Internet”) when they lose network connectivity. This affects scheduling, geofencing, and remote access but usually doesn’t prevent the local thermostat from controlling the HVAC directly. Check your router and internet connection.
- Sensor error / Check sensor: Means the thermostat’s internal temperature sensor has failed or become disconnected. The thermostat cannot read room temperature and will not operate normally until the sensor is repaired or the unit is replaced.
- Furnace fault / Equipment fault: Some smart thermostats (particularly ecobee and Honeywell T9/T10) can read fault signals from compatible HVAC equipment and display them on screen. An equipment fault message usually means a fault code is stored on your furnace or air handler’s control board — check the HVAC unit for a flashing LED code sequence.
- Stage fault / Short cycle alert: Some advanced thermostats detect when the HVAC system is short-cycling (starting and stopping too frequently) and display an alert. This usually indicates a refrigerant issue, oversized equipment, or a dirty filter causing overheating and safety shutoff.
Frequently Asked Questions
Most thermostats show two temperature numbers: the set temperature (your desired temperature, also called the setpoint) and the current room temperature. The set temperature is what you’re asking your HVAC to reach; the current temperature is what the thermostat sensor is actually reading right now. When the two numbers match, your system turns off and waits for the room to drift away from the setpoint before cycling on again.
A flashing “Heat On” or “Cool On” message typically indicates a compressor protection delay — usually 5 minutes — that prevents your HVAC from short-cycling after a recent shutdown. This is normal behavior and is not an error. The system is queued to start but waiting for the safety timer to clear. If the message keeps flashing indefinitely (beyond 10 minutes), there may be a wiring, power, or system fault that needs investigation.
The “Auto” fan setting means the fan only runs when the heating or cooling system is actively running a cycle. The “On” setting means the fan runs continuously, regardless of whether the system is heating or cooling. “Auto” is more energy-efficient and is recommended for most households. “On” can improve air circulation and filtration but increases electricity use and causes faster filter clogging.
Em Heat stands for Emergency Heat. This setting appears on heat pump thermostats and activates the secondary (backup) heating system — usually electric resistance strips — bypassing the heat pump entirely. It should only be used when the heat pump is malfunctioning or damaged. Running Em Heat continuously is very expensive, as electric resistance heating is far less efficient than a heat pump. Switch off Em Heat as soon as the heat pump is repaired.
Analog thermostats with no digital display use a rotating dial or pointer. The dial is marked with a temperature scale (typically 50°F to 90°F or 10°C to 32°C). You read your current temperature setting by looking at where the pointer or center marker aligns with the temperature scale. Analog thermostats don’t show current room temperature — they only show the setpoint you’ve dialed in. To read actual room temperature from an analog thermostat, you’ll need a separate thermometer.
A snowflake symbol (❄) represents the cooling/air conditioning mode. A sun symbol (☀) represents the heating mode. When either symbol is solid on your display, it means that mode is currently active and your HVAC system is running. On some thermostats, a blinking snowflake or sun means the system wants to run but is in a protective delay countdown. Some thermostats use these icons as mode selectors you tap to switch between heating and cooling.
This discrepancy usually happens because the thermostat is poorly located — near a heat source, in direct sunlight, near a drafty window, or in a hallway far from the living spaces. The thermostat reads its immediate surroundings, not the whole house. Other causes include a dirty sensor, low battery (which causes voltage drift), or a faulty thermistor inside the thermostat. You can often correct small inaccuracies using the temperature offset calibration feature in the thermostat’s settings menu.
Aux Heat (Auxiliary Heat) activates on heat pump systems when the outdoor temperature is too cold for the heat pump to efficiently meet the setpoint on its own. Unlike Em Heat, Aux Heat runs the heat pump AND the backup heating element simultaneously for a short boost. It switches on automatically and turns off once the heat pump catches up. Occasional Aux Heat is normal in cold weather; frequent activation — especially above 35–40°F — may indicate the heat pump is undersized or has an efficiency problem.
Most thermostats indicate an active call with a lit indicator light, a “Heat On,” “Cool On,” or “Fan On” message, or by displaying a flame or snowflake icon in an illuminated or solid (non-blinking) state. If your system is running but you don’t see any of these indicators, the HVAC system may be running from a direct signal fault or a wiring issue that’s bypassing the thermostat’s control entirely — which is worth investigating.
Yes. Thermostat terminals use standard letter codes: R or Rh (24V power from furnace), Rc (24V power from AC), C (common wire), W or W1 (heat stage 1), W2 (heat stage 2), Y or Y1 (cooling stage 1), Y2 (cooling stage 2), G (fan), and O/B (reversing valve for heat pumps). Understanding these terminals helps you read compatibility requirements and diagnose issues. If your system isn’t responding correctly to thermostat commands, tracing which terminals are wired and comparing to the manufacturer’s wiring diagram is an excellent first diagnostic step.
You Can Read Any Thermostat Now — Here’s What to Do Next
Reading a thermostat fluently is one of those skills that seems trivial until you realize how much it changes your relationship with your home’s comfort and energy use. Once you understand the difference between current temperature and setpoint, know what each mode symbol means, can interpret a programmable schedule, and recognize the indicators that something might be wrong — your thermostat stops being a mystery box and starts being a genuinely useful tool.
The single most impactful thing most homeowners can do after reading this guide is to check whether their thermostat is correctly programmed for their actual schedule. Most programmable and smart thermostats are set up once and never revisited — which means they’re often running default factory schedules that have nothing to do with your real life. Taking 15 minutes to verify and update your schedule (or switch to a smart thermostat that learns your patterns automatically) is one of the highest-return actions you can take for comfort and energy savings.
If you noticed anything unusual while reading your thermostat display today — error codes, persistent holding, a current temperature that’s dramatically different from the setpoint without the system responding — use the diagnostic resources linked throughout this guide to investigate further. Problems caught early are almost always cheaper and simpler to fix than problems left to worsen.
Run the 10-Minute Thermostat Diagnosis →


