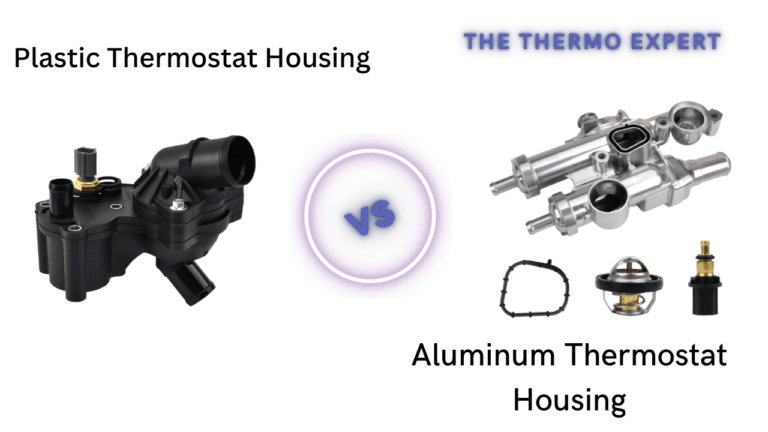
Plastic vs. Aluminum Thermostat Housing: Which One is Better for Your System?
The definitive guide to cooling system upgrades. We analyze thermal stress, longevity, and leak prevention to help you make the right choice.

If you have ever popped the hood of a modern vehicle—be it a BMW, a Jeep Wrangler, or a Ford Explorer—you may have noticed a disturbing trend: plastic engine components. Specifically, the thermostat housing. For decades, metal was the standard, but manufacturers shifted to composites to shave weight and reduce production costs.
However, as these vehicles age, owners are facing a common catastrophe: the dreaded coolant leak. The plastic housing warps, cracks, and fails, often leaving drivers stranded on the side of the highway. This has sparked a fierce debate in the automotive community: Plastic vs. Aluminum Thermostat Housing. Is the aftermarket metal upgrade the savior your engine needs, or is the OEM plastic engineered for a reason?
In this comprehensive comparison, we will strip down the marketing hype and look at the engineering reality. Before we dive in, it is crucial to understand the component itself. You can learn more about what a thermostat does in a car to appreciate why its housing is so critical to your engine’s survival. We will also reference the underlying mechanics of the valve itself, including the wax pellet valve technology that determines how the housing experiences thermal load.
Quick Comparison: Plastic vs. Aluminum
For those in a rush to fix a leak, here is the high-level breakdown of how these two materials stack up against each other.
| Feature | OEM Plastic (Composite) | Aftermarket Aluminum |
|---|---|---|
| Primary Advantage | Thermal insulation & lightweight | Extreme durability & crack resistance |
| Common Failure Mode | Cracking, warping at flanges | Corrosion (if poor coolant used) |
| Lifespan | 40,000 – 80,000 miles | Life of the vehicle (typically) |
| Cost | Low to Moderate | Moderate to High |
| Heat Transfer | Low (Insulator) | High (Conductor) |
| Seal Reliability | Degrades over time | Superior rigidity |
The Engineering Science Behind Thermostat Housing Materials
To make an informed buying decision, you need to look past surface-level marketing and understand the fundamental material science at play. The choice between plastic and aluminum is not arbitrary—it involves trade-offs across thermal expansion, tensile strength, fatigue resistance, and chemical compatibility. Let’s break down what actually happens at the molecular level when a housing is subjected to years of engine heat cycles.
What Modern Plastic Housings Are Really Made Of
The term “plastic” is a massive oversimplification. The thermostat housing on your modern car is not the same material as a Tupperware container. It is engineered polymer—usually a glass-fiber reinforced polyamide. The most common formulation is PA66-GF30, which translates to Polyamide 6/6 (Nylon 6/6) reinforced with 30 percent short glass fibers by weight. Some manufacturers, particularly European ones, use PA66-GF35 or PA6-GF50 for higher stress applications.
Pure nylon would melt or deform under coolant temperatures of 230°F or higher. The glass fiber reinforcement gives the polymer dimensional stability, increased tensile strength (around 25,000 psi), and a heat deflection temperature that exceeds 480°F under no load. These specifications look impressive on a manufacturer’s data sheet. The problem is that data sheets show new material under controlled conditions—they do not reflect what happens after seven years of exposure to ethylene glycol, octane combustion vapors, and cyclic loading.
Glass-reinforced nylon undergoes a process called hydrolysis when exposed to hot coolant for extended periods. Water molecules in the coolant slowly break down the polyamide chains. The matrix between the glass fibers degrades first, leaving fibers exposed and creating microcracks. Over time, these microcracks coalesce into the visible whitish stress lines that experienced mechanics recognize as the early warning sign of imminent housing failure.
Aluminum Alloys Used in Aftermarket Housings
On the metal side, not all aluminum is created equal. The two dominant alloys you will encounter are A356 (cast aluminum) and 6061-T6 (billet aluminum). A356 is a sand-cast or permanent-mold-cast aluminum-silicon-magnesium alloy that is heat-treatable. It contains roughly 7 percent silicon, which improves fluidity during casting and reduces shrinkage. After T6 heat treatment, A356 develops a tensile strength around 33,000 psi—significantly stronger than glass-filled nylon.
Billet 6061-T6 is a wrought alloy machined from a solid block of extruded or rolled aluminum. It contains magnesium and silicon as the primary alloying elements. After T6 tempering, it reaches roughly 45,000 psi tensile strength. Billet housings are CNC-machined rather than cast, which eliminates porosity and produces tighter dimensional tolerances. They are also significantly more expensive due to the labor and material waste involved in machining.
A third option is forged aluminum, sometimes seen on premium racing housings. Forging compresses the grain structure of the aluminum, producing a part that is stronger than cast and free of internal voids. Forged housings are rare in the consumer market because the tooling costs are prohibitive for low-volume aftermarket parts.
Thermal Expansion Coefficients: The Hidden Killer
One of the most overlooked factors in the plastic versus aluminum debate is the coefficient of thermal expansion (CTE). This number tells you how much a material grows when heated. Cast iron engine blocks have a CTE of approximately 11 micrometers per meter per degree Celsius. Aluminum alloys have a CTE of about 23 micrometers per meter per degree Celsius—roughly twice that of iron. Glass-filled nylon has a CTE of around 30 to 50 micrometers per meter per degree Celsius depending on direction (it is anisotropic), making it three to five times more expansive than iron.
What does this mean in practice? When a plastic housing bolts to an iron engine block, the housing expands far more than the block as the engine warms up. The bolts holding the housing in place must absorb this differential expansion, putting cyclic shear stress on the plastic flange. After thousands of warm-up and cool-down cycles, the plastic suffers fatigue at the bolt-hole bosses. This is why so many plastic failures occur right at the bolt-hole flange, not in the bulk of the housing.
An aluminum housing on an iron block also experiences differential expansion, but the magnitude is smaller and aluminum has far better fatigue resistance than nylon. On all-aluminum engines (common in modern designs), an aluminum housing matches the block’s expansion almost exactly, dramatically reducing fatigue stress.
The Truth About Plastic (Composite) Housings
Why Do Manufacturers Use Plastic?
It is easy to blame “cost-cutting” for the prevalence of plastic parts, and while cost is a factor, it isn’t the only one. Modern thermostat housings are made from high-grade thermoplastics, usually glass-fiber reinforced Nylon 66 (PA66-GF30). This material is chosen for specific engineering reasons:
- Thermal Insulation: Plastic does not conduct heat well. This means the coolant stays hotter inside the housing and doesn’t soak up as much radiant heat from the engine block before entering the radiator.
- Smooth Internal Surfaces: Injection molding creates incredibly smooth internal passages, which reduces fluid turbulence and improves flow efficiency compared to rough sand-cast aluminum.
- Corrosion Resistance: Plastic will never rust. In cooling systems where owners might neglect coolant flushes, plastic is immune to the electrolysis that eats away at metal.
- Weight Reduction: A typical plastic housing weighs 200-400 grams less than its aluminum equivalent. Across an entire vehicle, every gram counts toward fuel economy and emissions ratings.
- Manufacturing Speed: Injection molding cycles take 30-90 seconds per part, versus several minutes per casting. This dramatically lowers per-unit cost in high-volume production.
- Complex Geometry: Plastic can be molded into intricate shapes with integrated brackets, sensor bosses, and hose ports that would require multi-step machining if done in metal.
The Fatal Flaw: Thermal Cycling
Despite these benefits, plastic has an Achilles’ heel: thermal cycling. Every time you drive, the housing heats up to operating temperature (often 195°F to 220°F) and then cools down. Over years, this expansion and contraction make the plastic brittle. Eventually, the flange—where the housing bolts to the engine—warps. Once it warps, the gasket can no longer seal, leading to leaks.
If you suspect your housing is already failing, check our guide on how to tell if a car thermostat is bad to distinguish between a stuck valve and a leaking housing. Understanding the difference between a stuck-open versus stuck-closed thermostat is also critical, because each presents differently and a leaking housing can mask either symptom.

Standard OEM Replacement Housing
If you prefer sticking to factory specs, ensure you buy high-quality OEM replacements like ACDelco or Mahle.
Check Price on AmazonThe Anatomy of a Plastic Housing Failure
Mechanics who have replaced hundreds of plastic thermostat housings recognize a consistent failure progression. Understanding this progression can help you catch a failing housing before it strands you on the side of the highway with a 240°F engine.
Stage 1: Polymer Embrittlement (40,000 to 60,000 miles)
In the first stage, the housing looks completely normal from the outside. Internally, however, the polymer matrix is beginning to lose flexibility. Heat exposure has volatilized some of the plasticizers and stabilizers in the original formulation. A new housing flexes slightly under bolt torque; an embrittled one transmits force more rigidly to the bolt-hole bosses.
You cannot see this stage with the naked eye, but you can feel it during routine maintenance. Mechanics replacing nearby components sometimes notice that the housing has lost its slight “give” when wiggled. This stage rarely causes leaks but sets the stage for the next phase.
Stage 2: Microcracking and Stress Whitening (60,000 to 90,000 miles)
This is the stage at which DIY mechanics start spotting trouble. Faint white lines appear at the bolt-hole bosses, around hose nipples, and along the parting line where the two halves of the injection mold meet. These stress whitening marks are the visible evidence of microcracks propagating through the polymer.
At this stage, you may notice a faint coolant residue near the housing—often described as a crusty, dried-up green or pink film—even though no active drip is visible. The system is weeping coolant slowly through hairline cracks. Pressure-testing the cooling system at this stage will often reveal a slow pressure drop. If the cooling system loses pressure, the boiling point of the coolant drops and the chance of a hotspot in the cylinder head increases.
Stage 3: Active Leakage (typically 80,000 to 120,000 miles)
The third stage is when most owners finally take action because they see fluid pooling under the car. By this point, the housing has either developed a through-crack or warped enough that the gasket can no longer maintain a seal. Common active-leak symptoms include:
- Visible drips on the garage floor under the front of the engine
- A sweet maple-syrup odor from the engine bay after a hot drive
- The coolant reservoir level dropping perceptibly between fill-ups
- Steam visible from under the hood at idle
- The temperature gauge fluctuating because air is being drawn into the system
Stage 4: Catastrophic Failure
If a leak is ignored long enough, the housing can split outright. This typically happens during a hot soak after shutdown, when residual heat causes the coolant to boil locally and expand against an already-weakened wall. The driver returns to a parking lot puddle of coolant and an engine that will not run more than a few miles before overheating. In the worst cases, the engine has already overheated catastrophically, warping the cylinder head and requiring a head gasket replacement or even an engine rebuild.
⚠️ Critical Warning
Once you see stress whitening or any coolant residue around your plastic housing, the clock is ticking. The progression from Stage 2 to Stage 4 can take years, but it can also happen in a single hot summer week of stop-and-go traffic. If you are considering whether to upgrade now or wait, the math almost always favors replacement before catastrophic failure.
The Upgrade: Why Switch to Aluminum?
Enter the aftermarket solution: Cast Aluminum or Billet Aluminum housings. These parts are designed to address the structural weaknesses of the factory plastic units.
Durability and Rigidity
The primary argument for aluminum is simple physics. Aluminum has a much higher tensile strength than plastic. It does not become brittle with heat exposure. An aluminum housing installed today will likely maintain its structural integrity for 15 or 20 years. Crucially, the mating surface (flange) is far less likely to warp, ensuring the gasket seal remains tight indefinitely.
The Heat Dissipation Factor
Aluminum acts as a heat sink. While plastic insulates, aluminum radiates heat. In high-performance applications or towing scenarios, this can be beneficial as it helps dissipate a tiny fraction of heat from the coolant. However, this also means the housing itself gets extremely hot to the touch, unlike plastic covers.
Potential Downsides
It isn’t all perfect. Aluminum housings are often sand-cast, which can leave rougher internal surfaces than molded plastic. Poor casting quality can lead to porosity (tiny leaks through the metal itself) in very cheap aftermarket parts. Furthermore, if you mix incompatible metals or use old coolant, you risk galvanic corrosion.
Choosing the right thermostat temperature is also vital when upgrading. If you are modifying your system, you might be considering a 160°F thermostat versus a 180°F unit. Lower temps put less thermal stress on the engine, but they also carry sludge and open-loop fuel-mapping risks. Aluminum can handle the heat of a 195°F thermostat versus a 180°F without breaking a sweat, and the higher temperature actually reduces engine wear and fuel-economy losses on most modern engines.

Top Rated Aluminum Upgrade Kit
This kit replaces the breakage-prone plastic housing with durable cast aluminum. Includes gaskets and bolts.
Check Price on AmazonAluminum Housing Manufacturing: Cast vs. Billet vs. Forged
When shopping for an aluminum thermostat housing upgrade, you will see three primary manufacturing descriptions. The price difference between them can be substantial, and understanding what you are paying for will help you decide whether the premium options are worth the cost.
Sand Cast Aluminum
Sand casting is the oldest and most affordable manufacturing method. Molten aluminum (typically A356 alloy) is poured into a sand mold and allowed to solidify. Once cooled, the casting is broken out, machined for sealing surfaces and bolt holes, and finished. The advantages are low tooling cost, the ability to produce complex geometries, and short lead times for low-volume production.
The disadvantages are surface finish and porosity. Sand-cast surfaces are visibly rough—sometimes you can see the grain of the sand mold in the finished part. More importantly, casting can trap microscopic gas bubbles in the metal, creating porosity that can leak under pressure. Reputable manufacturers use degassing processes and post-cast machining to minimize this, but very cheap imports often skip these steps.
Permanent Mold (Gravity Die) Cast Aluminum
Permanent mold casting uses reusable metal molds instead of single-use sand molds. The result is a tighter dimensional tolerance, a smoother surface finish, and reduced porosity. Permanent mold castings are typically about 20 to 40 percent more expensive than equivalent sand castings but offer significantly better quality. Many higher-end aftermarket housings from brands like Dorman OE Solutions and Mishimoto use permanent mold casting.
Billet (CNC Machined) Aluminum
Billet refers to parts machined from solid bar stock or plate. There is no casting involved—a CNC mill removes material from a solid block of 6061-T6 or 7075-T6 aluminum until the finished part emerges. Billet housings have zero porosity, perfect dimensional accuracy, and a beautiful machined finish. They are also significantly stronger than cast parts.
The downside is cost. Billet housings can cost two to four times what a cast housing costs because of the machine time and material waste involved. They are most popular in motorsports applications, high-end JDM tuner cars, and luxury enthusiast restorations. For most street vehicles, a quality cast housing is plenty robust and saves you considerable money.
Forged Aluminum
Forging compresses heated aluminum billet between dies under tremendous pressure, aligning the grain structure for maximum strength. Forged thermostat housings are rare in the aftermarket because the tooling required to forge the complex internal geometry is prohibitively expensive for low-volume production. When you do see forged housings, they are usually for racing applications and command premium prices.
How to Spot Quality in an Aluminum Housing
Whether cast or billet, look for the following quality indicators when shopping:
- Smooth, flat sealing surfaces: Run your fingernail across the gasket flange. It should feel uniform with no pits, ridges, or dimples.
- Properly threaded bolt holes: The threads should be clean, with no chips or burrs.
- Heli-coil or threaded inserts: Premium housings use stainless steel inserts in bolt holes to prevent thread stripping during reinstallation.
- Anodized or powder-coated finish: A protective coating helps prevent oxidation and gives the part a more durable cosmetic appearance.
- Pressure-tested certification: The best manufacturers pressure-test every housing before shipment and stamp it with a serial number.
Vehicle-Specific Failure Patterns: Brand by Brand Analysis
Not every vehicle has equally bad plastic housings. Some manufacturers and engine families are notorious for early failure, while others rarely have problems. If you own one of these, an aluminum upgrade is essentially mandatory if you intend to keep the vehicle past 100,000 miles.
BMW: The Cooling System Time Bomb
Few manufacturers have a worse reputation for plastic cooling components than BMW. The N52 inline-six engine, used in the 3-Series and 5-Series from roughly 2006 to 2013, is infamous for plastic thermostat housings that crack between 60,000 and 90,000 miles. The N20 four-cylinder turbo, used in the 328i and 528i from 2012 to 2017, suffers similar issues, often paired with cracked plastic water pumps.
The newer B58 inline-six (introduced in 2015) and B48 four-cylinder are no better. BMW continues to use plastic for cooling components despite the well-documented failure patterns. Aftermarket aluminum housings for these engines are widely available from manufacturers like CSF, Wagner Tuning, and BimmerWorld. For BMW owners, the question is generally not “if” but “when” to upgrade.
Jeep 3.6L Pentastar
The Pentastar V6, used in Wranglers, Grand Cherokees, and Chrysler 300s from 2011 onward, has a complex plastic intake manifold that integrates the thermostat housing. When the housing portion fails, the entire intake assembly often must be replaced if you stay with OEM parts. Aftermarket aluminum housing kits from Dorman and others let you replace just the housing portion, saving hundreds of dollars.
Pentastar housings typically fail between 80,000 and 130,000 miles. The failure mode is usually cracking at the upper hose connection, leading to a slow leak that gradually worsens. Owners report that the plastic becomes visibly discolored before failure, going from a deep gray to a chalky lighter shade.
Ford Triton and EcoBoost Engines
Ford’s 5.4L Triton V8 and the more recent 3.5L EcoBoost V6 both use plastic thermostat housings prone to failure between 90,000 and 140,000 miles. The 5.4L is particularly notorious because the housing is buried under a complex air intake assembly, making replacement labor-intensive. Many Ford technicians estimate three to four hours of labor for a thermostat housing replacement on these engines.
The EcoBoost variants suffer additionally because they run higher cylinder pressures and operating temperatures than naturally aspirated engines, accelerating polymer degradation. Aluminum upgrade kits for these platforms are available from Ford Performance and several aftermarket suppliers.
GM 3.6L LFX/LLT V6
GM’s 3.6L V6, found in everything from the Camaro to the Acadia and Equinox, has a plastic thermostat housing that fails consistently around the 100,000-mile mark. The housing on these engines is integrated into the front cover, making replacement somewhat involved but not as bad as the Ford Triton. Failure typically presents as a small drip from the front of the engine that progressively worsens.
Chrysler 2.7L V6
The Chrysler 2.7L V6 is one of the worst offenders for thermostat housing failures. These engines, used in the Sebring, Stratus, Intrepid, and Concorde from the late 1990s through the mid-2000s, have plastic housings that often fail under 80,000 miles. The 2.7L is also prone to engine sludge issues, which can be exacerbated by cooling system problems caused by housing leaks.
Volkswagen and Audi
The VW/Audi 2.0T TSI and TFSI engines, common in the GTI, Jetta, A4, and A3, use plastic thermostat housings integrated into the cylinder head. Failures typically occur between 70,000 and 110,000 miles. The good news is that aftermarket aluminum housings are abundant for these engines, often paired with upgraded coolant flanges and water pump kits to address all the cooling system weak points at once.
Toyota and Honda: The Exception
Notably, Toyota and Honda have largely avoided plastic thermostat housing failures. Most of their engines use aluminum housings or simple aluminum thermostat covers from the factory. This is one reason these brands enjoy such strong reliability reputations. If you are coming to thermostat housing concerns from a Toyota or Honda background, you may not understand the urgency until you experience a BMW or Pentastar failure firsthand.
💡 Owner Tip
If you own one of the vehicles above and are approaching the typical failure mileage, consider proactive replacement. Doing the job on your schedule with new parts in the garage is dramatically cheaper than doing it on the shoulder of an interstate at 2:00 AM. Pair it with a fresh coolant flush and a new thermostat for maximum benefit.
Head-to-Head: Detailed Performance Analysis
1. Leak Resistance
Winner: Aluminum.
The number one reason for thermostat housing failure is a leak at the seam. Plastic housings warp imperceptibly over time, lifting the seal away from the engine block. Aluminum is rigid. Once torqued down to spec, it stays flat. As long as you use a high-quality gasket, an aluminum housing solves the chronic leaking issues seen in vehicles like the Jeep Wrangler JK or the Ford 4.0L SOHC engines.
2. Cost Effectiveness
Winner: Tie (Dependent on Timeframe).
In the short term, a plastic replacement is usually 20-30% cheaper than a quality aluminum upgrade. However, if you plan to keep the car for another 5 years, the plastic one will likely fail again. The aluminum housing is a “one-and-done” fix, making it cheaper in the long run when you factor in the cost of coolant and labor for a second repair.
3. Installation Ease
Winner: Plastic (OEM).
OEM plastic housings are manufactured to incredibly tight tolerances. They almost always fit perfectly. Aftermarket aluminum housings can sometimes have casting flaws where bolt holes don’t align perfectly, or the surface requires light sanding to ensure it is perfectly flat. While high-end aluminum parts fit well, cheaper ones can be a headache to install.
4. Heat Cycling Endurance
Winner: Aluminum.
A typical engine experiences roughly 4,000 to 8,000 heat cycles per year (depending on driving habits). Plastic housings show measurable degradation after about 30,000 cycles. Aluminum housings show essentially zero degradation across hundreds of thousands of cycles—their fatigue limit far exceeds the stresses encountered in normal cooling system operation.
5. Vibration Resistance
Winner: Aluminum.
Engines vibrate constantly, and these vibrations transmit through every bolted-on component. Plastic absorbs some vibration through internal damping, which is generally good. However, embrittled plastic transmits vibration to bolt-hole bosses where stress concentrates and cracks initiate. Aluminum is stiffer and transmits vibration more uniformly, distributing stress without concentration points.
6. Repairability
Winner: Aluminum.
A leaking plastic housing must be replaced—you cannot reasonably repair a cracked polymer in a moving cooling system. A leaking aluminum housing, in many cases, can be repaired by re-tapping a stripped bolt hole, lapping a warped sealing surface flat, or even welding a porosity leak. A quality aluminum housing is essentially a permanent component you can service rather than dispose of.
7. Aesthetics
Winner: Aluminum.
This is subjective, but most enthusiasts agree that a polished or anodized aluminum housing looks dramatically better than a black plastic OEM unit. For show cars and engine bay builds, aluminum is the only acceptable choice. Many aftermarket aluminum housings come in colors—red, blue, polished, raw, anodized—to match other engine bay components.
The Complete DIY Thermostat Housing Replacement Guide
Replacing a thermostat housing is one of the more accessible engine repairs for a determined DIY owner, but it is not without pitfalls. The job typically takes two to four hours depending on engine accessibility, costs $20 to $200 in parts depending on whether you choose plastic or aluminum, and saves you between $300 and $900 in labor compared to a dealership visit. Here is the complete process from start to finish.
Tools You Will Need
- Socket set, both metric and standard (most modern cars are metric)
- Torque wrench accurate in the 5 to 25 ft-lb range (housing bolts are typically light-torque)
- Drain pan with at least 2.5-gallon capacity for coolant catch
- Flathead screwdriver or pick set for hose clamp removal
- Plastic scraper (never metal—you can scratch sealing surfaces)
- Brake cleaner or similar non-residue solvent for cleaning sealing surfaces
- Shop towels or paper rags
- Latex or nitrile gloves (coolant is toxic and absorbs through skin)
- Funnel for refilling coolant
- Coolant pressure tester (highly recommended for testing the new installation)
- Optional: thread-locking compound for bolts that came with it from the factory
Parts Checklist
Do not start the job without all of the following on hand. Returning to the auto parts store with the car partially disassembled is one of the fastest ways to ruin a Saturday:
- New thermostat housing (plastic OEM or aluminum upgrade)
- New thermostat (always replace at the same time—it is much cheaper to do now than later)
- New gasket or O-ring matched to the housing (often included with the housing kit)
- New bolts if the originals show corrosion or thread damage (some OEM bolts are torque-to-yield and should not be reused)
- Fresh coolant matching your vehicle’s specification (do not mix coolant types)
- Distilled water if your coolant is sold as concentrate rather than pre-mixed
Step 1: Allow the Engine to Cool Completely
This sounds obvious but bears emphasis. A pressurized cooling system can spray scalding coolant several feet when opened. Wait at least four hours after the last drive—overnight is ideal. Verify the engine is cool by carefully touching the upper radiator hose. If it is warmer than ambient, wait longer.
Step 2: Drain the Coolant
Locate the radiator drain petcock (usually a plastic valve at the bottom corner of the radiator). Place your drain pan beneath it, open the petcock, and let the coolant drain. Some vehicles also have a block drain plug for a more complete drain. While the coolant is draining, also remove the radiator cap to allow air in—this speeds the drain considerably.
Step 3: Remove Surrounding Components
Depending on your vehicle, you may need to remove an engine cover, air intake tubing, throttle body cables, sensors, or other components blocking access to the housing. Take photos as you disassemble so you remember how things go back together. Bag and label fasteners by location.
Step 4: Remove Coolant Hoses
Carefully release hose clamps and pull the upper radiator hose, bypass hose, and any heater hoses away from the housing. If hoses are stuck on the nipples (common after years of heat), twist them gently to break the seal. Never use a knife to cut a hose unless you are replacing it—accidental nipple damage on a brand-new housing is heartbreaking.
Step 5: Remove Housing Bolts
Loosen housing bolts in a star or cross pattern, working from the outside in. Most housings have two to four bolts. The bolts are often longer than they appear and may have washers or collars—keep track of orientation.
Step 6: Carefully Pry the Housing Free
The housing will likely be stuck to the engine via dried gasket material or sealant. Use a plastic scraper to gently work it free. Never pry against an aluminum sealing surface with a metal tool—you can leave gouges that will leak. If the housing is truly stuck, tap it sideways with a soft mallet to break the seal.
Step 7: Clean the Sealing Surfaces
This is the step where most DIY installs go wrong. Both the engine block sealing surface and the new housing’s sealing surface must be perfectly clean and free of old gasket material. Use a plastic scraper followed by brake cleaner. Inspect the engine block surface for nicks, scratches, or warpage. Minor imperfections can be polished with very fine sandpaper backed by a flat surface; major damage may require machine shop work.
Step 8: Install the New Thermostat and Gasket
Drop the new thermostat into its seat with the spring side facing the engine (this is universal for almost all designs). Verify the orientation matches the old thermostat. Place the new gasket dry on the engine—do not use sealant unless the manufacturer specifically calls for it, which is rare with modern designs.
Step 9: Install the Housing and Torque Bolts
Set the new housing in place and start all bolts by hand to ensure no cross-threading. Then torque the bolts in a star pattern in two passes: first to 50 percent of the final spec, then to full spec. Typical torque values are 89 to 106 inch-pounds (roughly 7 to 9 ft-lbs) for housing bolts—much lower than most owners think. Over-torqueing is the leading cause of new aluminum housing leaks, paradoxically.
⚠️ Torque Warning
If you do not own a torque wrench accurate at low values, buy one before this job. “Tight enough” by feel is almost always too tight on housing bolts. Over-torqueing crushes the gasket, distorts the housing, and can strip threads in the engine block—an extremely expensive mistake.
Step 10: Reconnect Hoses and Refill
Reattach all hoses and tighten clamps to spec (typically just snug—not gorilla tight). Reinstall any components you removed for access. Refill the cooling system with fresh coolant mixed to manufacturer specification (typically 50/50 with distilled water, but check your owner’s manual).
Step 11: Bleed the System
Air pockets in a cooling system cause hot spots and false overheating readings. Most modern vehicles have a specific bleed procedure. Generally, you start the engine with the radiator cap off, set the heater to maximum hot, and let the engine warm to operating temperature while watching the coolant level. Top up as the level drops. Some vehicles have dedicated bleed screws on the highest points of the cooling system; consult your service manual.
Step 12: Pressure Test and Verify
If you own a coolant pressure tester, pump the system to its rated pressure (usually 13 to 18 psi) and watch for any drops over 15 minutes. No pressure drop means you have a good seal. Drive the vehicle for a few short trips, monitoring the temperature gauge and checking under the hood after each drive for fresh coolant traces.
Coolant Chemistry and Material Compatibility
One of the most overlooked aspects of switching to an aluminum thermostat housing is coolant chemistry. The wrong coolant can dramatically reduce the life of an aluminum housing through corrosion, while the right coolant can keep it pristine for decades. This section explains the major coolant types and their interaction with both plastic and aluminum housings.
The Three Main Coolant Chemistries
IAT (Inorganic Additive Technology): This is the traditional green coolant, used in most American vehicles before about 1996. It contains silicates and phosphates as corrosion inhibitors. IAT has the shortest service life (typically two years or 30,000 miles) and is generally not recommended for newer aluminum-heavy cooling systems.
OAT (Organic Acid Technology): This is the modern long-life coolant used in most GM and Volkswagen vehicles. It uses organic acids like 2-EHA (2-ethylhexanoic acid) for corrosion protection. OAT has a five-year or 150,000-mile service life. It is excellent for aluminum components but should never be mixed with IAT or HOAT coolants.
HOAT (Hybrid Organic Acid Technology): A hybrid that uses some silicates plus organic acids. Common in Ford, Chrysler, and many European vehicles. HOAT offers good aluminum protection with quicker initial corrosion shielding. It has a five-year service life similar to OAT.
Galvanic Corrosion: The Hidden Risk
Galvanic corrosion occurs when two dissimilar metals are in electrical contact in the presence of an electrolyte. Coolant, especially when degraded, becomes an electrolyte. If your engine block is iron, your cylinder head is aluminum, your radiator is brass, and your new thermostat housing is aluminum, you have at least three different metals in the system. Without proper inhibitors in the coolant, the most “anodic” metal will sacrifice itself to protect the others—often the aluminum thermostat housing.
This is why coolant change intervals matter. A fresh coolant has active inhibitors that suppress galvanic activity. Old, worn-out coolant has depleted inhibitors and becomes increasingly conductive over time. A neglected cooling system can corrode an aluminum housing in three to five years, while a properly maintained system will preserve it indefinitely.
The “Universal” Coolant Myth
Many auto parts stores sell “universal” or “all makes/models” coolants that claim to be compatible with any system. While these coolants will not destroy your engine immediately, they generally provide weaker corrosion protection than a coolant specifically formulated for your vehicle’s metallurgy. For an aluminum housing upgrade, always use the coolant specified in your owner’s manual unless a knowledgeable shop recommends otherwise.
Distilled Water: Non-Negotiable
If you mix your own coolant from concentrate, use only distilled water. Tap water contains dissolved minerals (calcium, magnesium, chlorides) that promote scale formation and accelerate corrosion. Distilled water is cheap—usually under two dollars per gallon at any grocery store. There is no excuse to use tap water in a modern cooling system.
The Role of Sacrificial Anodes
Some premium aluminum housings include a small zinc or magnesium sacrificial anode inserted into a port. The anode is more anodic than aluminum, so it corrodes preferentially, protecting the housing. These anodes need replacement every two to four years but can dramatically extend housing life in fleet vehicles or commercial applications. They are uncommon in passenger car applications but worth considering for trucks and high-mileage daily drivers.
Coolant Change Schedule for Aluminum-Equipped Systems
- OAT coolant: Every 5 years or 150,000 miles, whichever comes first
- HOAT coolant: Every 5 years or 150,000 miles
- IAT coolant: Every 2 years or 30,000 miles (consider upgrading the system to OAT/HOAT if your vehicle’s metallurgy supports it)
- After installing an aluminum housing: Always perform a fresh coolant flush regardless of when you last changed it
Routinely test coolant pH every year. A reading below 7.5 indicates degraded inhibitors and an immediate flush is needed even if the calendar says you have time remaining.
Gasket and O-Ring Selection: The Component That Makes or Breaks the Job
You can install the most expensive billet aluminum housing on the market, but if you cheap out on the gasket, you will have leaks. The gasket is what creates the actual seal—the housing simply provides the rigid clamping surface. Understanding gasket types will help you choose the right sealing solution for your application.
Paper Composite Gaskets
Traditional paper or fiber composite gaskets are common on older vehicles. They consist of layers of cellulose or aramid fibers compressed together, often with rubber or graphite impregnation. They seal by deforming slightly under bolt clamping force. Paper gaskets are inexpensive (often under $5) but have a finite lifespan—they harden, dry out, and develop set after years of service.
Paper gaskets work fine with both plastic and aluminum housings, but they require careful surface prep. Any nicks or dings in the sealing surface will defeat them. Many enthusiasts also apply a thin film of high-temperature gasket sealant on paper gaskets, though this is generally not necessary with quality gaskets and clean surfaces.
Rubber O-Rings
Most modern thermostat housings use a molded rubber O-ring rather than a flat gasket. O-rings sit in a groove machined into the housing and seal by being compressed slightly when the housing is bolted down. The advantages are reusability (rubber returns to its original shape), excellent sealing in dynamic temperature environments, and no need for sealants.
O-rings are typically made from silicone, EPDM, or fluorocarbon (Viton). For coolant applications, silicone and EPDM are most common. Always replace the O-ring when removing the housing—even an O-ring that looks fine has likely taken a permanent set in the groove and may not seal reliably if reinstalled.
Multi-Layer Steel (MLS) Gaskets
Some performance applications use MLS gaskets borrowed from cylinder head technology. These consist of multiple layers of stainless steel with embossed sealing beads. MLS gaskets are extremely durable and handle high temperatures and pressures well. However, they require near-perfect sealing surfaces—any imperfection will leak. They are overkill for most thermostat housing applications but ideal for heavily modified or boosted engines.
Form-In-Place (FIPG) Sealant
Some manufacturers, particularly Toyota, use form-in-place gasket sealant instead of a discrete gasket. The sealant is applied as a bead, and the housing is installed while it is still wet. The sealant cures into a custom-fit gasket. FIPG offers excellent sealing on irregular surfaces but requires careful application. Use only the specific FIPG product called out in your service manual—different formulations have different cure times and chemistries.
What Not to Do
- Do not use silicone bathroom caulk or general-purpose RTV. These contain acetic acid that corrodes aluminum and contaminates coolant.
- Do not double up on gaskets to fix a fitment problem. The right answer is a new housing or proper resurfacing.
- Do not reuse old gaskets even if they “look fine.” The cost of a new gasket is trivial compared to the labor of a redo.
- Do not over-tighten bolts to “guarantee” a seal. Crushed gaskets do not seal better—they seal worse.
True Cost of Ownership Analysis: Plastic vs. Aluminum Over 10 Years
The sticker price of a thermostat housing is only part of the story. To make a sound financial decision, you need to look at the total cost of ownership over the time you plan to keep the vehicle. Let us walk through a realistic 10-year cost comparison for a typical vehicle that originally came with a plastic thermostat housing.
Scenario A: Stick with Plastic, Replace as Needed
Year 0 (vehicle is 5 years old, 75,000 miles): Original housing leaks. You replace with OEM plastic.
- OEM plastic housing: $45 to $90
- New thermostat: $25 to $50
- New gasket: $8 to $20
- Coolant (2 gallons): $30 to $50
- Labor (DIY): $0 / Shop: $250 to $450
- Total Year 0 (DIY): $108 to $210
- Total Year 0 (Shop): $358 to $660
Year 6 (vehicle is 11 years old, 145,000 miles): Replacement plastic housing fails again. Repeat the process at higher labor rates due to inflation.
- OEM plastic housing (with inflation): $55 to $110
- New thermostat: $30 to $60
- New gasket: $10 to $25
- Coolant: $35 to $60
- Labor (Shop): $300 to $550
- Total Year 6 (DIY): $130 to $255
- Total Year 6 (Shop): $430 to $805
10-Year Plastic Total (DIY): $238 to $465
10-Year Plastic Total (Shop): $788 to $1,465
Scenario B: Upgrade to Aluminum at Year 0
- Quality aluminum housing kit: $90 to $200
- New thermostat: $25 to $50
- New O-ring/gasket (often included): $0 to $15
- Coolant (2 gallons): $30 to $50
- Labor (DIY): $0 / Shop: $250 to $450
- Total Year 0 (DIY): $145 to $315
- Total Year 0 (Shop): $395 to $765
Years 1-10: Aluminum housing requires no replacement. Routine coolant changes only.
- Coolant flush at year 5: $40 to $70 (DIY) / $150 to $250 (shop)
10-Year Aluminum Total (DIY): $185 to $385
10-Year Aluminum Total (Shop): $545 to $1,015
The Verdict
For DIY mechanics, the costs are nearly identical—aluminum saves about $50 to $80 over a decade, plus you avoid the inconvenience of doing the job twice. For people who pay a shop, aluminum saves between $200 and $450 over the same period. In both cases, the aluminum option provides peace of mind and one fewer breakdown to deal with.
Hidden Costs Not in This Analysis
The numbers above ignore several real-world costs that strongly favor aluminum:
- Roadside breakdown: If your plastic housing fails on a highway, you may need a tow ($100 to $300), an emergency mechanic markup, and possibly a rental car.
- Engine damage from overheating: A severe overheat can warp a cylinder head ($800 to $2,500 to repair) or destroy an engine entirely ($3,000 to $8,000 for a replacement).
- Lost time: A weekend repair is one thing; missing work for a Tuesday breakdown is another.
- Resale value: A car with documented preventive maintenance, including an aluminum upgrade on a known-weak engine, often sells faster and at a small premium.
If you are shopping for HVAC parts as well, similar cost-of-ownership math applies to home systems. Our HVAC system replacement cost guide walks through the same logic for furnace and AC decisions.
Performance Applications: Towing, Off-Road, and Track Use
For drivers who push their vehicles harder than commuter duty, the thermostat housing material decision becomes even more critical. Heavy load applications generate higher coolant temperatures, more aggressive thermal cycling, and increased vibration—all of which accelerate plastic failure.
Towing and Heavy Loads
When you tow at maximum capacity, your engine works at sustained high load for extended periods. Coolant temperatures can climb 20 to 40 degrees above normal cruising temps. Plastic housings on towing rigs (particularly Ford F-150 EcoBoost, Ram 1500, and GM full-size trucks) often fail well before the typical mileage thresholds. Many towing-focused owners install aluminum housings as a preventive measure during the first year of ownership.
For vehicles regularly towing more than 6,000 pounds, an aluminum upgrade is virtually mandatory. The combination of higher operating temps and the inability to pull over easily with a trailer makes plastic failure especially dangerous.
Off-Road and Trail Use
Off-road driving subjects the cooling system to a unique combination of low-speed high-load operation, vibration from rough terrain, and environmental contamination (mud, water crossings, dust). Plastic housings often crack from impact damage when rocks fly up under the vehicle, while aluminum housings shrug off the same hits.
Jeep Wrangler and Bronco owners particularly benefit from aluminum upgrades. Both vehicles see hard service in environments where roadside repairs are difficult or impossible. A failed thermostat housing on the Rubicon Trail is a much bigger problem than one in a suburban driveway.
Track Day and Autocross
Track day driving puts unique demands on the cooling system. Sustained high RPM, heavy braking with associated heat soak, and minimal airflow at low pit lane speeds all combine to push coolant temps to their limits. Aluminum housings help in two ways: they resist the elevated thermal stress, and they marginally improve heat dissipation through the housing walls.
Track-focused builds typically combine an aluminum housing with a lower-temp thermostat (often 160°F or 170°F instead of the OEM 195°F), an upgraded radiator, and a higher-flow water pump. The aluminum housing is the cheapest part of the upgrade but arguably the most important for reliability.
Forced Induction (Turbo and Supercharger)
Forced-induction engines run hotter than naturally aspirated engines because compressing intake air heats it, raising combustion temperatures. Aftermarket turbo and supercharger installations often increase cooling system stress beyond what the original plastic housing was rated for. Owners who add forced induction to a vehicle should plan to replace the thermostat housing with an aluminum unit as part of the build, not as an afterthought when it fails.
Diesel Applications
Light- and medium-duty diesel pickups (Cummins, Power Stroke, Duramax) have generally avoided the plastic housing problem because their cooling systems are over-built compared to gasoline equivalents. However, modified diesel trucks running tunes and aftermarket turbos generate enough additional heat to stress factory components. An aluminum housing upgrade is good insurance on a tuned diesel even if the OEM housing was not weak.
Top Aftermarket Aluminum Housing Brands Compared
The aftermarket has dozens of suppliers offering aluminum thermostat housings. Quality varies dramatically between brands. Here is an honest assessment of the major players based on durability, fitment, and customer service track records.
Dorman OE Solutions
Dorman has built a reputation as the affordable upgrade brand, specifically targeting OEM plastic component failures with aluminum redesigns. Their housings are typically permanent-mold cast A356 aluminum with machined sealing surfaces. Pricing falls in the $40 to $90 range for most popular applications. Fitment is generally good though not perfect—some kits require minor sanding of the sealing surface. Dorman backs their products with a limited lifetime warranty, which is unusual at this price point.
Mishimoto
Mishimoto is best known for performance cooling system upgrades targeting tuners and enthusiasts. Their thermostat housings are often billet machined or higher-quality castings. Prices are higher ($90 to $250) but quality is excellent. Mishimoto includes detailed installation instructions and high-quality silicone hoses with many of their kits.
aFe Power
aFe focuses primarily on intake systems but offers some cooling components. Their aluminum housings tend to be billet machined and serve specific high-performance applications. Limited model coverage but excellent quality where available.
CSF (Cooling Systems Factory)
CSF is a major OEM supplier for European brands and has expanded into the aftermarket. Their BMW, VW, and Audi housings are often the same parts that the dealerships sell, just without the dealer markup. Prices reflect this OEM-spec quality—generally $80 to $200.
URO Parts
URO targets European applications (BMW, Mercedes, Audi, Volvo) at budget price points. Quality is acceptable but inconsistent—some lots are excellent, others have casting defects. Reviews are heavily polarized. We recommend URO for short-term repairs on older vehicles but suggest CSF or Dorman for daily drivers you intend to keep.
OEM Replacement (ACDelco, Mahle, Behr)
The major OEM suppliers all sell direct replacement housings—usually plastic to match the original. ACDelco is the GM OEM brand, Mahle and Behr supply many European manufacturers. These are the safest choice if you want to maintain factory configuration but offer no improvement over the failed plastic original.
Generic Imports
Many generic imported aluminum housings are available on Amazon, eBay, and similar marketplaces for $20 to $50. Quality is wildly variable. Some are excellent value; others have visible casting porosity, misaligned bolt holes, or rough sealing surfaces. We strongly recommend reading recent reviews carefully and avoiding listings with no brand identification or reviews mentioning leaks within the first year.
What to Look for in Reviews
When evaluating any aftermarket housing, focus on reviews that mention:
- Long-term durability (one or more years post-installation)
- Fitment without requiring modification
- No leaks after proper installation
- Hose nipple integrity (some cheap housings have weak nipples that crack)
- Bolt-hole thread quality
Avoid housings that have repeated reports of leaks, fitment issues, or short lifespan. The savings of $20 over a quality brand are not worth doing the job twice.
Maintenance and Inspection Schedule
Whether you stick with plastic or upgrade to aluminum, regular inspection of your thermostat housing is the single most effective way to avoid catastrophic failure. Build the following checks into your routine maintenance schedule.
Monthly Visual Inspection
Open the hood once a month and look at the area around the thermostat housing. You are looking for:
- Crusty residue suggesting weeping coolant (often pink, green, orange, or white depending on coolant chemistry)
- Visible cracks or stress whitening on plastic housings
- Corrosion or oxidation on aluminum housings (usually a chalky white film)
- Loose hose clamps or hardened/cracked hoses near the housing
Annual Pressure Test
Once per year, perform or have performed a cooling system pressure test. This involves pressurizing the system to its rated cap pressure (usually 13 to 18 psi) and watching for leaks or pressure decay. A properly sealing system holds pressure indefinitely. Any noticeable drop indicates a leak somewhere—often the thermostat housing.
Coolant Quality Testing
Check coolant pH and corrosion-inhibitor level annually using an inexpensive test strip or refractometer. A pH below 7.5 indicates degraded inhibitors and an immediate flush is needed even if the calendar says you have time remaining.
Symptom-Based Inspection Triggers
Stop and inspect immediately if you notice any of the following:
- Temperature gauge fluctuating during normal driving
- Coolant reservoir level dropping between fill-ups
- Sweet smell after a hot drive
- White exhaust smoke (could indicate coolant entering the combustion chamber)
- Heater output decreasing or becoming inconsistent
- Bubbling sounds from the coolant reservoir after shutdown
Many of these symptoms overlap with other cooling system problems. Our complete guide to bad thermostat symptoms can help you narrow down the cause.
Service Interval Recommendations
- Plastic housings on known-weak engines: Inspect every 30,000 miles, plan replacement at 80,000 miles regardless of leak status
- Plastic housings on robust engines: Inspect every 50,000 miles, replace if any stress whitening is visible
- Aluminum housings: Visual inspection annually, no scheduled replacement under normal conditions
- Coolant: Follow the manufacturer’s interval (usually 5 years for OAT/HOAT, 2 years for IAT)
Common Myths About Plastic and Aluminum Housings
The internet is full of misinformation about cooling system upgrades. Let us debunk the most persistent myths.
Myth 1: “Aluminum housings cause engines to overheat by absorbing too much heat.”
This is physically incorrect. A thermostat housing’s thermal mass is negligible compared to the total cooling system capacity. The amount of heat absorbed by the housing material is a rounding error in the system’s heat budget. The radiator does the actual cooling work, not the housing.
Myth 2: “Plastic housings flow better than aluminum.”
Marginally true but practically irrelevant. Injection-molded plastic does have slightly smoother internal surfaces than sand-cast aluminum. The flow difference is on the order of 1 to 2 percent—undetectable in real-world driving. Permanent mold and CNC-machined aluminum housings have surfaces equally smooth as plastic.
Myth 3: “Aluminum housings will galvanically destroy my engine.”
Only with neglected coolant. Modern OAT and HOAT coolants contain corrosion inhibitors specifically designed to prevent galvanic activity in mixed-metal cooling systems. Millions of vehicles run aluminum cylinder heads on iron blocks for hundreds of thousands of miles without galvanic problems. As long as you maintain coolant on schedule, an aluminum housing presents no galvanic risk.
Myth 4: “OEM plastic is always better because manufacturers know best.”
This conflates “what the manufacturer chose” with “what is best.” OEMs choose materials based on a complex calculation of cost, weight, manufacturing speed, regulatory targets, and warranty exposure. A part that fails at 90,000 miles is fine for the manufacturer—the warranty has expired. As an owner planning to keep the car longer than the warranty period, your priorities are different from the manufacturer’s.
Myth 5: “I can fix a cracked plastic housing with epoxy or JB Weld.”
You can—temporarily. Epoxy repairs on plastic housings can hold for a few weeks or months but never long-term. The same thermal cycling that caused the original failure will eventually defeat the epoxy bond. Treat any epoxy repair as an emergency get-home fix, not a permanent solution.
Myth 6: “Cheap aluminum housings are just as good as premium ones.”
Sometimes, but the variance is enormous. Quality control on budget imports is inconsistent—you might get a perfectly functional housing or one with hidden porosity that leaks within months. Premium brands have consistent quality control because their reputation depends on it. The $50 premium for a Dorman or Mishimoto over a generic import buys you predictable quality.
Climate Considerations: Cold, Hot, and Variable Environments
The climate you drive in significantly influences which housing material is right for you. Different environmental conditions stress materials differently.
Extreme Cold Climates
In cold-weather regions (Minnesota, Canada, northern Europe), thermal cycling becomes more aggressive. A car parked overnight at -20°F that warms to 200°F operating temperature experiences a 220°F temperature swing—much more severe than a vehicle in a temperate climate. Plastic housings degrade much faster under these conditions, often failing 30 to 40 percent earlier than the typical mileage thresholds.
Cold climates also cause coolant viscosity to spike at startup, increasing pressure on the thermostat housing during the first few minutes of operation. Aluminum tolerates these pressure spikes better than aging plastic.
Hot Desert Climates
Desert environments (Arizona, southwest Texas, Middle East) push cooling systems to their thermal limits. Underhood temperatures regularly exceed 200°F even when the engine is cold-soaked, creating chronic thermal stress on plastic components. UV exposure from sunlight through engine bay openings can also accelerate plastic degradation in some vehicles.
For desert vehicles, aluminum housings paired with a lower-temp thermostat (180°F instead of 195°F) can provide significant peace of mind during summer heat waves.
Coastal and Salt-Spray Environments
Coastal drivers face a unique trade-off. Salt-laden air can corrode aluminum exterior surfaces, leaving an ugly white powder. However, this is purely cosmetic—the salt does not penetrate to the coolant side of the housing where it could cause problems. Anodized or powder-coated aluminum housings resist this surface corrosion and maintain their appearance for years.
Plastic housings are immune to salt corrosion, but coastal vehicles often see more humidity, which accelerates polymer degradation through hydrolysis. The two effects roughly cancel out, making either material acceptable for coastal use.
Variable Climates and Seasonal Drivers
Vehicles that see all four seasons—particularly in the upper Midwest and northeastern US—experience the most varied thermal stress. The combination of -20°F winter mornings and 95°F summer afternoons puts the maximum strain on plastic. Aluminum is the clear winner for vehicles in these climates if longevity is the priority.
High Altitude Considerations
Vehicles regularly operated at high altitude (Denver, Salt Lake City, mountain passes) face reduced atmospheric pressure, which lowers the boiling point of coolant. The cooling system runs at higher relative pressure to compensate, putting additional stress on the thermostat housing. Aluminum’s superior pressure rating provides a safety margin here that plastic does not match.
Pros & Cons Summary
Plastic Housing Pros
- OEM perfect fitment guaranteed.
- Does not corrode or rust.
- Smooth internal flow.
- Lower initial purchase price.
Plastic Housing Cons
- Becomes brittle and cracks over time.
- Warps at flanges causing leaks.
- Cannot withstand overtightening of bolts.
- Short lifespan (typically 5-7 years).
Aluminum Housing Pros
- Superior strength and durability.
- Resistant to warping and cracking.
- Can handle higher heat cycles.
- Permanent fix for chronic leak issues.
Aluminum Housing Cons
- Susceptible to corrosion if coolant is neglected.
- Potential for casting imperfections in cheap units.
- Slightly heavier (negligible for daily drivers).
- Higher upfront cost.
Signs You Need to Upgrade Immediately
Whether you currently have plastic or metal, knowing when the part is failing is crucial to saving your engine. Watch out for these symptoms:
- Coolant Puddles: A pool of green, orange, or pink fluid under the front center of your car.
- Sweet Smell: A maple syrup odor coming from the engine bay after driving.
- Overheating: If the housing cracks, air enters the system, causing airlocks and overheating. Read more on the signs of a bad thermostat.
- Visible Cracks: On plastic housings, you may see hairline white stress marks near the bolt holes or hose connections.
- Steam at Idle: Visible vapor rising from the engine bay after a hot drive, especially around the thermostat area.
- Dropping Reservoir Level: If you find yourself topping off coolant every few weeks with no visible puddle, you likely have a slow weep.
- Heater Performance Issues: Inconsistent or weak cabin heat can indicate air in the cooling system from a slow housing leak.
Understanding Your Cooling System: Hoses, Sensors, and Routing
The thermostat housing is a hub for several critical components. Replacing the housing is also an excellent opportunity to inspect and refresh the surrounding parts that share its environment.
Hoses Connected to the Housing
Most thermostat housings have between two and five hose connections. The most common are:
- Upper radiator hose: The largest hose, carrying hot coolant from the engine to the radiator. Replace at the same time as the housing if it shows any softness, cracking, or swelling.
- Bypass hose: A smaller hose that allows coolant to circulate within the engine when the thermostat is closed. Often overlooked but critical to proper warm-up.
- Heater core hoses: Two hoses (supply and return) that route hot coolant to the cabin heater core. Inspect both for soft spots or leaks.
- Reservoir overflow line: A small hose connecting to the coolant overflow tank. Easy to forget but important for system function.
Temperature Sensors and Sending Units
Most thermostat housings host one or more sensors:
- ECT (Engine Coolant Temperature) sensor: Reports coolant temperature to the engine control unit (ECU) for fuel injection and ignition timing decisions. A failing ECT can cause poor fuel economy, hard starts, and check engine lights.
- Coolant temperature gauge sender: Drives the dashboard temperature gauge. Often integrated with the ECT on modern vehicles but separate on older ones.
- Cooling fan switch: Activates the radiator fan at a preset coolant temperature. Common on older vehicles; modern cars typically use the ECU and ECT for fan control.
When replacing your housing, transfer all sensors carefully. Use anti-seize compound on threaded sensor bodies to prevent galvanic seizing in the new aluminum housing. Never overtighten temperature sensors—they have small heat-sensing tips that can crack from excessive torque.
Tying It Back to Diagnostics
The ECT sensor is critical to engine management. A bad sensor can mimic many other problems, including symptoms that look like a stuck thermostat. If you replace your housing and still see temperature-related drivability issues, the sensor itself may need replacement. Our guide on how to tell if a car thermostat is bad covers diagnostic procedures that can help isolate the cause.
Frequently Asked Questions
Does an aluminum thermostat housing cool better than plastic?
Technically, aluminum dissipates heat better than plastic, but the effect on overall engine cooling is negligible. The thermostat housing’s job is to contain coolant, not cool it (that is the radiator’s job). The main benefit of aluminum is durability, not cooling performance.
Can I mix aluminum housing with a plastic intake manifold?
Yes, this is very common. Many upgrade kits for cars like the Ford Mustang or Jeep Wrangler bolt an aluminum housing directly to a plastic intake or engine block. Just ensure you use the correct O-ring or gasket to seal the different materials properly.
Why do BMWs use plastic cooling parts?
BMW and other European manufacturers prioritize weight savings and recyclability. The specific plastics they use are designed to last through the warranty period, but they are notorious for failing after 60,000-80,000 miles due to the high operating temperatures of modern engines.
Will an aluminum housing corrode?
Aluminum is resistant to rust but can suffer from galvanic corrosion or oxidation if the coolant becomes acidic. It is vital to change your coolant according to the manufacturer’s schedule to protect an aluminum housing.
How long does an aluminum thermostat housing typically last?
A quality aluminum housing—properly installed with fresh coolant and replaced gaskets at maintenance intervals—will essentially last the lifetime of the vehicle. Most owners report no issues 10, 15, or even 20 years after installation. The only caveat is severely neglected coolant, which can corrode aluminum over time.
Do I need to replace the thermostat itself when I replace the housing?
Yes, always. The thermostat is a wear item with a finite lifespan, and the labor to access the thermostat is identical to the labor for the housing. Replacing both at the same time costs only the price of the thermostat (typically $20 to $50) and saves you a future repair. There is no good reason to replace just one.
Can I install an aluminum housing myself, or do I need a mechanic?
Most thermostat housing replacements are DIY-friendly with basic hand tools and a torque wrench. The job typically takes two to four hours for a first-timer. The hardest parts are usually accessing the housing past other engine components and bleeding the cooling system afterward. If your housing is buried (like the Ford 5.4L Triton), the labor savings of DIY can be substantial—often $300 to $500.
What is the difference between cast and billet aluminum housings?
Cast aluminum is poured into a mold and solidified; billet is machined from a solid block of metal. Billet is stronger, has zero porosity, and offers tighter tolerances—but costs two to four times as much. For street vehicles, a quality cast housing (especially permanent-mold cast) is more than adequate. Billet makes sense for racing, high-performance builds, and show cars where the appearance and absolute strength justify the premium.
My housing is leaking but the bolts feel loose. Can I just retorque them?
Possibly, but usually no. If a plastic housing has warped, retorqueing the bolts will not flatten the warped surface. You may temporarily reduce the leak but will not stop it. Worse, overtightening cracked plastic accelerates failure. The right answer is replacement, especially given how cheap the parts are. For aluminum housings with weeping seals, a careful retorque to spec sometimes works—but always verify the surfaces are not damaged first.
Are aluminum housings legal for emissions-controlled vehicles?
Yes. The thermostat housing has no direct emissions implications and is not regulated by emissions inspections. As long as the housing maintains the correct thermostat temperature for your engine, your emissions will be unaffected. Some performance applications use lower-temp thermostats, which can affect closed-loop fuel mapping—but the housing material itself is irrelevant to emissions.
What torque should I use on the housing bolts?
Always check your service manual for the exact specification. As a general guide, most thermostat housing bolts torque to 89 to 106 inch-pounds (about 7 to 9 ft-lbs)—much lighter than most other engine fasteners. Using a regular ratchet without a torque wrench almost guarantees overtightening, which can crack plastic housings or strip threads in aluminum block holes.
Why does my new aluminum housing run hotter than the old plastic one?
It does not actually run hotter—the housing surface temperature is hotter to the touch because aluminum conducts heat better. Internal coolant temperatures are the same. If your gauge reads higher after the swap, you likely have air trapped in the system. Re-bleed the cooling system following the manufacturer’s procedure.
Can I run a 160°F or 180°F thermostat with my new aluminum housing?
Absolutely—the housing material is irrelevant to thermostat operating temperature selection. The choice between thermostat temperatures depends on your engine, climate, and driving style. See our deep dives on 160°F thermostat risks and the 180°F vs 195°F comparison for guidance on which temperature is right for your application.
Does the housing material affect my warranty?
If your vehicle is still under factory warranty, replacing the OEM plastic housing with an aftermarket aluminum unit could theoretically affect coverage for related cooling system failures. The Magnuson-Moss Warranty Act protects consumers from blanket warranty denials, but the manufacturer can still deny claims they prove are caused by the modification. Out of warranty, this is a non-issue.
Final Verdict: Which One Should You Buy?
The battle of Plastic vs. Aluminum Thermostat Housing has a clear winner for those seeking longevity.
Stick with Plastic if: You are on a strict budget, are planning to sell the car soon, or are restoring a vehicle to exact factory concours condition. Modern OEM plastic housings are adequate for general use, provided you accept they will need replacement again in 50,000 to 80,000 miles.
Upgrade to Aluminum if: You plan to keep the vehicle for the long haul, you live in a climate with extreme temperature swings, or you are tired of recurring leaks. For engines notorious for housing failures (like the Jeep 3.6L Pentastar or BMW N-series), the aluminum upgrade is widely considered an essential “bulletproofing” mod.
The math, the physics, and the long-term economics all point in the same direction: for any vehicle you intend to keep beyond the warranty period, especially one with a known weakness in this component, aluminum is the right answer. The marginal cost is recovered in avoided repeat repairs, and the peace of mind from never wondering whether your housing is about to fail is genuinely valuable.
If your vehicle came with aluminum from the factory (most Toyotas, Hondas, and many heavy-duty trucks), you have nothing to do—the OEM design is excellent. If you have plastic, the timing of your upgrade is the only question. Doing it preventively at 60,000 to 80,000 miles is dramatically less stressful than doing it after a roadside breakdown.
Don’t wait for steam to pour out from under your hood. Inspect your housing today, and if you see signs of seepage, make the switch.


