What Is a Split HVAC System? A Complete Homeowner’s Breakdown
Understand every component, how it works, what it costs, and whether a split system is the right choice for your home in 2026.
1. What a Split HVAC System Really Is
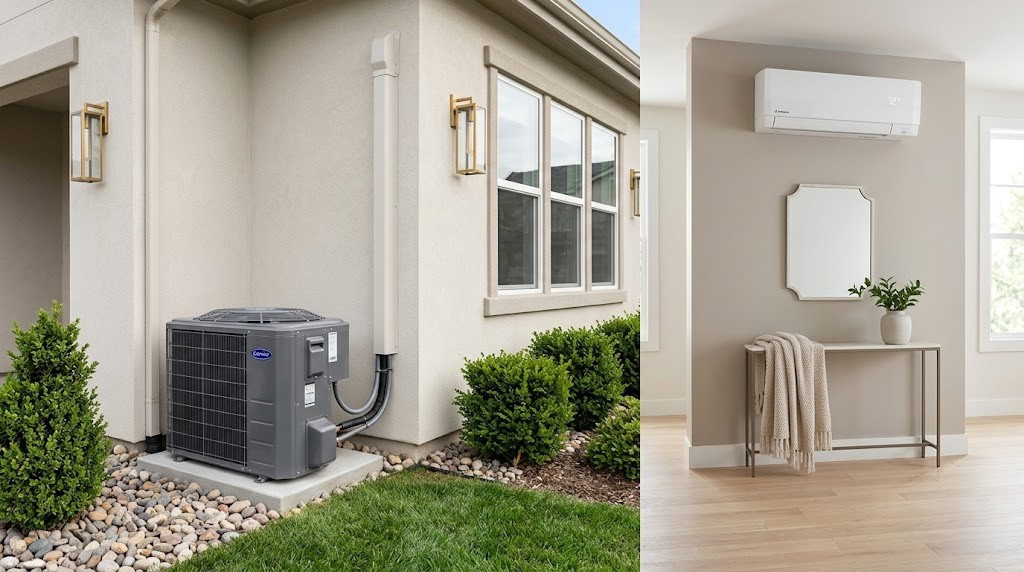
When contractors talk about a “split system,” they are using an industry shorthand that describes where the equipment physically lives, not what kind of heating or cooling technology is inside. The name comes from the fact that the refrigeration cycle—the loop of gas and liquid that moves heat—travels between two separated cabinets. One cabinet sits outside, bolted to a concrete or composite pad, and the other lives in a closet, basement, attic, or high on a wall indoors.
That physical separation is a big deal, and it is the reason split systems dominate the U.S. and Canadian residential market. Keeping the compressor outdoors means you isolate the loudest, hottest-running component far from the bedrooms and living rooms where comfort actually matters. It also lets the condenser dump waste heat directly to outdoor air during cooling mode, which is more efficient than trying to vent that heat through a wall or roof penetration.
A split system is fundamentally different from a packaged system, which crams every component—compressor, condenser, evaporator, and blower—into one big metal box that typically sits on a rooftop or a concrete pad next to the house. Packaged units are common in commercial buildings and in some southern U.S. markets where homes lack basements, but for most single-family homes in temperate and cold climates, split architecture wins on efficiency, serviceability, and noise.
The Split Layout in One Sentence
If you want a one-line definition you can repeat to a neighbor: a split HVAC system is a heating and cooling setup whose indoor and outdoor components are connected by refrigerant-carrying copper lines instead of being housed together. Everything else—whether it is a heat pump or a gas furnace paired with AC, whether it has ducts or not, whether it is one zone or eight—is a variation on that same basic idea.
Why the “Split” Concept Matters for You
For a homeowner, the split architecture has three practical consequences. First, the outdoor unit can be replaced somewhat independently of the indoor unit, though matching the pair is strongly recommended for efficiency and warranty reasons. Second, the refrigerant lines that run between the two units represent a critical performance pathway—if they’re kinked, undersized, or leaking, no amount of expensive equipment will cool your house well. Third, the split design is inherently modular: you can pair the same outdoor condenser with many different indoor configurations, which is why multi-zone ductless systems exist in the first place.
Key Takeaway
“Split HVAC” describes an architectural layout, not a specific technology. Whether your system runs on gas, electricity, or a heat pump, if the compressor is outside and the air handler is inside, you have a split system.

Honeywell T9 Smart Thermostat with Room Sensor
The T9 is a popular pairing for split HVAC systems because it supports multi-stage heating and cooling plus wireless room sensors—the features that actually matter when you’re running a variable-speed condenser.
Check Price on Amazon2. The Core Components of a Split HVAC System
Before you can understand how a split system heats or cools, you need to know the cast of characters. A conventional split HVAC has about eight major components, split roughly half and half between the outdoor and indoor sections. Understanding what each part does will make every conversation with a technician dramatically less frustrating, and it will help you spot problems before they become emergencies.
Outdoor Components
1. The Compressor
This is the heart of the system. The compressor pressurizes refrigerant gas, raising its temperature so it can release heat to the outdoor air. Modern compressors come in three flavors: single-stage (on or off), two-stage (low or high), and variable-speed inverter compressors that can ramp smoothly from about 25% to 100% output. Variable-speed compressors are quieter, more efficient, and better at dehumidifying because they run longer at lower speeds rather than cycling on and off aggressively.
2. The Condenser Coil
Wrapped around the outside of the outdoor cabinet, the condenser coil is where hot, high-pressure refrigerant releases its heat to the outdoor air. A fan mounted on top of the unit pulls ambient air across the coil to carry that heat away. Coil design matters a lot here—traditional copper-and-aluminum “spine fin” or “lanced fin” coils offer different trade-offs in efficiency, corrosion resistance, and repairability. If you’re comparing premium brands, the differences between Trane’s Spine Fin coil and Carrier’s Greenspeed technology are a good primer on why the coil construction isn’t just a marketing detail.
3. The Condenser Fan
A large propeller-style fan sitting on top of the outdoor cabinet pulls air up through the coil. In budget units, this is a permanent-split-capacitor (PSC) motor with a fixed speed. In premium units, it is an electronically commutated motor (ECM) that can adjust speed based on demand. ECM fan motors use significantly less electricity and allow the system to run quieter during shoulder-season operation.
4. The Reversing Valve (Heat Pumps Only)
If your outdoor unit is a heat pump rather than a straight AC condenser, there’s one extra component inside: a four-way reversing valve that flips the direction of refrigerant flow. This is what lets the same physical equipment cool your house in August and heat it in January.
Indoor Components
5. The Evaporator Coil
The evaporator coil sits directly above or beside your indoor air handler or furnace, inside the ductwork. Cold, low-pressure refrigerant flows through it, absorbing heat from the indoor air blowing across it. In cooling mode this is where moisture condenses out of the air, dripping down into a pan and out through a PVC drain line. A clogged drain line is the single most common callback for HVAC technicians.
6. The Air Handler or Furnace
In an all-electric or heat pump system, the indoor cabinet is called an air handler—it’s essentially a big blower plus the evaporator coil and, often, backup electric resistance heat strips. In a gas-heat home, the indoor unit is a gas furnace with the AC evaporator coil sitting on top of it, and the furnace blower does double duty as the air-moving component for both heating and cooling. The furnace is effectively its own subsystem, and if yours is nearing the end of its life, the topic of furnace replacement cost and planning deserves its own deep dive.
7. The Blower Motor
The blower is the fan inside the indoor unit that moves air through your ductwork. Just like the outdoor fan, blowers come as PSC or ECM motors. The efficiency difference here is substantial—an ECM blower can cut your HVAC electricity use by hundreds of kilowatt-hours per year, especially if you run constant-fan mode. The topic of PSC vs. ECM blower wattage and operating costs is worth investigating before you buy, because blower technology is often glossed over in sales pitches.
8. The Thermostat and Controls
The thermostat is the brain of the operation. Modern smart thermostats communicate with the system using multi-wire or proprietary communicating protocols to tell the compressor, blower, and reversing valve exactly what to do. Simple mechanical thermostats work, but they cannot take advantage of the fine-grained staging that a variable-speed system offers.
Refrigerant Lines
Two insulated copper tubes (suction and liquid lines) carry refrigerant between the indoor and outdoor units.
Condensate Drain
A PVC pipe that carries condensed moisture from the indoor coil to a floor drain or exterior wall.
Filter Drier
A small cylinder in the liquid line that removes moisture and debris from the refrigerant circuit.
Air Filter
A replaceable pleated filter that protects the blower and coil from dust, pet hair, and pollen.
3. How a Split HVAC System Actually Works
At its core, a split HVAC system does something that seems almost magical the first time you learn it: it doesn’t generate cooling at all. It simply moves heat from one place to another. When your AC is “making cold air,” what it is actually doing is pulling heat out of the air inside your house and dumping that heat into the air outside your house. The same physics works in reverse for a heat pump in the winter.
The Four-Stage Refrigeration Cycle
Every split HVAC system—whether it’s a basic $4,000 builder-grade AC or a $15,000 variable-capacity heat pump—uses the same vapor-compression refrigeration cycle. There are four stages, and understanding them demystifies almost every HVAC conversation you’ll ever have.
Stage 1: Compression
Low-pressure refrigerant gas enters the compressor as a cool vapor. The compressor squeezes it into a small volume, which raises both its pressure and its temperature dramatically—from around 50°F to somewhere north of 150°F. This hot, high-pressure vapor then gets pushed out toward the condenser coil.
Stage 2: Condensation
The hot vapor flows through the condenser coil in the outdoor unit. The condenser fan blows outdoor air (which is cooler than 150°F, even in Phoenix in July) across the coil, and the refrigerant releases its heat to that outdoor air. As it cools, the vapor condenses into a warm, high-pressure liquid. This is the “dumping heat outside” step.
Stage 3: Expansion
The liquid refrigerant then travels through the liquid line into the indoor unit, where it passes through a metering device—either a thermostatic expansion valve (TXV) or an electronic expansion valve (EEV) on premium systems. This device creates a sudden pressure drop, which causes some of the liquid to flash-evaporate and get extremely cold—often around 40°F. This cold, low-pressure mixture enters the evaporator coil.
Stage 4: Evaporation
The cold refrigerant absorbs heat from the warm indoor air blowing across the evaporator coil. As it absorbs heat, it fully evaporates back into a cool gas. That cool gas travels back through the suction line to the compressor outside, and the cycle starts over. Meanwhile, the air that crossed the coil is now cooler and drier, and the blower pushes it into your ductwork.
Heating Mode: The Cycle Reversed
Here’s where things get interesting. If your split system is a heat pump, the reversing valve flips the direction of refrigerant flow. Now the outdoor coil becomes the evaporator—pulling heat out of even cold outdoor air—and the indoor coil becomes the condenser, releasing that heat into your house. Yes, there is usable heat energy in 30°F outdoor air, even though it feels cold to you. Modern cold-climate heat pumps can extract meaningful heat from air as cold as -15°F, though their efficiency drops as temperatures fall.
Airflow: The Forgotten Half of the System
While the refrigerant does the heavy lifting of heat transfer, airflow does the work of distribution. The blower motor pushes air across the indoor coil, into the supply ducts, through the rooms of your house, and back into the return duct. If ductwork is leaky, undersized, or poorly balanced, the most expensive equipment in the world can’t deliver comfort. Roughly 20% of the performance of any split system depends on airflow, not refrigerant.

Filtrete MPR 1500 Allergen Defense HVAC Filter
Proper airflow is half of HVAC performance. A quality pleated filter balances filtration and airflow without choking your system like some ultra-high-MERV filters can.
Check Price on Amazon4. The 6 Types of Split HVAC Systems
Once you understand the core architecture, it becomes easier to make sense of the dizzying array of split HVAC configurations sold today. They all follow the same indoor-plus-outdoor pattern, but differ in which fuels they use, how they stage capacity, and whether they require ductwork. Here are the six types you’re most likely to encounter as a homeowner.
Type 1: Standard Central AC with Gas Furnace
This is the quintessential American split system: an outdoor AC condenser paired with a gas furnace inside, with the AC’s evaporator coil sitting on top of the furnace. The furnace handles heating in winter; the AC handles cooling in summer. Both share the same blower and ductwork. It’s simple, reliable, well-understood by every HVAC contractor, and usually the cheapest configuration when you already have natural gas service.
Type 2: Heat Pump Split System (Air Handler Indoor)
Replace the gas furnace with an electric air handler and replace the AC condenser with a heat pump, and you have an all-electric split system. The heat pump handles both heating and cooling, with backup electric resistance heat strips in the air handler for very cold days. This is the fastest-growing configuration in the U.S. market because it eliminates fossil fuel combustion and often qualifies for substantial utility and federal rebates.
Type 3: Dual-Fuel / Hybrid Split System
A dual-fuel system pairs a heat pump outdoor unit with a gas furnace indoor unit. The heat pump handles cooling in summer and heating during mild weather, while the furnace takes over when outdoor temperatures drop below a “changeover” threshold—typically somewhere between 30°F and 40°F depending on the relative cost of gas vs. electricity in your area. Dual-fuel systems offer the best year-round operating cost in cold-climate regions with moderate gas prices.
Type 4: Ductless Mini-Split (Single Zone)
A single-zone ductless mini-split has one outdoor unit connected to one indoor wall-mounted, ceiling-mounted, or floor-mounted head. There’s no ductwork—the indoor head blows conditioned air directly into the room. Ductless systems are extremely efficient because they eliminate duct losses (which can reach 20–30% in poorly insulated attics) and because virtually all of them use variable-speed inverter compressors.
Type 5: Multi-Zone Ductless Mini-Split
The same concept as a single-zone, but the outdoor unit connects to two, three, four, or up to eight indoor heads, each independently controlled by its own thermostat. Multi-zone systems give you room-by-room temperature control with no ductwork at all, which makes them ideal for additions, basement finishes, and whole-house retrofits in older homes that lack existing ducts. They pair especially well with modern inverter heat pumps—if you want to dig deeper, the breakdown of Bosch’s inverter heat pump and its SEER2/HSPF2 ratings is a useful case study in how variable-speed tech performs in real-world multi-zone applications.
Type 6: Short Ducted / Concealed Duct Mini-Split
A hybrid approach that’s gaining popularity: a slim ducted air handler tucked into a closet ceiling or bulkhead, connected to one zone of short, low-static ductwork. It gives you the benefits of hidden supply registers without the cost and complexity of a full central system. Great for finishing an attic bedroom or a basement suite.
Comparison of Split System Types
| Type | Heating Source | Ductwork Needed? | Typical Cost Range | Best For |
|---|---|---|---|---|
| Central AC + Gas Furnace | Natural gas or propane | Yes | $7,000–$15,000 | Cold-climate homes with existing gas service |
| Heat Pump + Air Handler | Electric (heat pump + resistance backup) | Yes | $9,000–$18,000 | All-electric homes; mild to moderate climates |
| Dual-Fuel Hybrid | Heat pump + gas furnace | Yes | $11,000–$20,000 | Cold climates with both gas and electricity |
| Ductless Single-Zone | Heat pump | No | $3,500–$6,500 | Single room, addition, or garage |
| Multi-Zone Ductless | Heat pump | No | $8,000–$22,000 | Whole-house retrofits of ductless homes |
| Concealed Duct Mini-Split | Heat pump | Minimal (short runs) | $5,500–$10,000 per zone | Attics, additions, basement finishes |
5. Split vs. Packaged HVAC Systems
One of the most common points of confusion for homeowners is the difference between split and packaged systems. They sound similar, they often come from the same brands, and many first-time buyers don’t even realize there’s a choice. The differences, though, run deep enough to affect cost, performance, and longevity.
The Packaged System Defined
A packaged HVAC system consolidates every mechanical component—compressor, condenser, evaporator, blower, and heating element—into a single large cabinet. That cabinet sits outside the home, usually on a rooftop (“rooftop unit” or RTU) or next to the house on a concrete slab. Conditioned air is blown through a single large duct penetration into the home’s interior ductwork.
Where Each Architecture Wins
Split System Strengths
- Higher peak efficiency (SEER2 ratings up to 27+)
- Quieter indoors (no blower in attic or closet with vibration)
- Easier to service individual components
- More configuration flexibility (ductless, dual-fuel, multi-zone)
- Longer equipment lifespan on average
- Better comfort with variable-speed staging
Packaged System Strengths
- Lower installation cost (single cabinet, one set of connections)
- Saves interior space (nothing in closet or basement)
- Easier to access for maintenance on flat roofs
- Simpler to replace—no matched-coil issues
- Well-suited to slab-on-grade homes without basements
- Standard choice for most commercial buildings
Side-by-Side Comparison
| Criteria | Split System | Packaged System |
|---|---|---|
| Component location | Split between indoor and outdoor | All in one outdoor cabinet |
| Typical SEER2 ceiling | Up to 27+ | Usually 14–18 |
| Indoor noise | Very low (only blower runs indoors) | Varies; duct-borne noise possible |
| Install cost | Higher average ($8k–$20k) | Lower average ($5k–$12k) |
| Best climate fit | Temperate, cold, mixed | Hot, dry; flat-roof construction |
| Service complexity | Higher (two units, line set) | Lower (single location) |
| Average lifespan | 15–20 years | 12–15 years |
Which Should You Choose?
For most U.S. homeowners in single-family homes with basements, attics, or utility closets, the split system is the default and usually the right choice. It offers higher maximum efficiency, quieter operation, longer lifespan, and the flexibility to configure it in dozens of ways. The exception is slab-on-grade homes in hot-dry markets like Phoenix, Las Vegas, or parts of Texas, where rooftop packaged units have been the standard for decades and the ecosystem of contractors, replacement parts, and rebates is built around them.
6. Central Split vs. Ductless Mini-Split Systems
Within the broad category of split systems, the single most important sub-decision most homeowners face today is whether to go ducted (central) or ductless (mini-split). Both are legitimate split architectures, but they deliver comfort in radically different ways.
Central Split System: Whole-House Air Distribution
A central split system uses a single large indoor unit (furnace or air handler) plus an extensive network of metal or flex ducts that fan out to every room in the house. One thermostat typically controls the whole system, though motorized dampers and zoning control boards can divide a central system into up to four or five zones with separate thermostats.
The advantages are familiar to most Americans: hidden, quiet comfort, with a consistent temperature in every room if the ducts are properly designed. The disadvantages are less familiar but very real: duct losses can steal 20–35% of your system’s output, duct leakage lets dust and attic air into your supply stream, and retrofitting ducts into a home that doesn’t have them is enormously expensive.
Ductless Mini-Split: Room-by-Room Comfort
A ductless mini-split eliminates the ductwork entirely. Each room (or zone) gets its own indoor head—a small, wall-mounted, ceiling-cassette, or floor-mounted unit—that blows conditioned air directly into the space. Each head has its own thermostat, and the outdoor unit can connect to one, two, four, or more heads.
The efficiency advantage is dramatic. Without duct losses, a ductless system can deliver 20–30% more of its rated capacity to the actual living space. The comfort advantage is also substantial if different family members want different temperatures in different rooms. The trade-off is visual: the indoor head is visible on the wall or ceiling (though modern designs are far less intrusive than the boxy units of ten years ago).
Efficiency Comparison: The Numbers
| Metric | Central Split (Ducted) | Ductless Mini-Split |
|---|---|---|
| Maximum SEER2 | 18–22 | 25–30+ |
| Typical HSPF2 | 8–10 | 9–13 |
| Effective delivery | 65–80% of rated capacity | 95–100% of rated capacity |
| Zoning | Limited (2–5 zones with dampers) | Native (every head is a zone) |
| Visual impact | Invisible (only registers visible) | Indoor heads visible on walls |
| Best for homes | Already ducted, whole-house comfort | Unducted, additions, retrofits |
When the Hybrid Approach Wins
In many homes, the best answer isn’t either/or—it’s both. A homeowner might keep a central split system for the main living areas and add a ductless mini-split to handle a finished basement, a bonus room above the garage, or a sunroom that never gets enough airflow from the main system. This hybrid approach is increasingly common and often costs less than trying to extend ductwork into a problematic zone.

Senville LETO Series 12,000 BTU Ductless Mini-Split
A popular DIY-friendly ductless split system that covers up to 600 sq ft with a 22+ SEER inverter compressor and cold-climate performance down to -22°F.
Check Price on Amazon7. Sizing a Split HVAC System: Getting BTUs Right
Of all the ways a split HVAC system can be installed badly, improper sizing is the most expensive and the most common. An oversized system costs more upfront, cycles on and off too quickly to dehumidify properly, wears out faster, and delivers worse comfort than a correctly sized smaller system. An undersized system can’t keep up on design-day temperatures. Getting this number right is where real HVAC expertise earns its keep.
Why the Old “Rule of Thumb” Is Wrong
You may have heard the old contractor rule: 1 ton of cooling per 500 or 600 square feet of house. This rule is wrong, and it has been wrong for decades. It doesn’t account for insulation levels, window area and orientation, air tightness, duct location, local climate, or internal heat gains. Two identical floor plans in the same neighborhood can have cooling loads that differ by 50% or more based on insulation, windows, and leakage alone.
Manual J: The Right Way to Size
The correct method for sizing any residential HVAC system is an ACCA Manual J load calculation. Manual J analyzes each room’s cooling and heating needs based on:
- Floor area and volume of each conditioned space
- Insulation R-values in walls, ceilings, and floors
- Window area, orientation, and U-value—south-facing glass is a massive summer load
- Air infiltration rate (how leaky the building envelope is)
- Internal gains from people, appliances, and lighting
- Design temperatures for your specific ZIP code
- Duct location and leakage—attic ducts add substantial load
A proper Manual J calculation generates two numbers for your home: the sensible cooling load (measured in BTUs per hour or tons, where 1 ton = 12,000 BTU/h) and the latent load (moisture removal capacity needed). For heating, it produces a design heat loss figure in BTU/h.
Typical Sizing Ranges by Climate
| Home Size (sq ft) | Cool Climate (Zone 5–6) |
Moderate Climate (Zone 4) |
Hot-Humid Climate (Zone 2–3) |
Hot-Dry Climate (Zone 2B) |
|---|---|---|---|---|
| 1,000–1,500 | 1.5 tons | 2 tons | 2.5 tons | 2 tons |
| 1,500–2,000 | 2 tons | 2.5 tons | 3 tons | 2.5 tons |
| 2,000–2,500 | 2.5 tons | 3 tons | 3.5 tons | 3 tons |
| 2,500–3,000 | 3 tons | 3.5 tons | 4 tons | 3.5 tons |
| 3,000–3,500 | 3.5 tons | 4 tons | 4.5 tons | 4 tons |
| 3,500–4,500 | 4 tons | 4.5 tons | 5 tons | 4.5 tons |
These ranges assume reasonably modern insulation (R-13 walls, R-30+ ceilings) and moderate window area. Treat them as rough starting points only.
The Right Size for Your Specific Home
The correct approach is to hire a contractor who performs and shares a full Manual J calculation. Ask to see the report. A reputable contractor will gladly walk you through it. A contractor who won’t show you the math—or who hasn’t done a load calculation at all—is a red flag. In some states, new installations legally require a documented Manual J, and permit inspectors can ask for it.
8. Efficiency Ratings Decoded: SEER2, HSPF2, and EER2
Walk into any HVAC showroom and you’ll be drowning in acronyms. SEER2. HSPF2. EER2. AFUE. COP. Each one measures something slightly different, and the difference between a “14 SEER2” unit and a “20 SEER2” unit can add up to thousands of dollars over the lifespan of the system. Let’s decode them one at a time.
SEER2: Cooling Efficiency
SEER2 (Seasonal Energy Efficiency Ratio 2) measures how efficiently a system cools over an entire cooling season, under updated 2023 testing conditions. Higher is better. The number represents the cooling output (in BTUs) divided by the electrical input (in watt-hours) across a simulated season.
The federal minimum SEER2 for new split systems is 14.3 in the northern U.S. and 14.3 in the southern U.S. for heat pumps, with 13.4 and 14.3 respectively for AC-only systems—the exact numbers vary slightly depending on whether you’re in the North or Southeast/Southwest regions under the DOE’s regional standards. High-efficiency variable-speed systems can hit 22–27 SEER2.
HSPF2: Heating Efficiency (Heat Pumps Only)
HSPF2 (Heating Seasonal Performance Factor 2) is the heat pump equivalent of SEER2. It measures the total heating output over a season divided by the total electrical input. Federal minimums are 7.5 HSPF2 for split heat pumps as of 2023, with premium cold-climate systems reaching 10–13 HSPF2.
EER2: Peak Cooling Efficiency
EER2 measures efficiency at a single peak condition—95°F outdoor temperature, 80°F indoor, 50% relative humidity—rather than seasonally. It’s particularly relevant in hot-dry climates where cooling systems run near peak conditions for hours at a time. A high EER2 matters more than high SEER2 in Phoenix; high SEER2 matters more in Minneapolis.
AFUE: Furnace Efficiency
If your split system includes a gas furnace, you’ll see AFUE (Annual Fuel Utilization Efficiency) quoted as a percentage. An 80% AFUE furnace converts 80% of the natural gas it burns into usable heat, venting the rest up the flue. A 95%+ AFUE condensing furnace recovers heat from the exhaust gases, pushing efficiency up to 97%. The payback for going from 80% to 95% varies with fuel costs but usually takes 5–8 years in cold climates.
Efficiency Ratings in Context
| Rating Tier | SEER2 | HSPF2 | Typical Cost Premium | Annual Savings vs. Baseline |
|---|---|---|---|---|
| Baseline (federal minimum) | 13.4–14.3 | 7.5 | — | — |
| Mid-tier (two-stage) | 15–17 | 8.5–9.5 | +$1,200–$2,200 | $100–$220/yr |
| High-efficiency (variable-speed) | 18–20 | 9.5–11 | +$2,500–$4,500 | $220–$400/yr |
| Premium inverter | 21–27 | 11–13 | +$4,500–$7,000 | $350–$550/yr |
The payback period for stepping up in efficiency depends heavily on your local electricity rates and how many hours the system actually runs. In places like California and New England where electricity runs $0.28+/kWh, premium efficiency pays back in 6–9 years. In cheap-electricity markets like the Pacific Northwest, it can take 15+ years. For a fuller treatment of practical efficiency strategies, including rebates and ENERGY STAR thresholds, the guide to HVAC energy efficiency tips covers the decisions most likely to move your bill.
9. The Installation Process and Timeline
A new split HVAC installation is one of the more invasive home improvement projects, but it rarely takes as long as homeowners expect. A straightforward like-for-like replacement typically finishes in a single day. A more complex project—new ducts, new electrical, new gas line, or a first-time install—can stretch to two or three days. Understanding the process helps you ask the right questions and spot corner-cutting.
Day 1: Pre-Install Inspection and Prep
Before any equipment gets delivered, a good contractor sends a technician to do a thorough site inspection. They should:
- Verify the Manual J load calculation
- Inspect existing ductwork for leaks, undersizing, or damage
- Check electrical service capacity at the panel
- Locate a suitable outdoor unit pad with proper clearance and drainage
- Identify the refrigerant line path and any obstructions
- Check the condensate drain route
- Confirm permits with the local building department
Installation Day: What Actually Happens
Step 1: Removal of Old Equipment
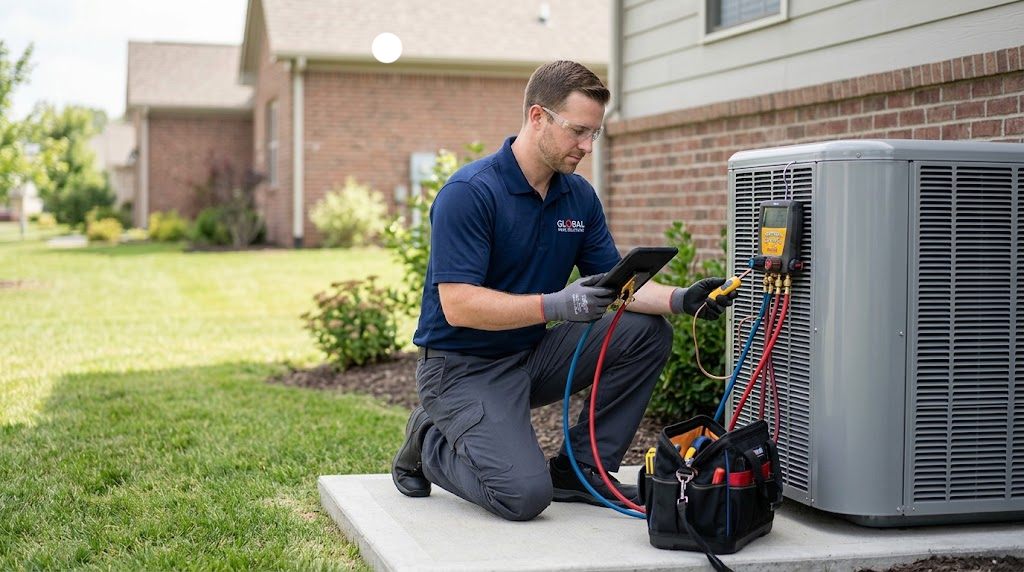
The crew recovers the refrigerant from the old system (required by EPA Section 608), disconnects electrical and refrigerant lines, and hauls the old condenser and indoor unit out. Refrigerant recovery is non-negotiable and is worth watching—it takes 15–30 minutes and requires a recovery machine, not just cutting the lines.
Step 2: Indoor Unit Placement
The new furnace or air handler goes in. The evaporator coil cabinet is sealed to the unit with mastic and metal tape—not duct tape, which fails over time. The condensate drain line is connected and trapped properly to prevent air from being sucked through it.
Step 3: Outdoor Unit Placement
The new condenser is set on a pad, leveled, and anchored. Proper clearances—typically 12 inches on the sides, 24 inches in front—are critical for airflow and service access.
Step 4: Refrigerant Line Set Installation
The two insulated copper lines are run from the indoor coil to the outdoor unit. In a replacement, the existing line set is often reused if it’s compatible with the new refrigerant (most modern systems use R-32 or R-454B replacing R-410A, which requires flushing or replacement of old lines). Proper brazing with a nitrogen purge prevents oxidation inside the lines.
Step 5: Electrical and Controls
The outdoor unit gets a dedicated disconnect at the wall and a fused 240V circuit. The indoor unit gets its own 120V or 240V circuit depending on configuration. Thermostat wiring is pulled and terminated. Any heat strips in an air handler get their own dedicated circuits.
Step 6: Evacuation and Charging
This is the most skill-dependent step. The installer connects a vacuum pump to the system and pulls it down to below 500 microns of absolute pressure—a deep vacuum that removes all air and moisture from the refrigerant circuit. They then hold that vacuum to verify there are no leaks, a process that should take at least 15 minutes. Only then is the factory refrigerant charge released into the system.
Step 7: Startup and Verification
The system is powered up and run through cooling and heating cycles. The installer measures superheat and subcool (pressure-temperature relationships that indicate correct refrigerant charge), supply-return temperature split, static pressure, and airflow. A final charge adjustment may be made based on these measurements. The homeowner is walked through thermostat operation and filter replacement.
Red Flags During Installation
- The installer doesn’t pull a vacuum, or skips the leak-hold step
- Refrigerant lines are brazed without nitrogen purge (no hiss from a nitrogen bottle)
- Old refrigerant is released to atmosphere instead of recovered
- No commissioning measurements (no gauges, no manometer, no thermometer)
- Missing or undersized disconnect and circuit breaker
- Ductwork sealed with fabric duct tape (will fail within 18 months)
For a more practical look at AC-specific installation and its real-world costs, the article on AC unit installation cost breaks down labor, permits, and equipment line items so you can audit your own quote.
10. Real-World Cost Breakdown
Split HVAC pricing is one of the most confusing purchases a homeowner makes. Three contractors can quote three wildly different prices on the “same” job, and the cheapest is rarely the best value. Let’s look at the actual cost components so you can evaluate any quote you receive.
The Five Cost Buckets
Equipment (35–45% of total)
The equipment itself—outdoor condenser, indoor air handler or furnace, evaporator coil, thermostat, and line set—typically represents less than half the job. A 3-ton 16-SEER2 heat pump system equipment cost runs $3,500–$5,500 at wholesale. A premium 5-ton variable-speed inverter system can push equipment cost to $9,000–$13,000.
Labor (30–40% of total)
Professional installation labor for a like-for-like replacement runs 8–14 hours of crew time at $80–$150/hour loaded labor rate. A new install with ductwork can consume 30+ crew hours. Labor is the single biggest variable between contractors.
Materials and Supplies (10–15%)
Refrigerant, brazing rod, nitrogen, line set insulation, condensate pump, drain line, thermostat wire, electrical whip, disconnect box, breaker, pad, vibration isolators, and a hundred small items add up quickly. Expect $400–$1,200 in miscellaneous materials.
Permits and Inspections (2–5%)
Most jurisdictions require a permit for HVAC replacement—typically $100–$400—plus a final inspection. Some areas also require a separate electrical permit. A reputable contractor pulls the permit; a sketchy one suggests skipping it.
Overhead and Profit (10–20%)
Office staff, warehouse rent, truck fleet, insurance, training, and the company’s margin all live here. This is not optional or negotiable in any real sense—it’s the cost of having a legitimate business that will still exist when your system fails in year seven.
Typical 2026 Installed Prices
| System Type | Size | Efficiency | Installed Price Range |
|---|---|---|---|
| Central AC + 80% Furnace | 2.5 ton / 60k BTU | 14.3 SEER2 / 80% AFUE | $7,500–$10,500 |
| Central AC + 95% Furnace | 3 ton / 80k BTU | 16 SEER2 / 96% AFUE | $11,000–$14,500 |
| Heat Pump + Air Handler | 3 ton | 15.2 SEER2 / 7.8 HSPF2 | $10,000–$13,500 |
| Variable-Speed Heat Pump | 3 ton | 20 SEER2 / 10 HSPF2 | $14,500–$19,000 |
| Dual-Fuel (HP + 95% Gas) | 3 ton / 80k BTU | 17 SEER2 / 96% AFUE | $13,500–$17,500 |
| Single-Zone Ductless Mini-Split | 12k BTU | 22 SEER2 / 10 HSPF2 | $3,800–$6,200 |
| Multi-Zone Ductless (3 head) | 24k–36k BTU | 22 SEER2 | $9,500–$15,500 |
Rebates and Tax Credits in 2026
The federal Energy Efficient Home Improvement Credit (25C) offers up to $2,000 for qualifying heat pump installations, plus another $1,200 for other efficiency upgrades. The Inflation Reduction Act’s HEEHRA rebate program is active in most states, offering point-of-sale rebates up to $8,000 for low- and moderate-income households. Utility rebates on top of those can add another $500–$2,500. It’s worth budgeting your project assuming these are available, because in many jurisdictions they effectively cut the premium for a heat pump installation to near zero.

Fieldpiece SMAN360 Digital Manifold Gauge Set
If you want to verify your installer’s commissioning measurements—or if you’re a serious DIY homeowner—a digital manifold shows superheat and subcool readings that tell you whether the system is charged correctly.
Check Price on Amazon11. Maintenance, Lifespan, and Long-Term Care
A well-installed and well-maintained split HVAC system should last 15–20 years. A poorly maintained one often gives up in under a decade. The difference between those two outcomes is not complicated or expensive—it’s just consistent. Here’s what actually matters.
Monthly Tasks (5 Minutes)
- Check the air filter. Most 1-inch filters need replacement every 1–3 months. 4-inch media filters can last 6–12 months. A dirty filter is the single most common cause of HVAC problems.
- Look at the outdoor unit. Clear leaves, grass clippings, and debris from within 2 feet of the coil.
- Listen for unusual noises. Grinding, squealing, or rattling during startup means something is loose, worn, or failing—catch it early.
Seasonal Tasks (15 Minutes)
- Clean the outdoor coil. In spring before cooling season, gently rinse the coil with a garden hose from inside out. Don’t use a pressure washer—the fins bend easily.
- Pour condensate drain cleaner. A cup of white vinegar or a commercial drain treatment poured into the access port prevents the slime buildup that causes clogs and overflows.
- Test system operation. Run cooling in spring, heating in fall—catch any weak performance before you really need the system.
Annual Professional Maintenance
One professional tune-up per year—ideally one in spring for cooling and one in fall for heating if you can afford both—should include:
- Refrigerant pressure and superheat/subcool check
- Electrical contact and capacitor test
- Evaporator and condenser coil inspection and cleaning as needed
- Blower motor amp draw and wheel cleanliness check
- Condensate drain and pan inspection
- Temperature split measurement (supply vs. return)
- Thermostat calibration check
- Inducer motor and heat exchanger inspection (on gas furnaces)
- Combustion analysis (on gas furnaces, every 2 years minimum)
Expected Lifespan by Component
| Component | Typical Lifespan | Replacement Cost |
|---|---|---|
| Outdoor Condenser / Heat Pump | 15–20 years | $3,500–$8,000 |
| Indoor Air Handler | 15–25 years | $1,800–$4,500 |
| Gas Furnace | 20–25 years | $3,500–$7,500 |
| Evaporator Coil | 10–15 years | $1,500–$3,000 |
| Blower Motor | 10–15 years | $450–$1,200 |
| Capacitor | 5–10 years | $150–$400 |
| Contactor | 5–10 years | $200–$450 |
| Thermostat | 10–15 years | $150–$450 |
| Refrigerant Line Set | 25+ years (if undamaged) | $500–$1,500 |
When to Repair vs. Replace
The general rule of thumb: if a repair costs more than 50% of a new system’s price and your existing system is more than 10 years old, replacement is usually the smarter economic move. Failing compressors, cracked heat exchangers, and major refrigerant leaks on old R-22 systems almost always tip the decision toward replacement.
12. Pros, Cons, and Who Should Buy a Split HVAC System
Every HVAC architecture has trade-offs, and split systems are no exception. Here’s an honest look at where they shine and where they fall short.
Strengths of Split HVAC
- Highest peak efficiency ratings available (up to 30+ SEER2 in mini-splits)
- Quietest indoor operation of any central HVAC type
- Longest average equipment lifespan (15–20 years)
- Widest selection of brands, models, and configurations
- Every HVAC technician in the country knows how to work on them
- Flexible fuel options: electric, gas, dual-fuel
- Easy to retrofit with zoning or add on additional mini-splits
- Compatible with high-end features like ECM blowers, inverter compressors, and communicating controls
- Eligible for nearly all federal and state rebate programs
Drawbacks to Consider
- Higher upfront install cost than packaged systems
- Requires interior space for the air handler or furnace
- Refrigerant line set can leak over time if improperly installed
- More failure points than packaged units (two cabinets, more connections)
- Outdoor condenser takes up yard or side-house space
- Duct losses in central split systems waste 15–30% of output
- Service calls may require separate trips for indoor and outdoor work
- Noise from the outdoor unit can annoy close neighbors
- Ductless heads are visible and can be aesthetically limiting
Who Should Choose a Split HVAC System?
The Ideal Candidate
- Single-family home with a basement, attic, garage, or utility closet for the indoor unit
- At least modest yard space for the outdoor condenser
- Moderate to cold climate where cooling is seasonal and heating matters
- Homeowner who values efficiency, comfort, and quiet operation over lowest-possible install cost
- Plans to stay in the home at least 7–10 years
Consider Alternatives If:
- You live in a slab-on-grade home in a hot-dry climate (rooftop packaged is often simpler)
- You own a small apartment or condo (PTAC or window units may be more practical)
- Your home is off-grid or solar-only with limited electrical service (consider high-efficiency ductless heat pumps specifically)
- You’re planning major renovations in the next 2 years (wait and plan HVAC around the new layout)
Common Regret #1: Going Too Cheap on Install Quality
The single most common HVAC regret we hear is homeowners who picked the cheapest quote and ended up with a poorly charged, loud, leaky system that needed service calls within the first year. The cost difference between a mediocre installer and a great one is usually $800–$1,500. That’s a rounding error over a 20-year lifespan.
Common Regret #2: Buying the Cheapest Equipment
The second most common regret is spending the same installation labor on budget equipment rather than mid-tier. Labor is typically 40% of the job. If you’re already paying $5,000 in labor, spending an extra $1,500 on equipment to move from a 14.3 SEER2 single-stage to a 17 SEER2 two-stage system is often the best dollar-for-dollar upgrade you can make—and it’s invisible to the installer’s workload.
13. Top Split HVAC Brands and What to Look For
Brand loyalty is strong in HVAC, and most contractors heavily favor one or two brands they’ve been trained on. That doesn’t mean other brands are bad—it means you should understand the ecosystem around the brand your contractor recommends. Here are the major split HVAC brands and what differentiates them.
Premium Tier
Trane and American Standard
Same equipment, different labels. Trane dealers sell at premium prices with premium service expectations. Known for their distinctive spine fin outdoor coil (more corrosion-resistant but harder to repair when damaged), variable-speed communicating systems, and reliable compressors. Warranties are solid but tied to contractor registration.
Carrier and Bryant
Carrier is the premium line, Bryant the mid-tier twin. Carrier’s Infinity series with Greenspeed variable-speed inverter heat pump tech is genuinely excellent. The entire ecosystem of communicating controls, zoning, and indoor air quality accessories is mature. The tradeoff is cost—Carrier dealers are often 15–25% more expensive than equivalent mid-tier brands.
Lennox
Very high-end SignatureSeries products with impressive SEER2 ratings and proprietary communicating controls. The knock on Lennox is parts availability—proprietary components can mean long wait times for repairs. Great if your area has strong Lennox dealer coverage; risky if it doesn’t.
Mid-Tier
Goodman and Amana
Both owned by Daikin, both offer excellent value. Same basic equipment as some higher-priced brands but marketed at a budget-friendly price point. Reliability has improved dramatically over the last decade. Not the cheapest or the fanciest—often the sweet spot for value-conscious homeowners.
Rheem and Ruud
Same equipment under different labels. Solid mid-tier performance, reasonable prices, and a strong distribution network. The EcoNet communicating platform works well.
York, Coleman, and Luxaire
All owned by Johnson Controls. Historically industrial HVAC, they’ve refined their residential lineup to be competitive. Often excellent value when you find a strong dealer.
Inverter Heat Pump Specialists
Mitsubishi Electric and Fujitsu
The giants of ductless mini-split technology. Mitsubishi’s Hyper-Heat line maintains rated capacity down to -13°F, making them a top choice for cold-climate heat pumping. Premium pricing but exceptional engineering and cold-weather performance.
Daikin
Huge global manufacturer that owns Goodman/Amana in North America. Daikin-branded products tend to be premium; their compressor tech is world-class.
Bosch
Made significant inroads into North American ducted and ductless heat pumps with very competitive efficiency numbers and clean, modern design. Worth a close look if your dealer carries them—their product positioning and multi-zone capabilities are detailed in this Bosch heat pump thermostat and multi-zone guide.
Choosing Between Brands: What Actually Matters
- The installer matters more than the brand. A great installer with Goodman will deliver better results than a mediocre installer with Trane.
- Local dealer density. Pick a brand with at least 3–4 independent dealers in your area, so you have options for service and aren’t held hostage.
- Parts availability. Ask your dealer how long typical non-warranty parts take to arrive. Under 48 hours is good; over a week is concerning.
- Warranty terms. Most major brands offer 10-year parts limited warranties. Read the fine print on whether the warranty transfers if you sell your home.
Bottom Line
There is no single “best” brand for every homeowner. The brand most likely to serve you well is the one your best local contractor installs most frequently, because they know it inside and out.
14. Common Split HVAC Problems and Troubleshooting
Even a well-maintained split system will have occasional issues. Knowing which problems you can solve yourself—and which absolutely require a technician—saves time, money, and frustration.
Problem 1: System Runs but Doesn’t Cool (or Heat) Enough
Homeowner-solvable causes: dirty air filter, blocked outdoor coil, closed registers, low thermostat setting. Replace the filter first—this resolves 40% of “weak cooling” calls on its own.
Technician required: low refrigerant (leak), failing capacitor, dirty evaporator coil, duct leakage, failing compressor.
Problem 2: System Won’t Turn On at All
Homeowner-solvable causes: tripped breaker, dead thermostat batteries, tripped float switch on condensate drain (clogged), outdoor disconnect pulled, wrong thermostat mode.
Technician required: bad transformer, failed contactor, blown capacitor, wiring issues.
Problem 3: Water Leaking from Indoor Unit
Homeowner-solvable: clogged condensate drain line. Use a wet/dry vacuum on the outdoor termination to pull out slime and debris.
Technician required: frozen evaporator coil (indicates low refrigerant or airflow), cracked drain pan, damaged trap.
Problem 4: Unusual Noises
| Noise | Likely Cause | Action |
|---|---|---|
| Clicking then silence | Bad capacitor or contactor | Call technician |
| Screeching or squealing | Failing blower motor bearings | Schedule service soon |
| Hissing near indoor unit | Refrigerant leak | Call technician urgently |
| Rattling outdoor unit | Loose panel or fan blade | Check for loose screws, then call if persistent |
| Grinding during startup | Failing compressor | Call technician urgently |
Problem 5: Outdoor Unit Won’t Run in Cold Weather (Heat Pumps)
Heat pumps go into defrost mode automatically when frost builds up on the outdoor coil. During defrost—which lasts 5–10 minutes—the outdoor fan stops and the compressor reverses briefly. This is normal. If the outdoor unit never ices up even in below-freezing weather, or ices up and never defrosts, a technician needs to check the defrost board and reversing valve.
Ready to Upgrade Your Home’s Comfort?
Whether you’re researching a first-time install or pricing a replacement, start by getting three Manual J-backed quotes from licensed local contractors. Compare not just the bottom line, but the equipment tier, efficiency rating, warranty terms, and installer reputation.
Shop Smart Thermostats on Amazon15. Frequently Asked Questions
Is a split HVAC system the same as a heat pump?
No. “Split HVAC” refers to the layout—two separated units connected by refrigerant lines—while a heat pump refers to the specific technology that can both cool and heat. A split system can be a straight AC + furnace, a heat pump, or a dual-fuel hybrid. All heat pumps in residential use are split systems (except rare packaged units), but not all split systems are heat pumps.
How long does a split HVAC system last?
A properly installed and maintained split system typically lasts 15 to 20 years. Gas furnaces often reach 20–25 years, while outdoor condensers average 15–18. Ductless mini-splits often run 12–15 years due to more frequent electronic component failures. Poor installation or skipped maintenance can cut these numbers in half.
What size split HVAC system do I need for my house?
The correct size depends on your home’s square footage, insulation, windows, air leakage, and climate. A rough rule is 1 ton of cooling per 500–800 square feet, but this is unreliable. The right answer comes from an ACCA Manual J load calculation performed by your contractor. Always ask to see the calculation before signing a contract.
Can I install a split HVAC system myself?
For central split systems, no—federal law requires EPA Section 608 certification to handle refrigerants, and most jurisdictions require licensed HVAC contractors to pull permits. Some pre-charged DIY ductless mini-split kits are sold for homeowner installation, but even those require electrical work that may require an electrician. The warranty typically voids on self-installed equipment unless it’s a designated DIY line.
What’s the difference between SEER and SEER2?
SEER2 is the updated testing standard that replaced SEER in January 2023. SEER2 uses higher external static pressure (more realistic of real-world ducted installation) during testing, which typically reduces the rated number by 4–5% compared to the old SEER rating for the same equipment. A SEER 16 unit under old testing is roughly equivalent to a SEER2 15.2 unit.
Should I replace both the indoor and outdoor units together?
Yes, in almost every case. The indoor evaporator coil and outdoor condenser are designed to work together as a matched set, with specific refrigerant metering characteristics. Mismatched systems run inefficiently, may fail to reach rated capacity, and typically void the manufacturer’s warranty. The only exception is a catastrophic failure of a very new system where the other half is still under warranty.
How much electricity does a split HVAC system use?
A typical 3-ton central AC draws 3,000–4,000 watts while running, consuming roughly 25–40 kWh per day during hot summer weather. A 3-ton heat pump in heating mode may draw similar power but delivers 2–3x more heat than pure resistance heating per kWh. Annual electricity use for a typical home’s HVAC ranges from 3,000 kWh (mild climate, efficient system) to 12,000+ kWh (hot climate, older equipment).
Can a split HVAC system work without ductwork?
Yes. Ductless mini-split systems are split HVAC systems that eliminate ductwork entirely. An outdoor unit connects to one or more indoor heads mounted on walls, ceilings, or floors. Each head conditions its own zone independently. Ductless systems are a perfect fit for homes without existing ducts, additions, garages, basements, and individual rooms that need climate control.
What refrigerant do new split HVAC systems use?
As of 2025–2026, most new residential split systems use R-454B or R-32, which replaced R-410A under EPA phase-down rules. These new refrigerants have a much lower Global Warming Potential (GWP) than R-410A. They are mildly flammable (A2L classification), but when installed correctly they pose minimal risk. Older R-22 systems are obsolete; refrigerant for them is expensive and becoming scarce.
How often should I change my HVAC filter?
Standard 1-inch pleated filters need replacement every 1 to 3 months, depending on indoor air quality, pets, and how often the system runs. Thicker 4-inch media filters last 6 to 12 months. In homes with multiple pets or during heavy pollen seasons, err on the side of more frequent changes. A clogged filter is the most common cause of HVAC performance problems.
Are split HVAC systems noisy?
Modern split systems are much quieter than older units. Premium outdoor units operate at 55–65 dB (comparable to a normal conversation), while budget units run 72–78 dB (closer to a vacuum cleaner). Indoor noise from a well-installed variable-speed system is nearly imperceptible. If your system is loud enough to be disruptive, something may be wrong—worn bearings, loose panels, or poor mounting.
Do split HVAC systems qualify for tax credits?
Many high-efficiency split systems qualify for federal tax credits under Section 25C (up to $2,000 for heat pumps, up to $1,200 for AC and furnace combinations), plus rebates through the Inflation Reduction Act’s HEEHRA program for qualifying households. Most states and utilities also offer additional rebates. Eligibility depends on specific efficiency ratings—your contractor should provide an AHRI certificate confirming the system qualifies.
The Bottom Line on Split HVAC Systems
A split HVAC system is not a specific technology—it’s an architectural decision. That decision shapes almost everything else about your home’s comfort: how efficient it is, how quiet it is, how much it costs to run, how long it lasts, and how much flexibility you have to upgrade or expand over time.
For the vast majority of American homeowners, a split system is the right answer. It offers the highest peak efficiency, the quietest operation, the longest lifespan, and the broadest ecosystem of brands, installers, parts, and accessories. Whether you choose a traditional gas-furnace-and-AC combo, an all-electric heat pump, a dual-fuel hybrid, or a ductless mini-split, you’re choosing the same fundamentally sound design.
The variables that actually move the needle on your experience are, in order: the quality of your installer, the correctness of system sizing, the efficiency tier you choose, and the quality of your ductwork (for ducted systems). The brand name on the cabinet is a distant fifth. If you get the first four right, almost any major brand will serve you well for 15–20 years.
Start your journey by requesting at least three written quotes that include a Manual J load calculation, an AHRI match certificate, a line-item breakdown of labor and materials, and a clear commissioning checklist. Talk with neighbors about their contractor experiences. Check state contractor licensing and Better Business Bureau records. And don’t be afraid to pay 10–15% more for an installer with an obviously superior process—it’s the best long-term investment you can make in your home’s comfort.
Your split HVAC system will run silently in the background for tens of thousands of hours over its lifetime. Getting the decision right now means two decades of worry-free comfort. Getting it wrong means biweekly service calls, sky-high electricity bills, and a system you replace prematurely. Take the time to understand what you’re buying. You’ll be living with it longer than almost any other major appliance in your house.
Start Your HVAC Research Today
Arm yourself with quality tools and smart accessories to monitor and maintain your split system. Better measurements mean better decisions—and longer system life.
Browse HVAC Tools on Amazon


